Section 6.1. Editing in iPhoto
6.1. Editing in iPhotoYou can't paint in additional elements, mask out unwanted backgrounds, or apply 50 different special effects filters in iPhoto, as you can with editing programs like Photoshop and GraphicConverter. Nonetheless, iPhoto is designed to handle basic photo fix-up tasks in three categories: one-click fixes, one-click effects, and advanced fine-tuning. Here's a quick summary; details appear later in the chapter. 6.1.1. One-Click FixesiPhoto presents these tools front and center, right at the bottom of the editing window. They're nearly idiot-proof:
6.1.2. One-Click EffectsIt's not entirely clear how often you'll use these eight special effects, new in iPhoto 6, but they'll be here when you need them. Among them, you'll find an inexplicable abundance of effects designed to make your photos look old and bleached out (Black & White, Sepia, Fade Color , Antique), and three options for fading out the photo at its corners or edges (Matte, Vignette, Edge Blur). 6.1.3. Advanced ControlsThis floating panel is aimed at power users who used to go galloping off to Photoshop every time they needed greater control over photo editing. It includes sliders for these parameters:
For anything beyond these touch-up tasks, you need to manipulate your photos in a more powerful editing program. 6.1.4. Using the Editing ToolsAll iPhoto editing is performed in a special editing mode, where editing tool icons appear along the bottom (Figure 6-1). You enter Edit mode either by double-clicking a photo's thumbnail (the quick way) or by highlighting the thumbnail and then clicking the Edit icon at the bottom of the screen (the long way). Figure 6-1. iPhoto's editing tools appear in the toolbar when you open a photo for editing. A >> symbol at the right end of the toolbar (as shown here) means that the window is too narrow to display all the tools. Just drag the window wider to show all tools, or click the double-arrow to access the tools via a pop-up menu.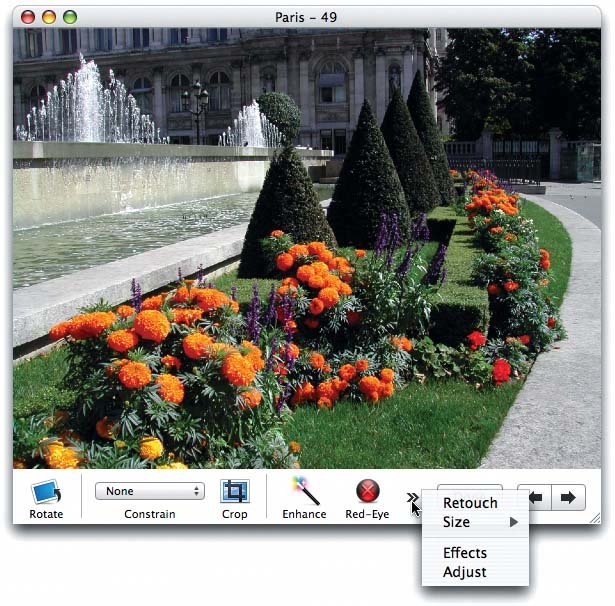 As you may recall, however, iPhoto offers you several different layouts of this Edit world. First, there's the one where the photo appears right in the iPhoto window. Second, there's the one where the photo opens up in a separate window of its own. Third, there's the new full-screen mode, where the photo fills your entire screen, and elements like the menu bar, Source list, and thumbnails display are temporarily hidden. A reminder: You specify which arrangement you prefer in the iPhoto Review pages 108-110 for details on these different editing modes. But considering how much better the full-screen mode is than any other method, it's worth taking a few moments to learn about its ins and outs. |
 Preferences dialog box. Then again, you can decide on an individual basis, too. To do so, Control-click (or right-click) a thumbnail or a photo in its own window; from the shortcut menu, choose "Edit," "Edit in separate window," or "Edit using full screen," depending on your preference.
 EAN: 2147483647
Pages: 183