13.5.2. The Scripts, One by One
Now that your downloaded scripts are easily accessible, here's what they're for.
13.5.2.1. Assign Keywords for Last Imports
This script is supposed to automate the process of assigning keywords to your last batch of imported images by presenting a Keyword dialog box, over and over again, for each photo in that batch. But it's much slower than just using the regular iPhoto Keywords feature, and a bit buggy too. You're best off ignoring this one.
13.5.2.2. Delete Album and Contents
As you know from Chapter 5, deleting an album doesn't actually delete any photos from your collectionat least not usually.
When you run this script (by choosing its name from your Scripts  iPhoto scripts menu), however, youre presented with a dialog box listing all of your albums. Select the album you want to delete, and then click OK. After asking your permission, iPhoto moves both the album and the photos inside it to the iPhoto Trash.
Once you choose iPhoto Empty Trash, the album and the photos in it are gone forever , even from the master Photo Library. Be careful!
13.5.2.3. Do Photoshop Action
Do Photoshop Action is the mother of all iPhoto AppleScripts. It lets high-end graphics nerds run Photoshop actions (also known as macrosthat is, canned software robots that perform repetitive processing steps) on iPhoto pictures.
In the graphic-design world, Photoshop actions automate tedious tasks like opening each photo, scaling it to a certain size and resolution, changing it to grayscale instead of full color , and then exporting it in a different graphic format. If you're not quite that high- powered a graphics professional, you can still use Photoshop to color-balance your photos and adjust their contrasttasks that Photoshop's AutoLevels command performs with better results than iPhoto's own Enhance tool.
If you have Photoshop CS, your software is ready to go right out of the box. You don't have to download anything.
If you use Photoshop 7, though, you must take a preliminary step before you can take advantage of this powerful script: Go to www.adobe.com/support/downloads/detail.jsp?ftpID=1535 and download the file called "Photoshop 7.0 Scripting plug-in." Run the downloaded installer by double-clicking it.
No matter which version you have, though, get ready for this AppleScript by doing two pieces of homework:
-
Become familiar with actions in Photoshop. You can find the starter set by choosing Window Actions. You have a dozen prefab actions to choose from, such as Custom RGB to Grayscale and Save As Photoshop PDF, and you can also "record actions of your own.
-
Note the name of the action you want to use. The Do Photoshop Actions Apple-Script will ask you what action you want it to apply, but you'll have to type the action's name exactly as it appears in Photoshop's Actions palette, including capitalization.
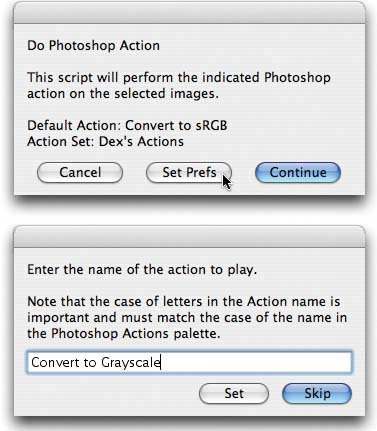
Now, in iPhoto, highlight a thumbnail (or several). From your Script menu, choose iPhoto Scripts Do Photoshop Action, and then proceed as described in Figure 13-6. Youve just harnessed the power of Photoshop's batch processing, right from within iPhoto.
Figure 13-6. When you click Set Prefs (top), the script asks you to type in the name of the action you want to apply (bottom). It also lets you specify a different action set (a collection of actions in Photoshop). But unless you've created your own, Default Actions is the set you want.
Type in the precise name of the action you want, and then click Set. In the next dialog box, click Continue.
Type in the precise name of the action you want, and then click Set. In the next dialog box, click Continue.
Finally, click Choose. Photoshop opens each selected iPhoto image in Photoshop, executes the action you've specified, and saves the picture into the folder you selected. Once it's finished, you can return to iPhoto for more work.
Note: If you get an error message at the end of the process telling you that, "There is no such element," you've just run up against a quirk of the script. The script attempts to open the resulting file in Previewbut if your Photoshop action contains a Close command, the file closes , and there's nothing for Preview to open.Glitches like this are a good argument for learning to open up a script in Script Editor and make minor editsin this case, deleting the " Open in Preview" lines of the script.
13.5.2.4. Find Unassigned Images
This command rounds up all photos that you haven't put into any album and drops them into a new album called Unassigned. You might use this script when, for example, you're burning all of your photos onto various CDs by category, and you want to make sure you're not leaving any out.
As the message tells you, this might take some time to complete, especially if you have more than 1,000 photos or so. ( AppleScript will inform you along the way that it's still working.) When it's done scanning your entire library, it also lets you know how many unassigned images it discovered .
13.5.2.5. Open in Preview
This script opens an iPhoto picture in Preview, Mac OS X's graphics-viewing program. You might, at first, wonder if perhaps Apple's AppleScript team inhaled a bit too much of that new-computer smell. Why would you want to open a photo in Preview, when it's already in iPhoto, the world's greatest graphics viewer?
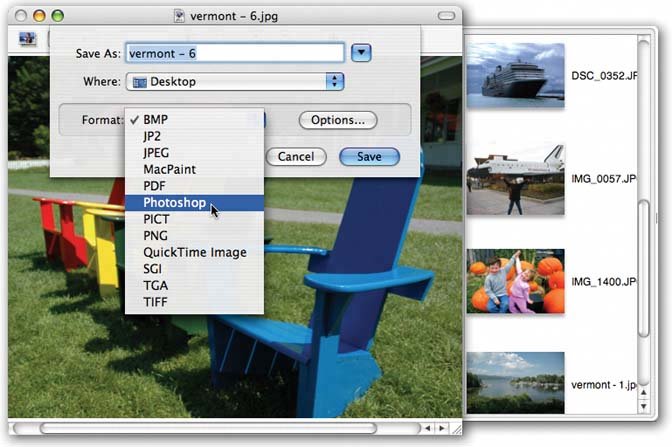
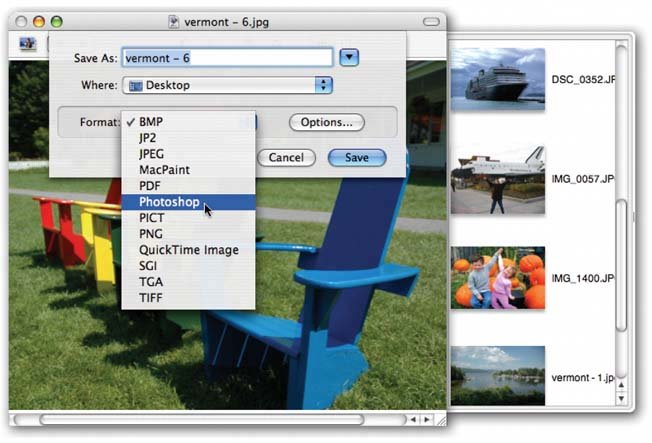
Actually, Preview has a few tricks up its sleeve that iPhoto doesn't know, including its ability to export graphics in a huge variety of formats (see Figure 13-7).
Figure 13-7. In iPhoto, you're stuck with four export options: Original, JPG, TIFF, and PNG. But if you open that same image in Preview, choosing File Export offers you twelve conversion formats.
To use this script, click a photo in iPhoto and then choose this commands name from the Script iPhoto Scripts menu. The photo appears in Preview a moment later.
If you select more than one picture in iPhoto before running the script, the script offers you (via a small, misspelled dialog box) a choice: You can open the pictures either in individual windows or as a collection in Preview. Collections are much cooler and easier to manage; for example, once you've clicked a thumbnail in the thumbnails " drawer " (shown at right in Figure 13-7), you can move to the next or previous one by pressing the up or down arrow keys.
13.5.2.6. Photo Summary
This handy little script builds tidy, ready-to-print catalog pages of your photos, as shown in Figure 13-8.
Figure 13-8. Select the pictures you want in iPhoto and then choose this script's name from the Scripts iPhoto Scripts submenu. You get a document in TextEdit that includes each photos thumbnail, title, file name, width, and so on. Print or save.
13.5.2.7. Photo to iDVD Background
Once you've clicked a photo, you can use this script to turn it into the menu background for your current iDVD project. For best results, crop your picture first in iPhoto to 4:3 dimensions (see Section 6.5.1), to make sure that your photo will neatly fit the TV when played on a DVD player.
13.5.2.8. Prepare for iDVD
This script is supposed to open each of the selected images in Adobe Photoshop, scale them to 640 x 480 pixels, superimpose each photo's Comment text, and then open the results in Preview as a catalog for review.
The idea is to help you prepare your photos for use in an iDVD slideshow (see Chapter 12). Unfortunately, this script isn't quite ready for prime timeit does the resizing, but doesn't actually superimpose the text as promised .
13.5.2.9. Show Image File
This script is handy whenever you're looking at a photo in iPhoto and wish you could leap instantly to the Finder icon that represents it (deep inside your iPhoto Library folder), so that you can copy it to a disk, send it across a network, or whatever. It's one of the most useful Apple scripts by far.
Tip: Once you locate the picture, don't drag it out of its folder! Doing so will hopelessly confuse iPhoto. Instead, if you want to use this photo elsewhere, Option -drag it out of its window. That ritual makes a copy of the original file, leaving the original safe and sound in the iPhoto Library folder.
13.5.2.10. Speak Comments
Here's a wild one that can be truly handy when you want to treat visitors (or tradeshow attendees) to a slideshow of your photographic workwhen you're not around to narrate.
When you choose this script's name from the Script menu iPhoto Scripts submenu, iPhoto presents each of the selected photos, one at a time, at full iPhoto-window size and adds spoken narration that's based on whatever you've typed into those photos' Comments boxes. iPhoto uses whatever voice you've chosen on the Speech panel of System Preferences. It's weird, wacky, and strangely satisfying .
13.5.2.11. Talking Image Card
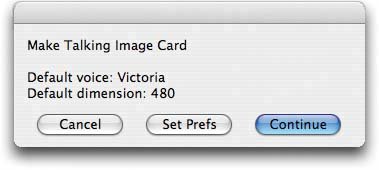
This one is a lot like the previous script, except that instead of performing the spoken cyber-recital out loud, it saves the result as a QuickTime movie, ready for distributing or archiving. Never let it be said that the geeks at Apple don't know how to have a good time.
To run this script, click a photo, and then choose this script's name from the Script menu iPhoto Scripts submenu. Just in case youre not in a Victoria mood, a dialog box now offers you the chance to change the voice of the narratorand, while you're at it, the dimensions of your movie. Click Continue when you're ready.
Finally, another dialog box lets you name the movie and choose a folder location for saving it (Figure 13-9). Click OK. AppleScript builds the movie and opens it in QuickTime. Click the Play button to let the party begin.
Figure 13-9. You can go with the proposed voice and pixel dimension for your movie, or click Set Prefs to select your own.
13.5.3. Editing AppleScripts
Using the menu bar to access and use your AppleScripts is terrific if you never need to make any adjustments to the scripts.
But part of the fun is fiddling with these scripts, peering into the lines of code that compose them, and adjusting them to your own devious designs.
To open one up in Script Editor, the little AppleScript-editing program included with every Mac, just hold down the Option key as you choose the script's name from the Scripts iPhoto Scripts menu.
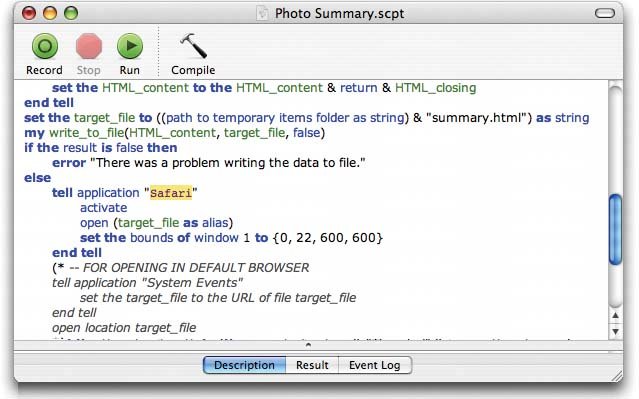
For example, the standard Photo Summary script opens your catalog page in TextEdit, but you can change it to open in Apple's Safari Web browser.
To do that, press Option as you choose Scripts iPhoto Scripts Photo Summary. The script opens as a page of computer code; just change the name of the program you want to open, as shown in Figure 13-10.
Figure 13-10. If you change the name of the program highlighted here in yellow, you can make your catalog open in another programSafari instead of TextEdit, for example. Posting the result on the Web may be more trouble than it's worth (you'll have to locate the image source files, copy them, then adjust the HTML code accordingly ), but this exercise gives a good glimpse into the workings of AppleScript.
While you're at it, you could easily change the typeface or size in your catalog. Once again, open the script in Script Editor. Scroll down until you find this line:
<FONT FACE=\"Lucida Grande\" SIZE=\"1\">
Carefully replace the font name and size to suit your taste, like this:
<FONT FACE=\"Verdana\" SIZE=\"3\">
Note: Clearly, the size isn't represented in points, as you're probably used to. Instead, the numbers 1, 2, and 3 refer to the relative size system used by Web-page designers. They range from 1 (very small) to 7 (jumbo).
Now your catalog will display all the entries in Verdana type with a larger, more readable font size.
As you go, you can click Run within Script Editor to see the effects of your editing. When you're finished fiddling, use the File Save As command, give your modified script a new, descriptive name (so that you don't overwrite the original script), and save the result onto the desktop. (From there, you'll probably want to move it into your Home Library Scripts iPhoto Scripts folder.)
