11.4. Fun with QuickTime The free version of QuickTime Player is, well, just a player. If you're willing to pay $30, however, you can turn it into QuickTime Player Pro, which offers a few special features relevant to iPhoto movie fans. -
Play movies in full-screen mode . QuickTime Player Pro can play exported slideshows in full-screen modeno menu bar, Dock, window edges, or other distracting elements. In effect, it turns your laptop screen into a portable theater. -
Edit your flicks . QuickTime Player Pro lets you trim off excess footage, add an additional soundtrack, or even add a text track for subtitles (captions). It's also great for combining or editing down the little movies that iPhoto downloads from your digital camera. -
Adjust video and audio . Only the Pro version lets you fine-tune your video and audio controlsBrightness, Treble, Bass, and so onand then save those settings with your movie. -
No more nagware . Upgrading eliminates the persistent "Upgrade Now" dialog box that appears when you open the regular Player program. If you decide that the upgrade is worthwhile, visit www.apple.com and click the QuickTime tab. There you'll find the links that let you upgrade your free QuickTime player to the Pro version. In exchange for $30, you'll be given a registration number that "unlocks" QuickTime's advanced features. (To input the serial number in QuickTime Player, choose QuickTime Player  Preferences Registration, and then click the Registration button.) Preferences Registration, and then click the Registration button.) Then you'll be ready for the following tricks. 11.4.1. Play Movies at Full Screen If you've upgraded to QuickTime Player Pro, here's how to create a full-screen cinematic experience. First, use a black background when you export your movie from iPhoto. That way, there will be no frame marks or distracting colors to detract from your images. Furthermore, the black bars on the sides of vertically oriented photos will blend in seamlessly with the rest of the darkened monitor, so that nobody is even aware that the photo has been rotated . Those black bars will also fill in the gap between the standard monitor shape and the nonstandard ones preferred by Apple these days (such as the screens on the extra-wide Cinema Display, the iMac, or the 15-inch laptops). Second, export your movie in as large a size as will fit on your screen. That means dimensions of 1024 x 768, or whatever matches your monitor's current setting. (To find out, choose  System Preferences and click the Display icon.) Your images will occupy more of your Macs display area, imparting greater impact. System Preferences and click the Display icon.) Your images will occupy more of your Macs display area, imparting greater impact. Figure 11-5. From the Movie Size pop-up menu, choose Normal or Current. (Yes, you could choose Full Screenbut that would stretch your photos to fill the screen, often resulting in distortion.) Click Play, sit back, and enjoy.
To end a self-playing show, click the mouse; to end a show in Slideshow mode, press  -period. -period. 
Once you've exported your movie, presenting it in "theater mode" is as simple as choosing Movie Present Movie. Then set up the dialog box as shown in Figure 11-5. Once you've created a slideshow movie, keep in mind that nothing's etched in stoneat least not if you have QuickTime Player Pro. Suppose you don't care for the empty frames of background color (or background picture) that iPhoto adds automatically at the beginning and end of your movie? Or what if, thanks to an unforeseen downsizing, a graduation, or a romantic breakup, you want to delete a photo or two from an existing movie? Using QuickTime Player Pro, you can snip unwanted photos or frames right out. 11.4.1.1. Selecting footage Before you can cut, copy, or paste footage, QuickTime Player needs to provide a way for you to specify what footage you want to manipulate. Its solution: the two tiny black triangles that sprout out of the left end of the horizontal scroll bar, as shown in Figure 11-6. These are the "in" and "out" points; by dragging these triangles , you can enclose the scene you want to cut or copy.
Tip: You can gain more precise control over the selection procedure shown in Figure 11-6 by clicking one of the black triangles and then pressing the right or left arrow key to adjust the selection a frame at a time.Or try Shift-clicking the Play button. As long as you hold down the Shift key, you continue to select footage. When you release Shift, you stop the playback; the selected passage then appears in gray on the scroll bar.
Figure 11-6. To select a particular scene, drag the tiny black triangles apart until they enclose the material you want, or use the clicking/Shift-clicking trick shown here. As you drag or click, QuickTime Player updates the movie picture to show you where you are. The material you select is represented by a gray strip in the scroll bar. 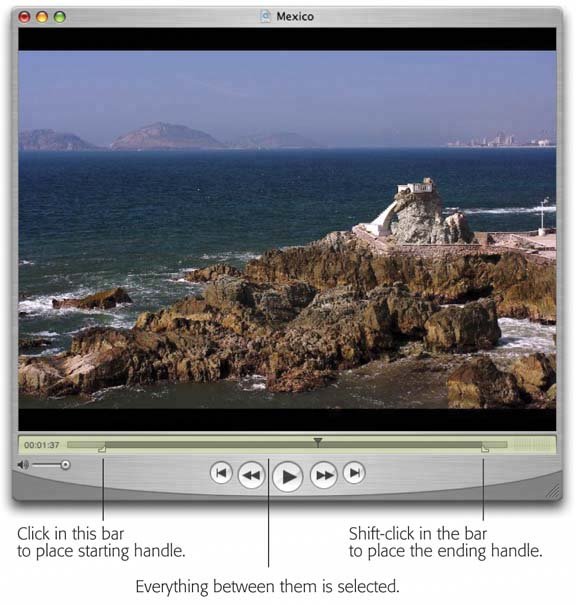
Once you've highlighted a passage of footage, you can proceed as follows : -
Jump to the end or beginning of the selected footage by pressing Option-right arrow or -left arrow key. -
Deselect the footage by dragging the two triangles together again. -
Play only the selected passage by choosing View Play Selection Only. (The other View menu commands, such as Loop, apply only to the selection at this point.) -
Drag the movie picture out of the Player window and onto the desktop, where it becomes a movie clipping that you can double-click to view. -
Cut, copy, or clear the highlighted material using the commands in the Edit menu. 11.4.2. Advanced Audio and Video Controls One of the difficulties of creating multimedia productions is that there's no standard calibration for all the various computers that might play them. For example, a slideshow that your friend creates on his Dell computer might look washed-out on your Mac. Luckily, QuickTime Player Pro offers a solution. See Figure 11-7. Figure 11-7. Should you inherit movies with poor audio and video, QuickTime Player Pro gives you some useful audio and video controls to compensate.
Fortunately, you can adjust the brightness, balance, bass, or treble using these generally controls. The trick is to show and hide them by choosing Window Show A/V Controls.
For real comedy , dont miss the Playback Speed slider, either 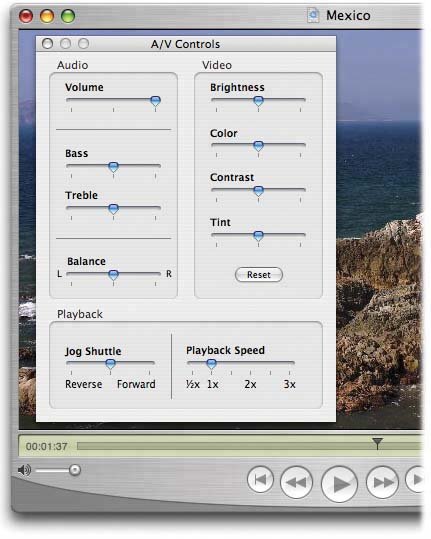
11.4.3. Exporting Edited Movies After you've finished working on a sound or movie, you can send it back out into the world by choosing File Save As. At this point, you can specify a new name for your edited masterpiece. You must also choose one of these two options: -
Save normally . The term "normally" is a red herring. In fact, you'll almost never want to use this option, because it produces a very tiny file that contains no footage at all; it's like an alias of the movie you edited. A file that you save "normally" works only as long as the original, unedited movie remains on your drive. If you try to email the newly saved file, your unhappy recipient won't see anything at all. -
Make movie self-contained . This option produces a new QuickTime moviethe one you've just finished editing. Although it consumes more disk space, it has none of the drawbacks of a "save normally" file. This is the option you should choose. |