6.8 Moving Data Between Documents
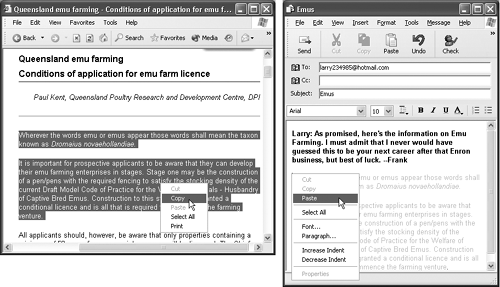
| You can't paste a picture into your Web browser, and you can't paste MIDI music information into your word processor. But you can put graphics into your word processor, paste movies into your database, insert text into Photoshop, and combine a surprising variety of seemingly dissimilar kinds of data. And you can transfer text from Web pages, email messages, and word processing documents to other email and word processing files; in fact, that's one of the most frequently performed tasks in all of computing. 6.8.1 Cut, Copy, and PasteMost experienced PC users have learned to quickly trigger the Cut, Copy, and Paste commands from the keyboard ”without even thinking. Figure 6-4 provides a recap. Figure 6-4. Suppose you want to email some text on a Web page to a friend. Left: Start by dragging through it and then choosing Copy from the shortcut menu (or choosing Edit |
POWER USERS' CLINIC |
6.8.2 Drag-and-Drop
As useful and popular as it is, the Copy/Paste routine doesn't win any awards for speed; after all, it requires four steps. In many cases, you can replace that routine with the far more direct (and enjoyable) drag-and-drop method. Figure 6-5 illustrates how it works.
Figure 6-5. Click in the middle of some highlighted text (left) and drag it into another place within the document ”into a different window or program (right).

NOTE
To drag highlighted material offscreen , drag the cursor until it approaches the top or bottom edge of the window. The document scrolls automatically; as you approach the destination, jerk the mouse away from the edge of the window to stop the scrolling.
FREQUENTLY ASKED QUESTION |
Several of the built-in Windows XP programs work with the drag-and-drop technique, including WordPad and Outlook Express. Most popular commercial programs offer the drag-and-drop feature, too, including email programs and word processors, America Online, Microsoft Office programs, and so on.
As illustrated in Figure 6-5, drag-and-drop is ideal for transferring material between windows or between programs. It's especially useful when you've already copied something valuable to your Clipboard, since drag-and-drop doesn't involve (and doesn't erase) the Clipboard.
Its most popular use, however, is rearranging the text in a single document. In, say, Word or WordPad, you can rearrange entire sections, paragraphs, sentences, or even individual letters , just by dragging them ”a terrific editing technique.
NOTE
Using drag-and-drop to move highlighted text within a document also deletes the text from its original location. By pressing Ctrl as you drag, however, you make a copy of the highlighted text.
6.8.2.1 Drag-and-drop to the desktop
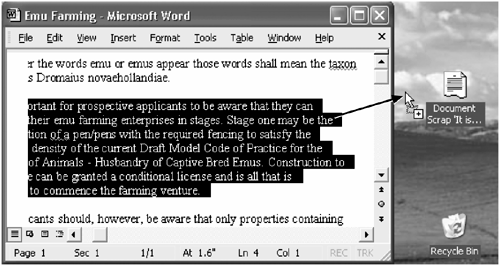
Figure 6-6 demonstrates how to drag text or graphics out of your document windows and directly onto the desktop. There your dragged material becomes an icon ”a Scrap file .
Figure 6-6. A Scrap file will appear when you drag material out of the document window and onto the desktop. Its icon depends on the kind of material contained within, as shown here at left. You can view a clipping just by double-clicking it, so that it opens into its own window (right).
When you drag a clipping from your desktop back into an application window, the material in that clipping reappears. Drag-and-drop, in other words, is a convenient and powerful feature; it lets you treat your desktop itself as a giant, computer-wide pasteboard ”an area where you can temporarily stash pieces of text or graphics as you work.
NOTE
You can drag a Scrap file onto a document's taskbar button, too. Don't release the mouse button yet. In a moment, the corresponding document window appears, so that you can continue your dragging operation until the cursor points to where you want the Scrap file to appear. Now release the mouse; the Scrap material appears in the document.
In Microsoft Office applications, this works with entire document icons, too. You can drag one Word file into another's window to insert its contents there.
6.8.3 Insert Object (OLE)
Here's yet another relative of the Copy and Paste duo: the Insert Object command, which is available ”although usually ignored ”in many Windows programs. (You may hear it referred to as Object Linking and Embedding technology, or OLE, or even "oh-LAY.")
Using this feature, you can insert material from one OLE-compatible program (like Paint) into a document running in another (like Word). When you click the painting, in this example, Word's menus change to those of the campaign program, so that you can edit the graphic. When you click off the graphic, the familiar Word menus return.
In general, OLE never became the hit that Microsoft hoped, probably because it can be flaky if you don't have a fast machine with a lot of memory. Still, if the idea of self-updating inserted material intrigues you, here's how to try it:
-
Create a document in a program that offers OLE features.
Some programs that do: Excel, Word, WordPad, PowerPoint, and Paint.
-
Click to indicate where you want the inserted object to appear. Choose Insert
 Object.
 (Insert
Object is the menu wording in Microsoft Office programs; its location may differ in other programs.) Now an Object dialog box appears, offering two tabs: Create New, which creates a new graph, picture, spreadsheet, or other embedded element; and Create from File, which imports a document you've already created (using, for example, Excel, Paint, Graph, or Imaging).
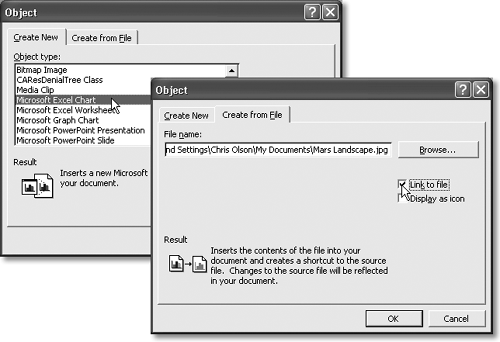
If you choose Create from File, a "Link to file" checkbox appears (Figure 6-7). It determines whether the inserted material will be embedded or (if you turn on the checkbox) linked. If you choose to link the inserted material, the fun begins. Now you can make changes in the original document and watch the revision appear automatically in any documents to which it's been linked.
Figure 6-7. Top: You can insert many kinds of "objects" into a Word or WordPad document: a Paint file ("Bitmap Image"), Image Document (something you've scanned), an Excel spreadsheet ("Worksheet"), and so on. Bottom: You may prefer to slap an entire existing file into the middle of the one you're now editing. Do that using the Create from File tab. Turn on "Link to file" if you want the data to update itself when the source file is edited separately.
-
Choose the kind of data you want to create, and click OK.
You've successfully embedded or linked new information. To edit the document, just double-click it; the menus and palettes you need to modify this info reappear. (If you're linked to a separate document, double-clicking the embedded object actually opens that other document.)
6.8.4 Export/Import
When it comes to transferring large chunks of information from one program to another ”especially address books, spreadsheet cells , and database records ”none of the data-transfer methods described so far in this chapter do the trick. For these purposes, use the Export and Import commands found in the File menu of almost every database, spreadsheet, email, and address-book program.
These Export/Import commands aren't part of Windows, so the manuals or help screens of the applications in question should be your source for instructions. For now, however, the power and convenience of this feature are worth noting: Because of these commands, your four years ' worth of collected names and addresses in, say, an old address-book program can find its way into a newer program, such as Palm Desktop, in a matter of minutes.
EAN: 2147483647
Pages: 230