5.9 Playlists
| < Day Day Up > |
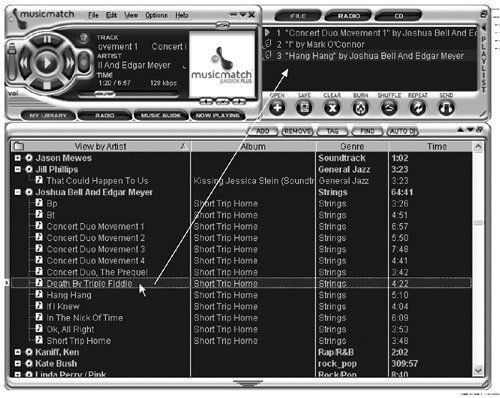
| A playlist is a list of songs that you've decided should go together. It can be made up of pretty much any group of songs arranged in any order. For example, if you're having a party, you can make a playlist from the current Top 40 and dance music in your music library. Unlike the tedious , afternoon-consuming way of making a mix album in the Olden Days of vinyl, cassettes, and a stopwatch, MP3 playlists are a cinch to set up. Once you've got 'em, you can save your playlists, download them to your iPod, or even burn them to CDs for posterity. 5.9.1 Making a New Playlist The Playlist window at the upper-right corner of the MusicMatch screen (Figure 5-16) is your workspace for making and mixing playlists. (If some technically challenged miscreant accidentally closed it when you weren't around, choose View Figure 5-16. You can make a playlist from anything you can drag into the Playlist window ”like the song being dragged here. The buttons at the bottom let you Open previously created playlists, Save your new creations, Clear the songs out of a playlist window, Burn the playlist to a CD, Shuffle the play order, Repeat the playlist over after the last track is finished, and Send the Playlist to an external device, like an iPod. The three buttons at the top of the window indicate the source of the songs in the playlist ”from audio files, streaming radio, or a CD. Once you have your Playlist window open, you're all ready to make a playlist. If there are song titles still in the window from the last time you used the program, click the Clear button just below the window to wipe the slate clean. To add songs to this window, start in the My Library window. Double-click each tune you'd like to add to your new playlist. You can also drag individual tracks ”or groups of them ”onto the playlist window, as shown in Figure 5-16. To make a playlist from the entire contents of albums or collected artists ' works, use any of these tactics:
Don't worry about clogging up your hard drive. When you add a song title to a playlist, you don't copy the song; you're just giving MusicMatch instructions about which tracks to play and where to find the files. In essence, you're creating file shortcuts of the originals . You can have the same song on several different playlists without having to worry that you've now got sixteen copies of "Convoy" by C.W. McCall. Once you have that new playlist just the way you want it, click the round Save button at the bottom of the Playlist window. A dialog box asks you what you'd like to call this new playlist. NOTE After you've created new playlists, don't move your original music files and folders around on the hard drive. The Playlists feature uses the file paths and locations of the music files when you originally saved the playlist, so moving the original files will result in having to redo your playlists. Once you've saved and stored some playlists, you can call one up again by clicking Open at the bottom of the Playlist window. When the Open Music box pops up, click the icon for Playlists, click the playlist you want, and click the Play button within the Open Music box to start the music. 5.9.2 Modifying a PlaylistTo reopen a playlist so you can add to it, shorten it, or rearrange the songs in it, proceed like this:
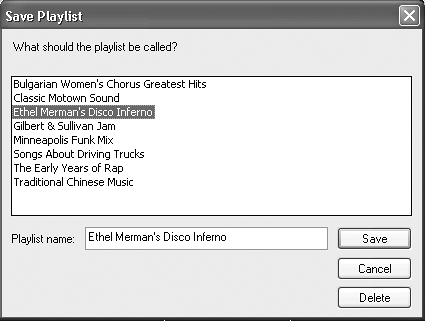
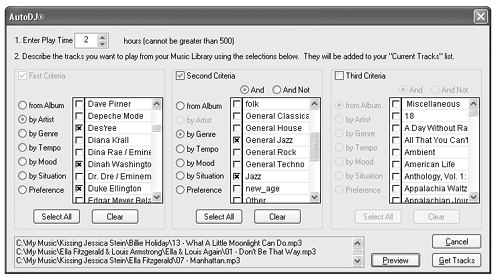
5.9.3 Deleting a PlaylistYou can delete a playlist, but you'd never guess how. Start by opening the Playlist dialog box. Then, believe it or not, you're supposed to click the playlist name and click Save. In the Save Playlist box, click the name of the one you want to delete and then click Delete (Figure 5-17). The playlist disappears from your collection. Figure 5-17. The Save box also holds the key to deleting playlists, which isn't exactly the most intuitive thing in the world, but it works. Click the red X in the top-right corner to close the dialog box (your other options are Save, Cancel, and Delete, none of which are good for making the escape). 5.9.4 AutoDJ PlaylistsComputers have automated many a time-consuming mission, and making playlists is no exception. With its AutoDJ feature, MusicMatch Jukebox Plus can compose its own playlists that appeal to your personal tastes. You just have to tell it what your personal tastes are for the playlist at hand. For example, you might tell one AutoDJ Playlist to assemble a two- hour set of songs from your immense jazz collection ”but only tracks by Louis Armstrong, Ella Fitzgerald, Art Tatum, and Duke Ellington. Doing it the AutoDJ way lets you spend less time picking through your library to find songs that match your mood, meaning you can get on with the music that much faster. To get started, click the AutoDJ button at the top of the My Library window (or choose Options Figure 5-18. The AutoDJ automatically generates a playlist with the guidelines you provide. Just pick the amount of time you want the playlist to last and then add criteria like albums, artists, or genres. This AutoDJ production, for example, will snag two hours of tunes by selected artists in the Jazz genre . You can give the AutoDJ up to three sets of criteria. You can get a sneak peek at the computer-generated playlist by clicking Preview. A list of tracks appears in the Preview window. If you like what you see, click the Get Tracks button to sweep all the tunes into the Playlist window. If you like the AutoDJ playlist enough to transfer it to your iPod the next time you synchronize it, click Save. NOTE The more information you've added to your track tags during your music-organizing activities, the more detailed and precise you can get when formulating an AutoDJ playlist. What you've done is give yourself more elements to use in the AutoDJ criteria boxes. |
| < Day Day Up > |
EAN: 2147483647
Pages: 171
- ERP Systems Impact on Organizations
- ERP System Acquisition: A Process Model and Results From an Austrian Survey
- Enterprise Application Integration: New Solutions for a Solved Problem or a Challenging Research Field?
- The Effects of an Enterprise Resource Planning System (ERP) Implementation on Job Characteristics – A Study using the Hackman and Oldham Job Characteristics Model
- Data Mining for Business Process Reengineering
 Playlist.) The Playlist window tucks itself behind the main MusicMatch Control panel, but leaves a vertical sign reading PLAYLIST on the edge that you can click to slide it out.