13.5 Recording Your Own MP3s

 < Day Day Up > 

In addition to songs downloaded from the iTunes Music Store (Chapter 6) or ripped from CDs (Chapters 4 and 5), the iPod can play digital audio files that you've recorded yourself. This sort of thing can come in handy in situations where, say, you have a recital or music lesson coming up and want to record yourself for analysis later. Or perhaps you have to give a speech and want to record a sample of yourself practicing to weed out the "ums" and "you knows ."

You can take either of two approaches. First, you can record on the iPod and transfer the finished recordings to the computer. (You need one of the snap-on iPod microphones described on Section 14.4.1.)

Second, you can record on the computer and transfer the recording to the iPod. In this case, your Mac or PC needs a microphone, as described in the next sections.

NOTE

If you don't already have a microphone or a sound-in port on your computer, you can do it the USB way with the iMic from Griffin Technology. The iMic works with both Windows and Macs through the USB port, as described in Chapter 14.

Griffin Technology also makes the PowerWave (http://www.griffintechnology.com/products/powerwave), a $100 device that works as both a desktop amplifier and audio input box for recording live sound on your Mac or PC.

13.4.1 Windows

Most new desktop systems these days include a small external microphone, and many laptops have built-in microphones. Check your manual.

You can record WAV files using the Sound Recorder program that comes with Windows, of course (choose Start Programs Accessories Entertainment Sound Recorder). But MusicMatch Jukebox, which, if it didnt come with your iPod, is a free download from http://www.musicmatch.com, is a more versatile option.

Here's how to do it:

  1. In MusicMatch Jukebox Plus, choose Options Recorder Source and pick the type of device you want to record from, as shown in Figure 13-7 .

    Figure 13-7. Choose "Line In" if you're connecting your stereo or a portable cassette player; choose "Mic In" if you're going to record from the computer's microphone.
    figs/13fig07.gif

    Since you're not ripping from a CD, you need to tell MusicMatch how you're going to do the recording.

  2. Connect your recording equipment to the PC.

    For Line In recording, which you can use to record MP3 files from those old vinyl records and dusty cassette tapes taking up space in the attic, connect your stereo receiver, turntable and preamplifier, or tape player to the computer.

    In most cases, that entails a Y-shaped cable with two RCA connector plugs on one end, which you plug into the output jacks of your audio source. Plug the 3.5mm stereo miniplug (Section 12.1.1) on the other end into the Line In port on your computer's sound card or sound-import device.

  3. On the MusicMatch Jukebox player controls, click the red Record button.

    MusicMatch asks you to enter a name for the file you're about to record.

  4. Type a name and then click the red Record button. Press Play on the tape deck, record player, or human being.

    When you're ready to stop recording from the external source, click Stop.

The new file appears in your MusicMatch Jukebox Plus music library under the name you gave it, in whatever format you've chosen for encoding digital audio files. (You can easily change the recording format by choosing Options Recorder )Format and picking either MP3 or WAV, both of which play on the iPod.) You may have to adjust the volume level on your equipment and experiment until you find the right balance.

You can now work with it as you would any of your other music library files. The next time you connect your iPod, you can add your newly recorded homemade tracks just like any other music file.

NOTE

When you've finished recording your own material and want to return to ripping CDs, don't forget to change the recorder's source preference back to the computer's CD drive.

13.5.2 Macintosh

Many recent Macintosh models, including the iMac, eMac, white iBook, and titanium PowerBook, have microphones built into the screens. Older Macs from the Beige Days usually came with an external PlainTalk microphone, and later Power Macs take in sounds with USB microphones from other companies. If you don't have a built-in microphone or even a sound-in port on your Mac, the iMic and PowerWave (Section 13.5.1) can pull in stereo sound input through the USB port.

GEM IN THE ROUGH
Recording Voice Notes in Mac OS X

If you'd like to make a voice recording (as opposed to recording something from your stereo), you don't need any add-on software. Instead, use iMovie to create an audioonly "movie" with no visuals to it.

To do that, use iMovie's narration-recording feature as you speak your piece. (In iMovie 3 and 4, for example, you do this by clicking the Audio button. Then click the round Record button to the right of the Microphone graph.)

When you're satisfied with the recording, save the file and quit iMovie. Inside the movie project folder (a folder that bears the name of your movie), you'll find a folder called Media. Inside that , there's a file called, for example, Voice 02. That's the sound file you just made.

Add .aiff to its name, confirming your decision when the Mac asks, and then drag the file into the iTunes window. It's now a standard track, ready for iPodding.


Connecting the Mac to a stereo receiver, cassette deck, or turntable and preamplifier requires audio patch cables. In most cases, you'll need a Y-shaped cable with two RCA connector plugs on one end (for the stereo) and a single 3.5mm stereo miniplug on the other end (for the Mac's sound-in jack or an iMic). (If you're recording from a portable cassette or Mini-Disc player, you'll probably need a stereo miniplug-to-miniplug cable.)

When you've connected the cables, direct your Mac's Sound preferences to the correct jack (microphone, line in, or whatever). In Mac OS 9, choose figs/apple.gif Control Panel Sound. In Mac OS X, open System Preferences and click the Sound icon, then click the Input tab.

Once you have the hardware, rustle up some recording software (iTunes doesn't offer recording capability). Plenty of inexpensive Macintosh shareware programs for audio recording await on the Web; visit, for example, http://www.osxaudio.com or http://www.hitsquad.com/smm/mac/AUDIO_RECORDING. Two popular shareware for audio recording for both Mac OS 9 and X are Amadeus II ($25) and Audiocorder ($20), shown in Figure 13-8. (Both are available on the "Missing CD" page at http://www.missingmanuals.com.)

Figure 13-8. If you have a Mac and a mike and a copy of Audiocorder, you can record yourself practicing that difficult harmonica solo, or hook up your stereo and digitize your old vinyl and copy the files onto the iPod. You'll never have to buy the White Album again.
figs/13fig08.gif

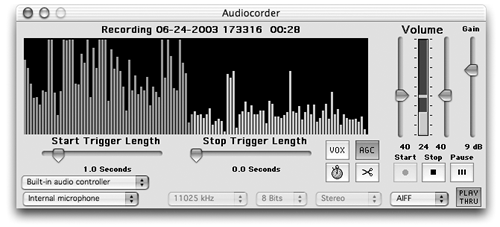
Follow the instructions provided with whatever sound-recording program you decide to use. Once you've recorded your sound files, named them, and saved them, you can add them into the iTunes library by dragging them onto the iTunes window or choosing File Add to Library. Now you can edit their track tags, add them to playlists, and copy them onto your iPod, just like any other audio file.

GEM IN THE ROUGH
The iPod's Secret Hidden Recording Feature

If you want to use your iPod to record sound and not just play it, $40 or $50 will buy you a small, white, snap-on microphone for 2003-and-later iPod models (Section 14.4.2). Its self-contained software lets you record hours of voice memos, classroom lectures, and other live-audio opportunities. You can even sync the recordings back to iTunes.

But if you (a) have a pre-2003 iPod and (b) you haven't installed the iPod 2.0.1 software update, you're in for a treat. The iPod can actually record your own six-second Notes to Self all by itself.

Restart the iPod by holding down the Menu and figs/r_arrow.gif figs/double.gif buttons simultaneously . When the Apple logo appears on the screen, hold down the figs/leftarrow.gif , figs/rightarrow.gif , and center Select buttons. When you let go of the three buttons, the iPod emits a loud chirp , flashes a backwards Apple logo, and then displays its secret diagnostic menu.

Press the figs/rightarrow.gif button to bop down the list until you get to the line that says J. RECORD. Press the Select button.

When the word BEGIN appears on the screen, you have about six seconds of recording time. Speak into the iPod's left earbud, which now functions as a microphone. When your recording time is up, the iPod screen says DONE. Stick the earbud in your ear and press the Select button to hear your six seconds of spoken-word glory .

When you're done, press the figs/r_arrow.gif figs/double.gif button to return to the list of diagnostic tests. To return the iPod to its normal menu screen, press the Menu and figs/r_arrow.gif figs/double.gif buttons to reset the iPod once more.

Apple's repair technicians use the recording function for troubleshooting ailing iPods. Otherwise, this feature seems to have no purpose in daily iPod activities, apart from tantalizing iPod fanatics the world over.


Some audio-recording programs may save the sound files in the AIFF format, and if you don't have the option to convert the files to MP3 or AAC there, you can always use the iTunes command Advanced Convert Selection to MP3 (or whatever format).

 < Day Day Up > 


iPod & iTunes. The Missing Manual
iPod: The Missing Manual (Missing Manuals)
ISBN: 1449390471
EAN: 2147483647
Year: 2004
Pages: 171
Authors: Biersdorfer

flylib.com © 2008-2017.
If you may any questions please contact us: flylib@qtcs.net