Section 4.4. What to Do with Music You ve Bought
4.4. What to Do with Music You've BoughtAs you know, the iTunes Music store gives you a lot more freedom to use your downloaded songs than other music services. There are a few restrictions, though. 4.4.1. Play It on Five ComputersYou can play Music Storebought songs only on an authorized computer. Authorization is Apple's copy protection scheme. Between work, home, and the family network, not everyone spends time on just one computer these days. So Apple lets you play your Music Store songs on up to five computers at once: Macs, PCs, or any combination. You just need to type in your Apple user name and password on each computer. Each must make an Internet connection to relay the information back to Music Store headquarters. 4.4.1.1. Authorizing ComputersYou authorized your first machine when you signed up for an Apple Account for the iTunes store. To authorize a song to play on another computer, follow these steps:
This second computer is now authorized to play that songand any other songs you bought using the same Apple Account. Note: Although you may feel like AAC stands for Always Authorizing Computers, remember that this whole authorizing business is necessary only to play songs you've bought . To play songs you've ripped into AAC format from CDs, for example, or to play everyday MP3 files, you don't have to authorize anything. 4.4.1.2. Deauthorizing ComputersYou won't be able to play the purchased music on a sixth computer if you try to authorize it. When you connect to the authorization system over the Internet, it will see five other computers already on its list, and deny your request. That's a drag, but copy protection is copy protectionand it's much better than rival music services, which permit you to play downloaded music only on three machines (just like iTunes did before 2004). In any case, you have to deauthorize one of the other computers if you want to play the music on Number 6. To deauthorize a computer, choose Advance Tip: Thinking of putting that older computer up for sale? Before you wipe the drive clean and send it on its way, be sure to deauthorize it, so your new machine will be able to play your songs from the iTunes Music Store. Erasing a hard drive, by itself, does not deauthorize a computer.And what if it's too late? What if you've already sold the old Mac without remembering to deauthorize it first? Or what if you're slamming into the five-machine limit, and you can't remember which five you've authorized? You're in luck. Click the Sign In button the next time you're in the Music Store, and then click the View Account button after you type in your Store name and password. On the main account page, click the Deauthorize All button. Then log out and go re-authorize the machines you still own. 4.4.2. Copy It to Your iPodNot only can you download your purchased songs to your iPod, but you can download it to unlimited numbers of iPods. Apple placed no copy restrictions on iPod joy. Tip: If your iPod is a pre-2003 model, you must first update its software to version 1.3 or later. Otherwise, the iPod won't recognize files in the AAC format. When you buy a song, it lands in the iTunes playlist called Purchased Music. But you can easily drag it into other playlists you've concocted within iTunes. The songs, artists , and albums appear just like any other tracks in iTunes. 4.4.3. Burn It to a CDYou can also burn purchased tracks to blank CDs, so you can listen to them in the car or on the big component rack in the living room. Here, Apple has put in only one tiny, almost irrelevant form of copy protection: If you've made store-bought songs part of a certain playlist, you can't burn more than seven CD copies of it in a row without making at least one change to the song list. And if you find that limitation restrictive , you must be so dedicated a music pirate that you wear an eye patch and a parrot on your shoulder. 4.4.4. Share it Across the NetworkYou can also share purchased music tracks with other people on your same office networkby playing them live, not by copying the actual files. Details on Section 2.4. 4.4.5. Back It UpIf your hard drive croaks and takes your entire music library with it, you have two alternatives. (a) Buy all of your Music Store songs all over again. (b) Calmly reach for the backup CD or DVD you had the foresight to make before disaster struck. 4.4.5.1. Backing up your music library To back up your entire music collection, you want to copy the iTunes folder in your Home Backing up this folder, huge though it may be, backs up not just your songs, but all the other work you've done in iTunes (creating and naming your playlists, organizing your columns , and so on). You can use any standard backup method for this:
When your hard drive croaks, restore your backed -up iTunes folder by dragging it back into your Music folder. You're saved. 4.4.5.2. Backing up playlistsiTunes also has a built-in backup feature. Note, however, that it can back up only one playlist at a time. This backup procedure isn't the same thing as burning an audio CD. Here, you're burning a data disc. That's important if you want to preserve the original file formats in your iTunes music library and avoid turning your high-quality AIFF files, for example, into squished -down MP3 files. To make this important change to your Burning desires, see Figure 4-9. After you've chosen the Data format for your backup disc, make a playlist that includes all the files you want to copy to the CD or DVD. Keep an eye on the total size at the bottom of the window to be sure it will fit on one disc: about 650 megabytes for a CD, 4.7 gigabytes for a DVD. (If not, you'll have to file your songs away into multiple playlistsone per backup discto spread out your collection over multiple discs.) Burn it to disc by clicking the Burn Disc button on the iTunes window. Insert a blank disc when the Mac asks, and then click the Burn Disc button again to start copying. If your hard drive ever dies, copy this data disc's files back onto the computer and re-import them into iTunes to rebuild your library from the backup disc.
4.4.5.3. Backing up non-music dataIf you've got a .Mac account (Apple's $100-a-year suite of online services), you can use the handy Backup program to save copies of your personal files to a remote Web site, recordable disc, or external hard driveincluding your list of iTunes playlists. |
 Music
Music 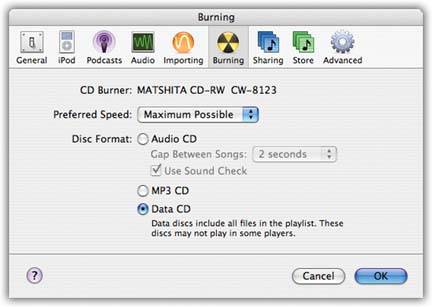
EAN: 2147483647
Pages: 314