Section 26.12. Velocity, Pedaling, and Other MIDI Data
26.12. Velocity, Pedaling, and Other MIDI DataAs you've probably started to gather by now, there's more to a musical performance than deciding which notes to play when. A keyboard player, for example, adds nuance and interest to a performance using a number of other tools. The velocity of the playing (how hard each key is struck), the pedaling (using a sustain pedal connected to the keyboard), and the control wheels (pitch and modulation) can all affect the way the music sounds. GarageBand records all of this information as you play and lets you edit it later. The key to viewing and editing these kinds of MIDI information is the Advanced panel of the Track Editor (Figure 26-15).
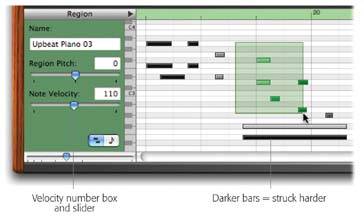
26.12.1. Editing Key VelocityKey velocity is a digital record of how hard you pressed each key when you recorded a MIDI region. On some instruments, greater key velocity just means "louder," as it does on a piano. But in others, greater velocity means "more vibrato," "crunchier sound," and so on. Key velocity is measured on a scale of 0 to 127. That may not seem like an especially logical scale to you , but (because it's a power of 2) it's very convenient for the Mac to understand. In any case, a velocity of 1 indicates a key pressed with all the force of a falling pigeon feather; a velocity of 127 reflects the force of, say, a second piano falling onto the first. (GarageBand doesn't actually let you change a note's velocity to 0, because that would be a nonsensical value for most musical purposes.) In the Track Editor, a note bar's color indicates its key velocity, as you can see here: Table 26-2.
To edit your notes' key velocities, first open the Track Editor's Advanced panel identified in Figure 26-15. Then proceed as shown in the same figure. Note: Things can get tricky when you've selected multiple notes with different velocities. In that case, the slider and the number box show the highest key velocity among the selected notes. But as you make the adjustment, you're adding or subtracting the same amount from all other notes.If you select three notes, therefore, that have velocity settings of 20, 30, and 40, the Velocity box will say 40. If you drag the slider to shave 10 off the heaviest note, the first two notes will also have decreased by 10. The three notes will now have velocity settings of 10, 20, and 30. By adjusting key velocities in this way, you can perform a number of different musical-surgery procedures:
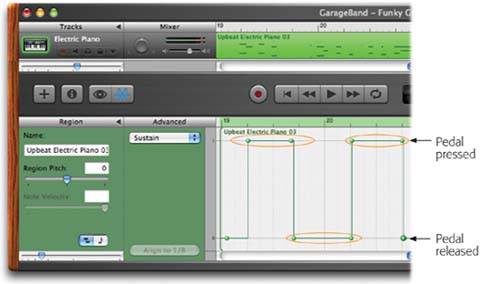
26.12.2. Editing PedalingIf your MIDI keyboard has a sustain pedalthe electronic equivalent of the rightmost pedal on a regular pianothen GarageBand records your foot -presses right along with the key-presses. In the Track Editor, you can even see standard sheet-music pedaling marks, as shown in Figure 26-16. You can use the Track Editor to edit pedaling you recorded during a performance, of course. But you can also use it to add pedaling to a performance that didn't have any to begin witha performance you created using Musical Typing (Section 26.3), for example, or a MIDI keyboard that didn't have a pedal. 26.12.2.1. "Drawing in" pedaling (notation view)It's light- years easier to edit and insert pedaling in notation view than in piano-roll view, thanks to the prominent Ped . markings that indicate when the pedal was pressed. (Note to all beginning piano students: No, it's not a cute little doggie . It's just Ped . in a very fancy font.) If you'd like to experiment, create a new document and insert the loop called Upbeat Electric Piano 03. Its notes are short and sharp, so you'll hear a clear difference when you start adding the sustain pedal. Then see Figure 26-16 for the details.
26.12.2.2. "Drawing in" pedaling (piano-roll view)If notation view isn't your thing, here's how you edit pedaling in piano-roll view:
26.12.2.3. Editing existing pedaling (notation view)You can change the pedaling by dragging the Ped . (pedal pressed) and * (pedal released) symbols right or left in the sheet music. You can also delete an entire pedal down-up sequence by clicking either one, so that the dotted line appears, and then pressing the Delete key. 26.12.2.4. Editing existing pedaling (piano-roll view)If you've ever edited volume levels of an iMovie video soundtrack, these round handles should seem familiar. They're audio control points, which you can slide around to fine-tune where they appear. For example, here's what you can do with pedaling points:
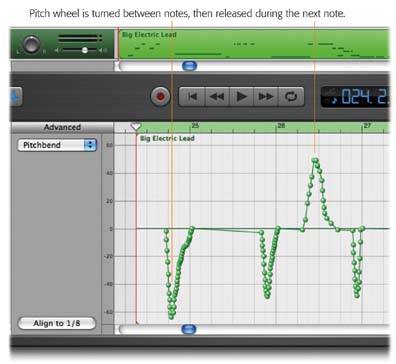
26.12.3. Editing Control Wheel DataMany MIDI keyboardsincluding the $100 M-Audio keyboard that Apple sells as a companion for GarageBandhave one or two control wheels at the left side. The pitch wheel lets you bend a note higher or lower in pitch (like a blues harmonica). Its sibling, the modulation wheel , can do a variety of things, like add a sweet vibrato to the sound, change its character, or do nothing at all, depending on which instrument sound you've selected. See Section 26.9 for more on using control wheels.
Here again, the Track Editor lets you edit any pitch wheel or mod wheel information you generated while recording. It even lets you " turn " one of those wheels after the fact, even if you don't even have a keyboard with control wheels. To inspect your control wheel data, open the region in the Track Editor, open the Advanced panel (Figure 26-15), confirm that you're in piano-roll view (not notation view), and from the Display pop-up menu, choose either Pitchbend or Modulation. If pitch wheel or mod wheel information is already a part of the recording, you'll see something like Figure 26-18. Note: As shown in Figure 26-18, pitch wheel effects usually involve turning the wheel in between notes, getting into ready position, and then releasing it, so that it returns to its spring-loaded "at rest" position during a note. Or you can do the opposite : Press a key, turn the pitch wheel up or down, and then release both together. Either way, don't be fooled by the up-down and down-up "hills" graphed in Figure 26-18; half of each "hill" actually takes place during the silence between notes.Most people turn the mod wheel, on the other hand, both up and down during a single note (to make the vibrato gradually begin and end, for example).
Pitch-wheel data is represented on a scale of 0 (when you're not touching the wheel) to positive or negative 63 (when you've turned the wheel as far as it will go). The mod wheel's scale goes from 0 (at rest) to 127 (turned all the way). In the case of the pitch wheel, each notch (from 0 to 1, for example) represents one half-step, which is one adjacent key on a piano keyboard. That's useful to remember if you're inclined to add pitch-wheel data to a recording manually (because your keyboard doesn't have wheels, for example). Once you've got that fact in mind, the techniques for adjusting or creating wheel control points are very similar to the methods for working with sustain pedal data:
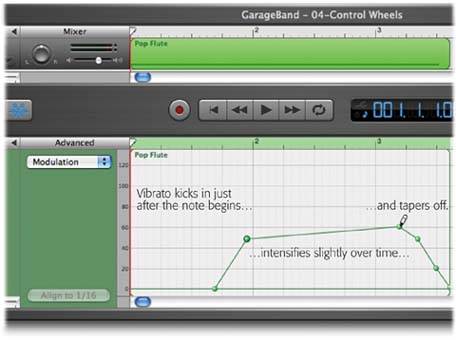
26.12.4. Control wheels: do-it-yourselfIf you'd like to experiment with control-wheel data, create a new GarageBand project. Double-click the icon of the Grand Piano starter track, scroll down to Woodwinds, click Pop Flute, and then close the dialog box. (A flute is a great sound for testing control wheels, because its notes are long and sustained so you can hear the effects over time.) Now open the miniature GarageBand onscreen keyboard (choose Window Now double-click the new green region to open the Track Editor. Make sure the Display pop-up menu says Notes. Zoom in until the note bar you recorded stretches across most of the screen. Change the Display pop-up menu to say Pitchbend. Now, starting at the 0 midline, go nuts You can repeat the same experiment with the modulation wheel. But this time, start your "hill" from the 0 line at the bottom of the graph, as shown in Figure 26-19. You'll hear your virtual flutist add a gradual vibrato to the note as the "hill" of your mod-wheel graph gets higher. 26.12.5. Importing MIDI FilesGraphics programs can exchange documents in the form of JPEG files. Word processors can exchange text files. Web-design programs can swap HTML documents. And in the musical world, the common exchange format for finished musical masterpieces is the MIDI file. It's a compact little file that contains no sound datajust note-trigger data that relies on a computer or synthesizer to give it a voice. Hundreds of thousands of MIDI files are all over the Internet, just waiting for you to download. Just go to Google.com, type in MIDI files "76 Trombones" or whatever, and in a matter of seconds you've got a list of instrumental versions of that song, arranged and prepared by amateur or professional musicians, ready to download. Tip: When you click a link to a MIDI file on a Web page, it generally begins to play. That's not the same as downloading the file. In that situation, hit your browser's Back button. This time, Option-click the original link. (Alternatively, Control-click the link and choose from the shortcut menu, "Download Link As" or "Save Link to Disk.") This time, instead of playing the MIDI file, your browser downloads it to your desktop. The beauty of downloading MIDI files (apart from their being free) is that you can work with them in your music software. You can import a favorite song into GarageBand, substitute high-quality Software Instrument sounds for the cheesy QuickTime sounds that you hear when you play them online, redo the orchestration by assigning different instrument sounds altogether to each line, add some live recordings to boost the realism, and so on. This vast Web library of ready-to-play music is ideal for exploits like practicing, karaoke , serving as background tracks for imovie movies and iPhoto slideshows, and so on. For the first time, GarageBand 2 can directly import MIDI files, so that you can dress them up with effects, add GarageBand's great-sounding drum loops , record some live tracks like vocals, and so on. Figure 26-20 shows the details. Once GarageBand is showing the imported musical material, you can play it back, change the tracks' instrument assignments, or adjust the tempo or key. (Most MIDI files "know" where their own beats and measures are, so that adjusting GarageBand's tempo correctly speeds up or slows down the MIDI data.)
|

 Keyboard, or press -K). Press the letter R key on your keyboard to begin recording, and hold down a long noteC4, for exampleon the little onscreen keyboard. Press the Space bar to stop recording after a few seconds of that note.
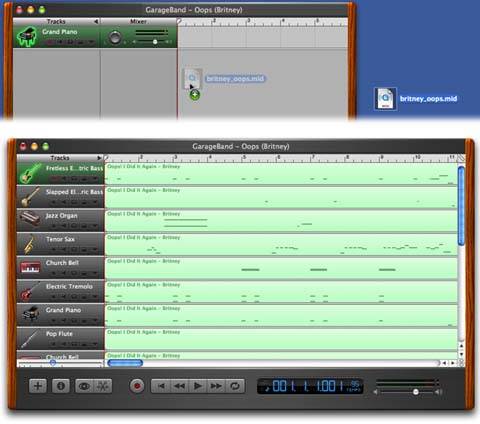
EAN: 2147483647
Pages: 314