19.3. Exporting to a QuickTime Movie For the best and most cinematic viewing experience, play your finished iMovie productions on TV, via VHS tape or DVD. That way, your public gets to see the full- sized picture that your camcorder captured. But when you want to distribute your movies electronically , convert them into QuickTime files instead. Both Mac and Windows machines can play these files right on the screen with little more than a double-click. Your distribution options for QuickTime files are far greater than for videocassette or DVD, too. You can email a QuickTime file to somebody or post it on the Web for all the world to see. You can put bigger QuickTime files onto a disk, like a recordable CD, a Zip disk, or an Apple iPod, to transport them. Here's how you do it: -
Choose File  Share . Share . The Share dialog box appears. -
Click the QuickTime icon at the top . Now the dialog box looks like Figure 19-3. 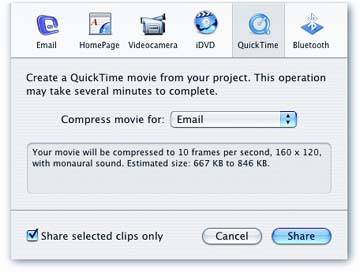 | Figure 19-3. Using the pop-up menu in this dialog box, you can indirectly specify how much compression you want applied to your movie, and what the dimensions of the finished movie frame will be. The small print below the pop-up menu warns you that many of these settings will reduce the size and quality of the finished product. | | -
Using the Formats pop-up menu, choose one of the preset export formats such as Email, Web, CD-ROM, or Expert Settings . This decision dramatically affects the picture quality, motion smoothness, file size, and window size of the finished QuickTime movie. Making a smart choice in this step requires some comprehension of the QuickTime technology itself, so although "Understanding QuickTime" in the next section is many pages long, it's well worth absorbing . It's critical to your grasp of QuickTime movies, what they are, and what they can do. That section also describes the choices in this pop-up menu one by one. -
Click Share . Now the standard Save File dialog box appears, sprouting from the title bar of the iMovie window. -
Type a name for your movie . (Unless, of course, you really do want to call your movie "My Great Movie," as iMovie suggests.) Don't remove the letters .mov from the end of the file's name, especially if it might be played on Windows computers. That suffix is a requirement for machines who aren't savvy enough to know a movie file when they see one. -
Navigate to the folder where you'll want to store the resulting QuickTime file . You can just press  -D if you want your QuickTime Movie saved onto the desktop, where it'll be easy to find. -D if you want your QuickTime Movie saved onto the desktop, where it'll be easy to find. -
Click Save . Now the time-consuming exporting and compression process begins. As you can read in the next section, compression can take a long time to completefrom a minute or two to an hour or more, depending on the settings you selected in step 3, the length of your movie, and the speed of your Mac. Feel free to switch into other programscheck your email or surf the Web, for examplewhile iMovie crunches away in the background. A progress bar lets you know how much farther iMovie has to go. When the exporting is complete, the progress bar disappears. Switch to the Finder, where you'll find a new QuickTime movie icon (see Figure 19-4). Double-click it to see the results.
Tip: You can click Stop anytime during the export process, but you'll wind up with no exported movie at all.
 | Figure 19-4. When you double-click the resulting QuickTime movie on your hard drive (left), it opens into your copy of QuickTime Player, the movie-playing application included with every Mac. Press the Space bar to make the movie play back (right). | |
19.3.1. Understanding QuickTime A computer displays video by flashing many still images in rapid succession. But if you've ever worked with graphics, you know that color graphics files are data hogs. A full-screen photograph file might occupy 5 or 10 MB of space on your hard drive and take several seconds to open up. Unfortunately, most computers are far too slow to open up 30 full-screen, photographic-quality pictures per second. Even if they could, full-screen, full-quality QuickTime movies would still be mostly useless. Each would consume hundreds of gigabytes of disk space, requiring days or weeks to download from the Web or by emaila guaranteed way to annoy citizens of the Internet and doom your movie-making career to obscurity. That's why most QuickTime movies aren't full-screen, photographic-quality films by any stretch of the imagination . In fact, most QuickTime movies are much "smaller"in three different dimensions: -
The window is much smaller . It's rare to see a QuickTime movie that, when played back, fills the computer screen. Instead, most QuickTime movies today play in a much smaller window (see Figure 19-5), therefore requiring far less data and resulting in far smaller files. 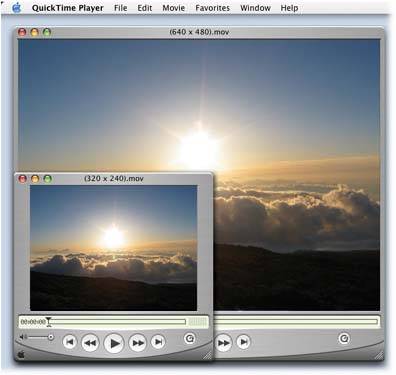 | Figure 19-5. Here's the same movie in two standard playback sizes (with the menu bar showing so you can gauge its size). Movies designed for playback from the hard drive are often 640 pixels wide, 480 tall (640 x 480). Movies intended for the Web email are smalleroften 320 x 240. (Movies sent by email are often as tiny as 160 x 120.) The common denominator: Almost all QuickTime movies have the same relative dimensionsa 4:3 width-to-height ratio, which is exactly the same ratio as the picture produced by your TV and your camcorder. | |
-
The frame rate is lower . Instead of showing 30 frames per second, many QuickTime movies have far lower frame rates; even fifteen frames per second produces smooth motion. On the Web, especially during live QuickTime "broadcasts," still lower frame rates are common, such as two or five frames per second. This kind of movie is noticeably jerky, but sends so little data that people using telephone-line modems can watch live events in this format. -
The video is compressed . This is the big onethe technical aspect of QuickTime movies that gives you the most control over the resulting quality of your movie. In short, when iMovie uses QuickTime to compress your video, it discards information that describes each frame. True, the picture deteriorates as a consequence, but the resulting QuickTime movie file is a tiny fraction of its original size. The following section describes this compression business in much greater detail. The bottom line is that by combining these three techniques, iMovie can turn your 10 GB DV movie into a 3 MB file that's small enough to email or post on your Web page. The resulting movie won't play as smoothly, fill as much of the screen, or look as good as the original DV footage. But your viewers won't care. They'll be delighted to be able to watch your movie at all, and grateful that the file didn't take hours to download. (And besides, having already been exposed to QuickTime movies, most know what to expect.)
Tip: The later the QuickTime version your Mac contains, the better and faster the movie-exporting process becomes. Mac OS X's Software Update feature is supposed to alert you every time a new version becomes available (if you have it turned on in System Preferences).
19.3.1.1. About Codecs As shown in Figure 19-3, at the moment you save your QuickTime movie, iMovie asks you which of several schemes you want to use for compressing your footage. To use the technical terminology, it asks you to choose a codec from a long list. That term is short for compressor/decompressor, the software module that translates the pixel-by-pixel description of your DV footage into the more compact QuickTime formatand then un translates it during playback. Each QuickTime codec works differently. Some provide spatial compression, some temporal, some both. Some are ideal for animations, and others for live action. Some work well on slower computers, others on faster ones. Some try to maintain excellent picture quality, but produce very large QuickTime files on the disk, and others make the opposite tradeoff . Later in this chapter, you can read about each of these codecs and when to use them. In the meantime, all of this background information should help explain a few phenomena pertaining to converting DV movies into QuickTime files: -
Saving a QuickTime movie takes a long time . It's nothing like saving, say, a word processing document. Comparing every pixel on every frame with every pixel on the next frame involves massive amounts of number crunching , which takes time. (Some codecs take longer than others, however.) -
QuickTime movies don't look as good as the original DV . Now you know why: In the act of shrinking your movie down to the file size that's reasonable for emailing, copying to a CD-ROM, and so on, a codec's job is to throw away some of the data that makes a movie look vivid and clear. -
QuickTime is an exercise in compromise . By choosing the appropriate codec and changing its settings appropriately, you can create a QuickTime movie with excellent picture and sound. Unfortunately, it will consume a lot of disk space. If you want a small file on the hard drive and excellent picture and sound, you can make the QuickTime movie play in a smaller window160 x 120 pixels, for example, instead of 320 x 240 or something largeror at a slower frame rate. The guide in this chapter, some experimentation, and the nature of the movie you're making all contribute to helping you make a codec decision. 19.3.2. The Share Presets: What They Mean iMovie offers several ready-to-use QuickTime compression settings that govern the quality, file size, and playback-window size of the movie you're exporting. Here's a guide to these presets to help you choose the one that's appropriate for your movie-distribution plans. Each of the descriptions below includes the information about each preset's video codec, size (Figure 19-5), and frame rate. (The frame rate indicates how many individual pictures you'll see per second when the QuickTime Movie plays back. Thirty frames per second is standard NTSC television quality. Ten to fifteen frames per second begins to look less smooth, and anything under ten yields a flickering , old-time movie effect.) | | | Trivia : Old-time silent movies actually played at eighteen frames per second. |
-
Audio codec . This statistic is the sonic equivalent of the frame rate, in that it tells you what kind of sound quality you'll get. At 44.1 kHz, the quality is exactly the same as that of a commercial music CD. At 22 kHz, it's half as good, but you won't hear any difference except when you listen through headphones or stereo speakers . When the sound plays through the built-in speaker on the standard Macintosh, most people can't tell the difference between 44.1 and 22 kHz. -
Time to compress one minute of video . The "Time to Compress" statistic provided below indicates how long it took a PowerBook G4 to compress a standard sample movie that's exactly one minute long. (Compressing a 10-minute movie, of course, would take about ten times as long.) Of course, the time it will take your movie to get compressed and saved depends on the codec you've chosen , the length of the movie, how much motion is visible on the screen, and your Mac's speed, but the next section offers a rough guide. -
File size . The final statistic provided for each option shows you how big the resulting QuickTime file might be (in megabytes). These numbers , too, refer to the sample one-minute DV movie described in the previous paragraph. 19.3.2.1. Email - Video codec: H.263
- Size: 160 x 120
- Frame rate: 10 per second
- Audio codec: QDesign Music 2, mono, 22 kHz
- Time to compress one minute of video: 1 minute
- File size: 1.2 MB
The movie you export with these settings is fairly blurry, and the size of the Quick Time screen is closer in size to a Wheat Thin than a Cineplex. Still, the H.263 video codec has two important benefits. First, it makes the exporting much faster than if you used, say, the Sorenson 3 codec (which takes nearly twice as long). Second, the resulting QuickTime file is relatively tiny; at just over 1 MB for a minute-long movie, it's actually within the realm of possibility that you could email this thing to somebody without incurring their wrath. (The Sorenson 3 codec produces a better-looking movie. But its movies are 3.3 MB per minutefar too large for casual emailing.) 19.3.2.2. Web - Video codec: H.263
- Size: 240 x 180
- Frame rate: 12 per second
- Audio codec: QDesign Music 2, stereo, 22 kHz
- Time to compress one minute of video: 1 minute, 35 seconds
- File size: 2.4 MB
This kind of movie is much more satisfying to watch than the Email type. The image is over twice as big, and the higher frame rate produces smoother motion. Once again, the Sorenson Video codec could provide far better image quality; but at 2.4 MB per minute, the product of the H.263 codec is small enough to download from a Web page without a high-speed Internet connection. RARELY ASKED QUESTION
30 fps Drop-Frame | | OK, I'll bite. Why on earth did the USA, which is supposed to be so technically advanced, settle on a TV standard that plays at such an oddball frame rate? Why is it 29.97why couldn't it be rounded off to 30? The 29.97 frame rate, known in the TV business as 30 fps drop-frame , dates back to the dawn of color TV. As they prepared to launch color TV broadcasts in January 1954, network engineers wanted to make sure that the expensive black-and-white TV sets of the day could receive the color shows, too. (Talk about backward-compatible software!) Trouble was, when they tried to broadcast a color signal at the then-standard 30 frames per second, the extra color information wound up distorting the audio signal. Eventually, they hit upon a discovery: If they slowed down the frame rate just a hair, the distortion disappeared. The video, meanwhile, looked just as good at 29.97 frames per second as it did at 30. A standard was born. |
19.3.2.3. Web Streaming In quality and size, this preset is identical to the Web preset described above. The only difference is that this kind of movie comes set up for streaming delivery from the Web, meaning it's played on your audience's screens as it's being sent from the Web. In other words, your viewers don't have to download the entire movie before playing it. Streaming means that your movies can be extremely long, even if they're therefore extremely large files. Only a tiny bit at a time is sent to your spectators' computers. For details on putting your QuickTime movies on the Web, see Section 19.4.2. 19.3.2.4. CD-ROM - Video codec: H.263
- Size: 320 x 240
- Frame rate: 15 per second
- Audio codec: IMA 4:1, Stereo, 44.1 kHz
- Time to compress one minute of video: 1 minute, 30 seconds
- File size: 6 MB
As you can see by the specs above, a movie with the CD-ROM setup generally contains too much data to be suitable for live Web delivery. But saving your QuickTime productions into this kind of QuickTime file is ideal if you plan to play it from a hard drive or a CD-ROM that you record yourself. The high frame rate means that motion will seem smooth, and the 320 x 240 dimensions of the window mean that the movie will fill a decent fraction of the computer screen. That's big enough to see a good amount of detail.
Tip: If you're willing to endure more compressing time and a larger resulting file, you can give your CD-ROM movies a dramatic picture-quality upgrade by substituting the Sorenson Video 3 codec for the H.263 codec. (Use the Expert settings described on the next page to do so; duplicate the settings described here, but choose the Sorenson Video 3 codec instead of H.263.)The only down side is that the resulting QuickTime movie contains too much data for older, slower CD-ROM drives , such as those rated below 12X, to deliver to the computer's brain. The movie will play on slower CD-ROM drives, but it will skip a lot.
19.3.2.5. Full Quality DV - Video codec: DV
- Size: 720 x 480
- Frame rate: 29.97 per second (for NTSC; 25 for PAL)
- Audio codec: No compression; stereo, 32 or 48 kHz (depending on source audio)
- Time to compress one minute of video: 1 minute
- File size: 411 MB
As the numbers (and the example in Figure 19-5) show you, this is the QuickTime format for people whose equipment doesn't mess around. The file size is massivemuch too large for playback from a CD-ROM drive. That's because this setting isn't intended for playback; it's intended to offer you a means of storing your iMovie production without sacrificing any video quality. The Full Quality DV setting applies no compression at all to your audio or video. Yet preserving your iMovie work as a giant, single DV clip on the hard drive is still a useful exercise. It can save hard drive space, for one thing, since the resulting QuickTime file is still far smaller than the collection of DV clips in your project's Media folder from which it was made. After creating a Full Quality DV movie, you could delete the project folder to free up some disk space, confident that you've got your entire movie safely preserved with 100 percent of its original DV quality intact. 19.3.3. The Expert Settings The canned presets aren't the only ways you can turn your iMovie project into a QuickTime movie. By choosing Expert Settings from the pop-up menu shown in Figure 19-3, and then clicking the Share button, you embark on a tour of crazy nested dialog boxes. Along the way, you'll be offered control of every aspect of the compression process, including which codec it uses, the degree of sound compression, how many frames per second you want, and so on. The first dialog box to appear is the "Save exported file as" box, where you can type a name and choose a folder location for the file you're about to save (Figure 19-6, top). Resist the temptation , for now. The real power lies in the buttons and pop-up menus elsewhere in this little box. For starters, the Export pop-up menu (shown at top in Figure 19-6) offers a wealth of conversion options. This is your opportunity to save your film as: -
An AVI file to give to your Windows PC-using friends . (Choose Movie to AVI .) -
A huge folder full of still images, one per frame of your movie. (Choose Movie to Image Sequence . Click Options to specify the file formatlike JPEG or Photoshopand how many stills per second you want.) -
A soundtrack. Here's a great opportunity to convert the audio tracks of your movie into standalone sound files. (Choose Sound to AIFF, Sound to Wave , or whatever format you want.) But most of the time, you'll ignore this Export pop-up menu. Most of the time, you'll want to leave it set to "Movie to QuickTime Movie," and then click the Options button to make some settings changes. As illustrated in Figure 19-6, that Options button opens a very important dialog box: the Movie Settings box. Here's where you can export your finished product with exactly the size-smoothness-speed compromise you want. You'll notice that this box offers three buttons for video: Settings, Filter, and Size. Below that, you get one Settings button for Sound; and at the bottom of the box, you get options for Internet streaming . All of these settings are covered in the next few pages. 19.3.3.1. The Settings Button The Settings button takes you to the powerful Compression Settings dialog box (Figure 19-7), the heart of the entire Expert software suite. Here's what the controls do: -
Compressor pop-up menu . The unlabeled pop-up menu at the top lets you choose one of 27 codecsor None, which means that iMovie won't compress your project at all. Each codec compresses your footage using a different scheme that entails different compromises. See Section 19.3.4 to learn about the codecs listed in this pop-up menu. For now, it's enough to note that for live video that will be played on modern computers, the H.264 or Sorenson Video 3 codecs almost always producethe highest quality at reasonably small file sizes. 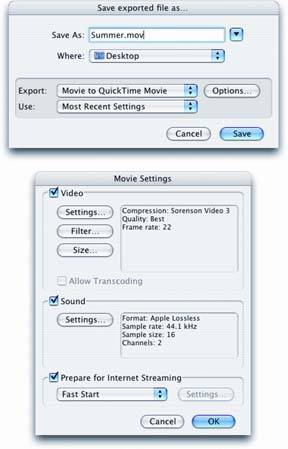 | Figure 19-6. You're about to burrow down through several nested dialog boxes, only the first two of which are shown here. (See Figure 19-7 for some of the others.)
Top: Use the Export pop-up menu when you want to save just your audio track, or when you want to convert your movie into another movie format (like AVI for Windows machines). Most of the time, though, you'll click Options.
Bottom: The Movie Settings box is just a summary screen for the dialog boxes that hide behind it: Settings, Filter, Size, and so on. | |
-
Quality slider . This slider offers another tradeoff between the size of the resulting QuickTime file and the quality of its picture. In general, the proposed value (usually Medium or High) offers the best balance between file size and picture quality. But on important projects, by all means experiment. Export a representative sample of your movie several times, moving the slider each time, so that you can compare the results.  | Figure 19-7. Top: This dialog box gives you point-by-point control over the look, size, and quality of the QuickTime movie you're exporting. Not all of these controls are available for all codecs. That is, depending on what you choose using the top pop-up menu, some of the controls here may be dimmed and unavailable. Furthermore, only some of the codecs offer an Options button in the middle of the dialog box.
In the Sorenson 3 codec controls, shown here, the "Limit data rate to __" option is useful when you're trying to produce a movie that will stream from the Web. Note, however, that this setting overrides the Quality slider setting. (Many people have been baffled by a crummy-looking Sorenson movie that they'd set to Best quality. Now you know why.)
Bottom: Here's where you can specify the dimensions of the movie you're saving, in pixels. (This box appears when you click the Size button shown at bottom in Figure 19-6.) | |
-
Frames per second . The number you specify here makes an enormous difference in the smoothness of the QuickTime movie's playback. As always, however, it's a tradeoffthe higher the number, the larger the QuickTime file, and the more difficult it is to email, store, or transfer. You can type any number between 1 and 29.97 in this box, or you can use the pop-up menu to the right of the "Frames per second" box. Settings like 8 and 10 make very compact, but very jerky movies. 12 and 15 are by far the most common frame rates for today's QuickTime movies online. An actual Hollywood movie plays 24 frames per second, and the European television signal (PAL) plays at 25. You save a little bit of disk space, while still showing as many frames as people are accustomed to seeing in motion pictures. And 29.97, of course, refers to standard North American TV (see the box on Section 19.3.2.2). -
Key frame every __ frames . You can read about key frames earlier this chapter they're the full frames that get "memorized" in your QuickTime movie, so that the QuickTime file can store less data for subsequent frames. Additional key frames make your QuickTime file bigger, so you have an incentive to make them appear infrequently (that is, to type in a higher number in this box). But if the resulting QuickTime movie is something that your viewers might want to skip around in, key frames are very useful. Somebody might scroll back into the movie to a spot with no key frame. When playback begins at that point, the image might be scrambled for a fraction of a second, until the next key frame appears. -
Limit data rate . This control is most useful for movies that will be played on the Web. If the movie will be played over a 56K modem, for example, you might want to limit the data rate to 5 K per second to ensure smooth playback; use 20 K for cable modems or DSL. iMovie automatically adjusts the picture quality as necessary, on a moment-by-moment basis, so that the QuickTime movie will never exceed this rate. 19.3.3.2. The Filter Button The Filter button opens up a rabbit hole into a world of QuickTime video controls. By opening the various flippy triangles , you'll find a lot of effects you've seen before in iMovie (color balance, brightness and contrast, lens flare, fake old-film grain)and a few you haven't (blur or sharpen, emboss, edge detection). You can apply any of these to the movie you're about to export. 19.3.3.3. The Size Button The Size button summons the dialog box shown at bottom in Figure 19-7, whereafter clicking "Use custom size"you can specify the dimensions for the playback window of your QuickTime movie. See Figure 19-5 for some examples of these different sizes. Of course, the larger the window you specify, the longer the movie will take to save, the slower it will be transmitted over the Internet, and the larger the resulting file will be. The huge majority of QuickTime movies play in at one of several standard sizes, such as 160 x 120, 240 x 180, or 320 x 240. All of them maintain this 4:3 aspect ratio. Still, there are dozens of other possible sizes that maintain the correct proportions . 19.3.3.4. Audio Settings In the middle of the dialog box shown at the bottom of Figure 19-6, the Settings button lets you specify how your soundtrack is compressed in the exported QuickTime movie (see Figure 19-8), and by how much. For example, you can specify these parameters: -
Compressor . When most people think of codecsthose who've even heard of codecs, that isthey think of video compression. But iMovie offers a choice of audio codecs, too. This pop-up menu lets you specify which one you want to use. Many of them aren't, in fact, appropriate for movie soundtracks . Remember that these codecs are provided by QuickTime, not by iMovie, and that QuickTime is designed to be an all-purpose multimedia format. It's supposed to be just as good at creating pictureless sound files as it is at creating movies. For best results in most movies, use the QDesign or IMA setting. -
Rate, Size . A computer captures and plays back sound by capturing thousands of individual slices, or snapshots, of sound per second. As though describing somebody at a wine tasting, computer nerds call this process sampling the sound. The two controls here let you specify how many samples you want the Mac to take per second (the sampling Rate) and how much data it's allowed to use to describe each sample (the sampling Size). For example, 11 kHz, 8 bits sounds like you're hearing the audio track over a bad telephone connection. Tinny. Use it only for speech. 662 K per minute. 22 kHz, 16 bits is fine for playing on a computer equipped with external speakers. 2.6 MB per minute. And 44.1 kHz, 16 bits is CD-quality audio, suitable for listening to with headphones. -
Use: Mono/Stereo . Exporting your QuickTime movie with a stereo format is often a waste of data. Most computers that might play back your movie, including [-some desktop models and iBooks, don't have stereo speakers. Therefore, consider using the Mono setting when you're trying to minimize the amount of data required to play back the soundtrack. 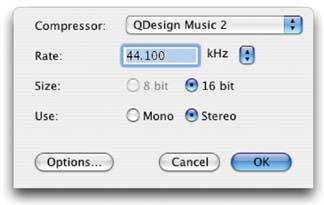 | Figure 19-8. It probably goes without saying that the better the audio quality you specify, the larger your QuickTime movie will be. In any case, this is the dialog box where you make such decisions. Audio isn't nearly as data-greedy as video, so compressing it isn't nearly as urgent an issue (unless you want your movie to play over the Internet). | |
19.3.4. The Video Codecs As it turns out, few of these codecs are very useful for everyday use. Many of them are designed for saving still frames (not movies), for storing your movies (not playing them), or for compatibility with very old versions of the QuickTime software. Most of the time, the Sorenson Video 3 compressor (for Internet playback) or H.264 (for CD, hard drive, or broadband-Web playback) are the ones that will make you and your audience the happiest. Here, however, are some of the most useful.
Note: The list of codecs that pop up in your dialog boxes may not match what you see here. Your codecs reflect the version of QuickTime that you have installed, which may be older or newer than the 7.0.1 version described here.
-
Animation . This codec is significant because, at its Best quality setting, it maintains all of the original DV picture quality, while still managing to convert files so that they're smaller than files with no compression at all. (As the name implies, this codec was originally designed to process video composed of large blocks of solid colorsthat is, cartoons or videos of the Mac screen.) The resulting file is therefore huge when compared with the other codecs described here, but not as huge as it would be if you used the None choice in this pop-up menu. -
Apple H.263, Apple VC H.263, H.261 . These codecs were designed for video teleconferencing (VC), in which a tiny, jerky image of you is transmitted over a telephone line to somebody who's also equipped with a video telephone. Apple's version, however, does a very good job at maintaining a good picture, while keeping the file size very small. In fact, Apple H.263 should be one of your first choices if you plan to send your video by email or post it on a Web page.
Tip: These codecs work best in footage where very little is going onlike a person sitting in front of a video telephone. The more that the frame remains the same, the better the picture quality, which is yet another argument for using a tripod whenever you can.
-
H.264 . This option appears only if you have QuickTime 7 or later, but it's a doozie. It looks spectacular, and it scales beautifully from cellphone screens all the way up to high-definition TVs. It's not as compact as Sorenson 3, described belowbut it delivers a DVD-quality picture in a file less than half the size. -
DV-PAL, DVCPRO-PAL . These options are here so that you can export your iMovie masterpiece in the European video format (PAL), while retaining full DV size and frame rate. (DVCPRO is a slight variant of the DV format, intended for use with super-expensive professional broadcast TV video gear.) Unfortunately, the quality of the video suffers when you make this kind of conversion, especially in action scenes. -
DV/DVCPRO -NTSC . Suppose you've just completed a masterful movie, and the thought of compressing it to some much smaller, image-degraded QuickTime movie breaks your heart. You can use this codec to turn your finished, effect-enhanced, fully edited iMovie production into a new, raw DV clip, exactly like the DV clips in the Media folder in your project folder. You might do so if, for example, you wanted to import your entire movie into another DV-editing program, such as Final Cut Express or Final Cut Pro, or if you wanted to turn it into a Video CD or DVD. ( DV , of course, means digital video; NTSC is the format used in the Western Hemisphere and Japan.) -
Sorenson Video, Sorenson Video 3 . This codec and H.264 should be your first choices. Sorenson gives you fairly high quality with very good compression, and files so small that you can play them from a CD-ROM or even over the Internet. Sorenson-compressed movies play back on either Macs or Windows computers, too. (Use Sorenson Video 3 if possible. Use the older Sorenson Videowithout a numberonly if your audience might still be using some ancient version of QuickTime to play back your opus.) |