12.1. About iPhoto Discs iPhoto CDs are discs (either CDs or DVDs) that you can create in iPhoto to archive your entire Photo Libraryor any selected portion of itwith just a few mouse clicks. The beauty of iPhoto's Burn command is that it exports much more than just the photos themselves to a disc. It also copies the thumbnails, titles, keywords, comments, ratings, and all the other important data about your Photo Library. Once you've burned all of this valuable information to disc, you can do all sorts of useful things: -
Make a backup of your whole Photo Library for safekeeping. -
Transfer specific photos, albums, or a whole Photo Library to another Mac without losing all your keywords, descriptions, ratings, and titles. -
Share discs with other iPhoto fans so that your friends or family can view your photo albums in their own copies of iPhoto. -
Offload photos to CD or DVD as your photo collection grows, to keep your current Photo Library at a trim, manageable size . -
Merge separate Photo Libraries (such as the one on your iBook and the one on your iMac) into a single master Photo Library.
Note: One thing an iPhoto CD is not good for is sharing your photos with somebody who doesn't have iPhoto! An iPhoto CD from iPhoto 5 is designed exclusively for transferring pictures into another copy of iPhoto 5. (iPhoto 5 can read iPhoto 2 and 4 discs, though.) If you just want to share the photos, export them as files (Section 12.6) or a QuickTime slideshow (Section 11.4) and burn the result to a CD .
12.1.1. Burning an iPhoto CD or DVD All you need to create an iPhoto CD is a Mac with a CD or DVD burner . -
Select the photos that you want to include on the disc . You can hand-select some photos (Section 7.3.3), click a Source list icon (album, book, slideshow), or click the Photo Library icon to burn your whole photo collection. In any case, the photo-viewing area should now be showing the photos you want to save onto a disc. -
Choose Share  Burn Disc . Burn Disc . A dialog box appears, prompting you to insert a blank disc. Pop in the disc; the dialog box vanishes after a few moments. -
Check the size of your selection to make sure it will fit . Take a look at the Info panel at the bottom of the iPhoto window, as shown in Figure 12-1; the little graph shows you how much of the disc will be filled up. If the set of photos you want to burn is smaller than 650 or 700 megabytes (for a CD) or about 4.3 gigabytes (for a DVD), you're good to go. You can burn the whole thing to a single disc. If your photo collection is larger than that, however, it's not going to fit. You'll have to split your backup operation across multiple discs. Select whatever number of photo albums or individual pictures that will fit on a single disc, using the indicator shown in Figure 12-1 as your guide. (Also shown in the figure: the Name box, where you can name the disc you're about to burn.) For example, you might decide to copy the 2003 folder onto one disk, the 2004 folder onto another, and so on, using the built-in year "collections" in the Source list as your source material. After burning one disc, select the next set of photos, and burn another CD or DVD. Burn as many discs as needed to contain your entire collection of photos. If and when you ever need to restore your photos from the multiple discs, you'll be able to merge them back together into a single Photo Library using the technique described in "Merging Photo Libraries" later in this chapter. 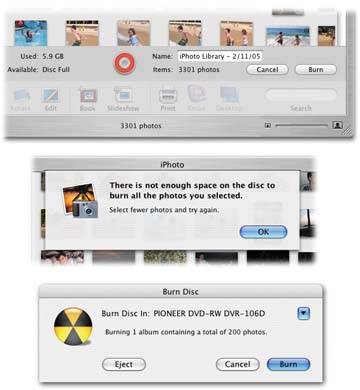 | Figure 12-1. Top: Once you've clicked Burn and inserted a blank disc, this Info panel lets you know how close you are to filling the disc. The indicator icon updates itself as you select or deselect photos and albums to show you how much free space is available on the disc.
Middle: If your photos take up more space than is available on the disc, the little disc icon turns redand when you click Burn, you see the Disc Full message shown here.
Bottom: If all is well, however, you get this message instead. Click Burn and sit back to enjoy the fruits of your Mac's little internal laser. | | -
Click the Burn button . As you can see in Figure 12-1, you'll either get a "not enough space" message or a "Burn Disc" message. If you get the latter, you're ready to proceed. -
Click the Burn button . First, iPhoto makes a disk imagea sort of pretend disk that serves as a temporary holding area for the photos that will be burned. Next, iPhoto copies the photos from your iPhoto Library folder to the disk image. Finally, the real burning begins. When the process is done, your Mac spits out the finished CD or DVD, ready to use, bearing whatever name you gave it.
Tip: You can safely bail out of the CD-creating process at any time by clicking the Cancel button when the Progress dialog box first appears.But don't click the Stop button once the Burning dialog box appears. At that point, your CD or DVD drive is already busy etching data onto the disc itself. Clicking Stop will bring the burning to a screeching halt, leaving you with a partially burned, nonfunctioning disc.
12.1.1.1. What you get The finished iPhoto disc contains not just your photos, but a clone of your iPhoto Library folder as well. In other words, this disc includes all the thumbnails, keywords, comments, ratings, photo album informationeven the unedited original versions of your photos that iPhoto keeps secretly tucked away. If you want to view the contents of your finished CD in iPhoto, pop the disc back into the drive. If iPhoto isn't running, your Mac opens it automatically. Moments later, the icon for the CD appears in the Source list of the iPhoto window, as shown in Figure 12-2. If you click the disc's icon, the photos it contains appear in the photo-viewing area, just as if they were stored in your Photo Library. 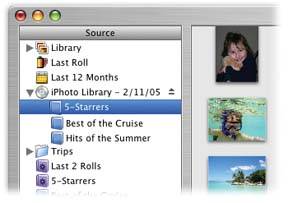 | Figure 12-2. Pop an iPhoto CD into your Mac and it appears right along with your albums in iPhoto. Click on the disc icon itself or one of the disc's album icons (as shown here) to display the photos it contains. In essence, iPhoto is giving you access to two different libraries at oncethe active Photo Library on your Mac's hard drive and a second library on the CD. | |
You can't make changes to them, of coursethat's the thing about CDs and DVDs. But you can copy them into your own albums, and make changes to the copies. 12.1.2. When Not to Burn The Burn command is convenient for creating quick backups , archiving portions of your Photo Library, or transferring photos to another Mac. But it's definitely not the best way to share your photos with Windows users, or even other Mac fans running Mac OS 9. Think about it: Burning an iPhoto CD automatically organizes your photos into a series of numerically named subfolders inside an iPhoto Library folder, surrounded by scads of special data files like .attr files, Library.cache , and Dir.data . All of this makes perfect sense to iPhoto, but is mostly meaningless to anyoneor, rather, any computerthat doesn't have iPhoto. A Windows user , for example, would have to dig through folder after folder on your iPhoto CD to find and open your photos. So if the destination of your CD or DVD isn't another iPhoto nut, don't use the Burn command. Instead, export the photos using the File Export or Web Page options described in Chapter 11. The pictures won't have any ratings, comments, keywords, and so on, but they'll be organized in a way that's much easier for non-iPhoto folk to navigate. |