11.2. Publishing Photos on the Web Putting your photos on the Web is the ultimate way to share them with the world. If the idea of enabling the vast throngs of the Internet-using public to browse, view, download, save, and print your photos sounds appealing, read on. It's amazingly easy to get your photos from iPhoto to the Internet. Before you can post your photos onlineand on your network using iPhoto's built-in Web toolsyou need a .Mac account. That's Apple's suite of Internet services: email accounts, secure file-backup, Web-site hosting, and a few other extras. If you don't already have a .Mac account, see the "Getting a .Mac Account" box on the next page. Follow the directions, and you'll have one in less than five minutes. (A .Mac membership costs $100 per year; a two-month trial account is free.) 11.2.1. Three Roads to Webdom iPhoto actually provides three different Web-publishing routes (two of which require a .Mac account), offering varying degrees of sophistication and complexity. -
The easiest , most hands-off approach : Use the HomePage feature within iPhoto. With only a couple of mouse clicks, this feature lets you construct Web pages, transfer them to the Internet, and make them available to the public. (A .Mac account is required.) What's especially nice about the resulting Web page is that it presents a tidy collection of thumbnail imagesa gallery that downloads relatively quickly into your audience's browsers. Then, when visitors click one of the thumbnails, a new window opens up to display the picture at full size (see Figure 11-2). 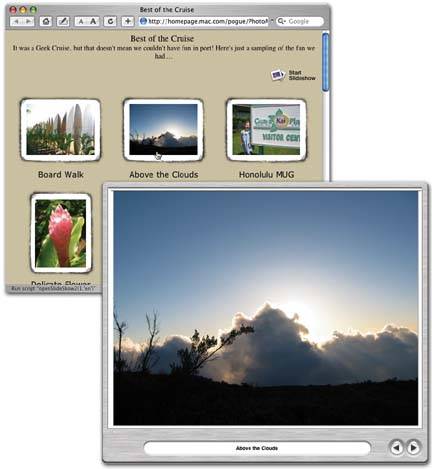 | Figure 11-2. You'd be nuts to stuff your full-size pictures onto the Web. The 70 percent of the population that uses dial-up modems would come after you with a lynch mob.
Fortunately, iPhoto adopts a respectful approach: It uploads only a gallery of smallish thumbnails (top). When visitors click one of them, a larger version of it opens (bottom right). This way, they wait only for the pictures they really want to see at full size. At this point, the left and right arrow buttons conduct a tour of the larger photos. | |
-
More effort, more design and layout options : Copy photos from iPhoto to the Pictures folder of your iDisk (a 125 MB Internet-based "virtual hard drive" that comes with a .Mac account). Then use the HomePage features at Apple's Web site (instead of the layout tools in iPhoto) to set up your pages. -
For the experienced Web page designer : If you already have a Web site, you can use iPhoto's Export command to generate Web pages (HTML documents) that already contain your photos. You can upload these files, with the accompanying graphics, to your Web site, whether that's a .Mac account or any other Web-hosting service. (Most Internet accounts, including those provided by America Online, Earthlink, and other service providers, come with free space for Web pages uploaded in this way.) This is the most labor- intensive route, but it offers much more flexibility if you know how to work with HTML to create more sophisticated pages. It's also the route you should take if you hope to incorporate the resulting photo gallery into an existing Web site (that is, one in which the photos aren't the only attraction). All three of these methods are detailed in the following pages. 11.2.2. Method 1: Use HomePage in iPhoto Web publishing doesn't get any easier than it is with iPhoto's built-in HomePage feature. Your photos end up on a handsome-looking Web page in just a few quick stepsand you don't have to know the first thing about HTML. -
In iPhoto, select the photos you want to put on the Web, or click the album that contains them . The selection can be one you've dragged pictures into, a smart album, the Last Roll(s) album, a year album, and so on. Or use the selection techniques described on Section 7.3.3 to isolate a bunch of photos within an album.
Note: The HomePage feature in iPhoto can't handle more than 48 photos per Web page. If you want to "publish" more than that, you'll have to create a series of separate pages.
-
Click the HomePage button . After it connects to the Internet, iPhoto opens its Publish HomePage window, which offers a visual menu of predesigned frame styles for your photos (see Figure 11-3). -
Click a frame style . The Publish HomePage window immediately displays a mock-up of how your finished Web page is going to look (Figure 11-3), displaying the thumbnails in whatever order they appear in iPhoto. You can choose from 23 different frame and text styles by clicking the photo thumbnails in the drawer alongside the window. -
Edit the page title, subtitle , and individual photo titles . Just click inside a text block to edit it. You can use iPhoto's spelling checker, if you need the help (Section 3.1.2). If you don't bother changing the photo names , iPhoto will simply use whatever titles the photos have in the program itself. (On the other hand, be careful: Any changes you make to the photo titles here are reflected in iPhoto.) -
Select the layout options you want . Use the Layout radio button in the lower-left corner of the window to switch between a two-column or three-column layout. 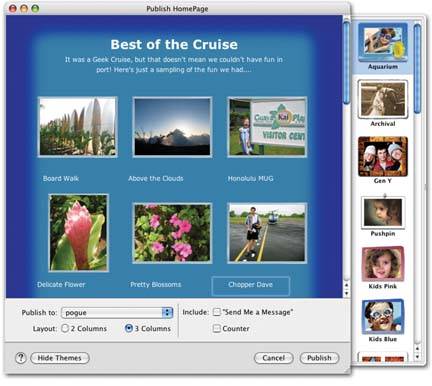 | Figure 11-3. Before you even open a Web browser, iPhoto shows you what your yet-to-be-created Web page is going to look like in the Publish HomePage window. In iPhoto 5, you can choose from among 14 canned Web designs, complete with frame styles, background colors, font schemes, and so on. Better yet, you're not looking at a page of HTML code. | | The "Send Me a Message" option lets you include a link on your Web pages that lets your fans send their gushing admiration via email to your .Mac address. Turning on the Counter option adds an odometer-style counter to your page, so you can marvel (or despair) at the number of visitors who hit your pages once you publish them. -
Click Publish . This is the big moment: iPhoto connects to the .Mac Web site, scales down your photos to a reasonable size, and then transfers them to the server (Figure 11-4, top). When the process is complete, as indicated by the alert dialog box (Figure 11-4, bottom), you can go to the page and see your results.
Note: If you include larger photos in your Web page, iPhoto automatically scales them down to 800 x 600 pixel JPEG files, so that they can be more easily loaded and displayed in a Web browser. If you want your Web pages to include exact copies of your original photosregardless of size or file formatyou must copy them to your iDisk yourself and then use the online HomePage tools to create your Web pages, as described later in this chapter. Or use the "Export Web Pages" option described on Section 11.2.4.In any case, beware: Your iDisk holds only 125 MB of dataa limit that's easy to hit once you're addicted to self-publishing. (If you're really addicted, Apple is happy to raise the ceiling to 200 MB or even a gigabytefor an additional annual fee.)
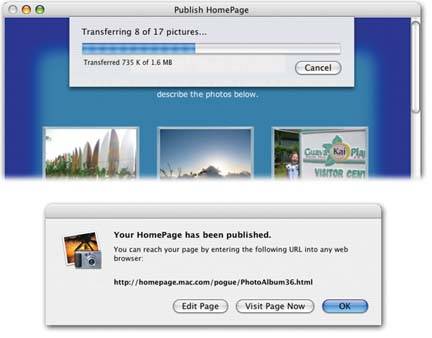 | Figure 11-4. Top: Click Publish to upload the photos to your .Mac account. Depending on the size and number of photos, this can take some time.
Bottom: Your new Web page has been born. You can see your finished page on the Web by clicking Visit Page Now, but pay heed to the URL listed above the buttons; that's the Web address you need to give out if you want others to visit the page. (You can either click this address to visit the page, or drag across it to copy it.) | |
11.2.2.1. What you get when you're done When you see what you've created with iPhoto, you'll be impressed: It's a professional-looking, stylishly titled Web page with thumbnails neatly arranged in a two- or three-column grid. Clicking a thumbnail opens an enlarged version of the picture, complete with Previous and Next buttons (Figure 11-2). You can return to your main index page at any time, or use the buttons in the slideshow window to navigate through the larger versions of your pictures.
Tip: In the URLs for your .Mac-hosted Web sites (such as http://hompage.mac.com/yackell/PhotoAlbum2.html), capitalization countsa point not to be forgotten when you share the site's address with friends. If you type one of these addresses into a Web browser with incorrect capitalization, you'll get only a "missing page" message.Then again, maybe it's better to send your friends a much shorter, easier to remember address. You can convert long URLs into shorter ones using a free URL redirection service. At http://www.here.is, for example, you can sign up to turn http://hompage.mac.com/gladys/PhotoAlbum22.html into www.here.is/gladys. (And if the here.is service isn't working as you read this, do your own shopping for free redirection services by searching Google for "free URL redirection.")
11.2.2.2. Editing or deleting the Web page The easiest way to edit your Web page is just to republish it from within iPhoto. That is, make your changes (add or delete photos, rearrange them, rename them, and so on) and then click the HomePage button again at the bottom of the iPhoto screen. You'll be offered the chance to replace the existing gallery pages. Deleting a Web page is easy once you've signed onto the .Mac HomePage Web site. Click the name of the page you want to delete, and then click the Delete button. When asked, "Are you sure?" click Yes. 11.2.3. Method 2: Use .Mac Although using iPhoto's HomePage feature is incredibly simple, there's another way to go about creating, editing, and managing your photo galleries online: visit your .Mac Web site. The advantage here is that you can make changes to your photo gallery even when you're far from home, using any Web-connected computer. As a bonus, Apple offers templates that lets you use your photos in Web pages that aren't photo-gallery designsthere's a nice baby announcement page, for example. 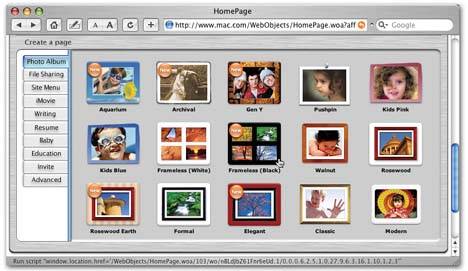 | Figure 11-5. Your Web-publishing options multiply considerably once you hit HomePage. In addition to the photo album themes shown here, you can also create resum s, personal newsletters, baby announcements, and party invitations. You can find these other options by clicking the "Create a page" tabs along the left side of the screen in the main HomePage screen. | |
To get started with HomePage, you first must copy the photos you want to publish from iPhoto to the Pictures folder of your iDiskin fact, into a new folder in the Pictures folder, one folder per Web page. (If your iDisk isn't already onscreen, just choose Go  iDisk My iDisk in the Finder, so that its icon appears on your desktop.) You can drag thumbnails directly out of iPhoto and into the Pictures folder on the iDisk. iDisk My iDisk in the Finder, so that its icon appears on your desktop.) You can drag thumbnails directly out of iPhoto and into the Pictures folder on the iDisk. Once your photos are in the iDisk's Pictures folder, you're ready to create your Web pages. Go to www.mac.com, sign in, click the HomePage icon, then click one of the "Create a page" tabs on the HomePage screen to view the styles of pages you can create. Some of the formatting options available are shown in Figure 11-5. The first tab, Photo Album, offers much the same photo-gallery layouts that you find in iPhoto itself. But you're free to use your photos in the other Web page designs here, too, like the baby announcements, writing samples, invitations, and so on. If you choose Photo Album, click the miniature image of the design you want. HomePage next asks which photos folder in your Pictures folder you want to place on your new Web page, as shown in Figure 11-6. Select a folder of pictures, and then click Choose. After a few moments, your new photo album page appears with photos already inserted in the appropriate spots. 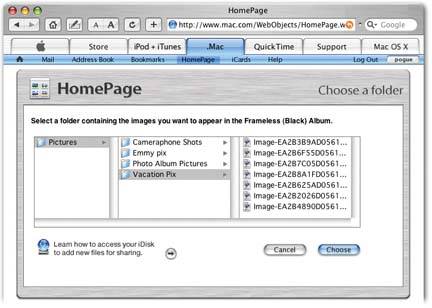 | Figure 11-6. Tell HomePage which photos to use. Two things to remember here: First, the pictures you choose must be in the Pictures folder of your iDisk, or HomePage won't see them; second, you can only choose a folder, not individual files . To include specific photos on a page, put them into a folder of their own in your Pictures folder before you start building the page. | |
(If you choose any other Web page design, like Baby, the routine is pretty much the same, except that you have to click Edit at the top of the page in order to choose the photos you want.) To finish the project, click Edit at the top of the page to change the chunks of dummy text on the page. (Make an effort to avoid misspellings and typos, unless you want an audience of 400 million to think you slept through fourth-grade English.) Finally, click Preview to see how the Web page will look. When everything is just the way you want it, click Publish. The page goes live, as indicated by the confirmation dialog box shown at the bottom of Figure 11-4.
Tip: You can create as many Web pages as your iDisk will hold, by the way. When you return to the main HomePage screen, a list of your existing Web pages appears, complete with New Page, Edit Page, and Delete Page buttons.
Corporations and professional Web designers may sniff at the simplicity of the result, but it takes them a lot longer than two minutes to do their thing. 11.2.4. Method 3: Export Web Pages If you already have your own Web site, you don't need .Mac or HomePage to create an online photo album. Instead, you can use iPhoto's Export command to generate HTML pages that you can upload to any Web server. You're still saving a lot of time and effortand you still get a handy, thumbnail gallery page like that shown back in Figure 11-2. The Web pages you export directly from iPhoto don't include any fancy designs or themed graphics. In fact, they're kind of stark; just take a look at Figure 11-10. But they offer more flexibility than the pages made with HomePage. For example, you can select the background color (or image) that appears on each page, specify the dimensions of thumbnails and images, and choose exactly how many thumbnails you want included on each page. This is the best method if you plan to post the pages you create to a Web site of your ownespecially if you plan on tinkering with the resulting HTML pages yourself. 11.2.4.1. Preparing the export Here are the basic Web exporting steps: -
In iPhoto, select the photos you want to include on the Web pages . Unlike the HomePage feature, the Export command puts no limit on the number of photos you can export to Web pages in one burst. Select as many photos as you want; iPhoto will generate as many pages as needed to accommodate all the pictures into your specified grid.
Tip: If you don't select any photos, iPhoto assumes you want to export all the photos in the current album, including the Photo Library or Last Roll(s) album.
-
Choose Share Export, or press Shift- -E . The Export Photos dialog box now appears. -
Click the Web Page tab . You see the dialog box shown in Figure 11-7. -
Set the Page attributes, including the title, grid size, and background . The title you set here will appear in the title bar of each exported Web page, and as a header in the page itself.
Tip: For maximum compatibility with the world's computers and operating systems, use all lowercase letters and no spaces.
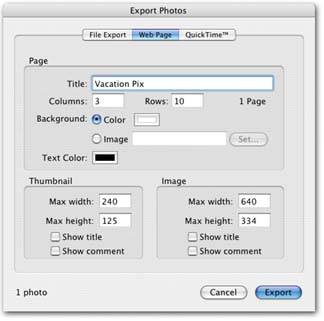 | Figure 11-7. As you change the size of the thumbnail grid or the size of the thumbnails, the number of pages generated to handle the images changes. The page count, based on your current settings, appears just to the right of the Rows field. The total count of the photos you're about to export appears in the lower-left corner of the window. | | Use the Columns and Rows boxes to specify how many thumbnails you want to appear across and down your "index" page. (The little "1 page" indicator tells you how many pages this particular index gallery requires.) If you'd like a background page color other than white, click the rectangular swatch next to the word Color, and follow the instructions in Figure 11-8. You can also pick a color for the text that appears on each page by clicking the Text Color swatch. You can even choose a background picture instead of a solid background color. To make it so, click the Image button, and then the Set button to select the graphics file on your hard drive. Be considerate of your audience, however. A background graphic makes your pages take longer to load, and a busy background pattern can be very distracting. -
Specify how big you want the thumbnail images to be, and also specify a size for the expanded images that appear when you click them . The sizes iPhoto proposes are fine if all of your photos are horizontal (that is, in landscape orientation). If some are wide and some are tall, however, you're better off specifying square dimensions for both the thumbnails and the enlarged photos240 x 240 for the thumbnails and 640 x 640 for the biggies, for example. -
Turn on "Show title" and "Show comment," if desired . This option draws upon the titles you've assigned in iPhoto, centering each picture's name underneath its thumbnail. The larger version of each picture will also bear this name when it opens into its own window. Turning on the "Show comment" option displays any text you've typed into the Comments field for each picture in iPhoto. Depending on which checkboxes you turn on, you can have the comments appear under each thumbnail, under each larger size image, or both. 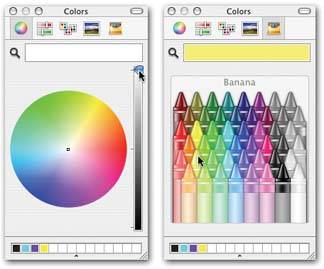 | Figure 11-8. Left: Drag the right-side slider all the way up to see the spectrum of colors available to you. Drag downwards to view darker colors.
Right: Alternatively, click one of the other color-picking buttons at the top of the dialog box. The crayon picker delights with both ease of use and creative color names, like Banana. | | -
Click Export . The Save dialog box appears. -
Choose a folder to hold the export files (or, by clicking New Folder, create one) and then click OK . The export process gets under way. 11.2.4.2. Examining the results When iPhoto is done with the export, you end up with a series of HTML documents and JPEG imagesthe building blocks of your Web-site-to-be. A number of these icons automatically inherit the name of the folder into which you've saved them. If you export the files into a folder named Tahiti, for example, you'll see something like Figure 11-9: -
Tahiti.html . This is the main HTML page, containing the first thumbnails in the series that you exported. It's the home page, the index page, and the starting point for the exported pages. -
Page1.html, Page2.html You see these only if you exported enough photos to require more than one page of thumbnailsthat is, if iPhoto required multiple "home" pages. -
Tahiti-Thumbnails . This folder holds the actual thumbnail graphics that appear on each of the index pages. -
Tahiti-Pages . This folder contains the HTML documents (named Image1.html, Image2.html, Image3.html, and so on) that open when you click the thumbnails on the index pages. -
Tahiti-Images . This folder houses the larger JPEG versions of your photos. Yes, these are the graphics that appear on the Image HTML pages.
Tip: Some Web servers require that the default home page of your site be called index.html . To force your exported Web site to use this name for the main HTML page, save your exported pages into a folder called "index." Now the home page will have the correct name ( index.html ) and all the other image and page files will be properly linked to it. (After exporting, feel free to rename the folder. Naming it "index" was necessary only during the exporting process.)
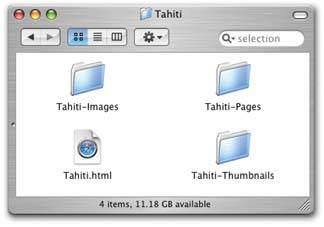 | Figure 11-9. This is what a Web site looks like before it's on the Internet. All the pieces are here, filed exactly where the home page (called, in this example, Tahiti.html) can find them. | |
Once you've created these pages, it's up to you to figure out how to post them on the Internet where the world can see them. To do that, you'll have to upload all the exported files to a Web server, using an FTP program like the free RBrowser Lite (available from the "Missing CD" page of www.missingmanuals.com). Only then do they look like real Web pages, as shown in Figure 11-10.  | Figure 11-10. Here's what a Web page exported straight from iPhoto looks like. The no-frills design is functional, but not particularly elegant. You have no control over fonts or sizes. On the other hand, the HTML code behind this page is 100 percent editable. | |
11.2.4.3. Enhancing iPhoto's HTML If you know how to work with HTML code, you don't have to accept the unremarkable Web pages exported by iPhoto. You're free to tear into them with a full-blown Web authoring program like Adobe GoLive, Macromedia Dreamweaver, or the free Netscape Composer (www.netscape.com) to add your own formatting, headers, footers, and other graphics. (Heck, even Microsoft Word lets you open and edit HTML Web pagesplenty of power for changing iPhoto's layout, reformatting the text, or adding your own page elements.) If you're a hard- core HTML coder , you can also open the files in a text editor like BBEdit or even TextEdit to tweak the code directly. With a few quick changes, you can make your iPhoto-generated Web pages look more sophisticated and less generic. Some of the changes you might want to consider making include: -
Change font faces and sizes. -
Change the alignment of titles. -
Add a footer with your contact information and email address. -
Add metadata tags (keywords) in the page header , so that search engines can locate and categorize your pages. -
Insert links to your other Web sites or relevant sites on the Web. If you're not an HTML coderor even if you areyou can perform many of these adjustments extremely easily with the BetterHTMLExport plug-in for iPhoto, described next. 11.2.5. Better HTML iPhoto's Export command produces simple, serviceable Web page versions of your photo albums. Most people assume that if they want anything fancier, they need either HTML programming chops or a dedicated Web design program. Actually, though, you can add a number of elegant features to your photo site using an excellent piece of add-on software that requires absolutely no hand coding or special editing software. It's the fittingly named BetterHTMLExport, an inexpensive iPhoto plug-in that extends the features of iPhoto's own HTML Exporter. You can download a copy of BetterHTMLExport from the "Missing CD" page of www.missingmanuals.com, among other places. The version for iPhoto 5 is a $20 shareware program. |