Section 4.5. The Recycle Bin
4.5. The Recycle BinThe Recycle Bin is your desktop trash basket . This is where files and folders go when they've outlived their usefulness , like a waiting room for data oblivion. Your files stay here until you empty the Recycle Binor until you rescue them by dragging them out again. While you can certainly drag files or folders onto the Recycle Bin icon, it's usually faster to highlight them and then perform one of the following options:
Windows XP asks if you're sure you want to send the item to the Recycle Bin. (You don't lose much by clicking Yes, since it's easy enough to change your mind, as explained in the following section.) Now the Recycle Bin icon looks like it's brimming over with paper. Tip: To turn off the "Are you sure?" message that appears when you send something Bin-ward, right-click the Recycle Bin. Then choose Properties from the shortcut menu, and turn off "Display delete confirmation dialog." Turning off the warning isn't much of a safety risk. After all, files aren't really being removed from your drive when you put them in the Recycle Bin. You can put unwanted files and folders into the Recycle Bin from any folder window, from within Windows Explorer, or even from inside the Open File dialog box of many Windows applications (see Chapter 5). 4.5.1. Restoring Deleted Files and FoldersIf you change your mind about sending something to the software graveyard, open the Recycle Bin by double-clicking it. A window like the one in Figure 4-8 opens. Figure 4-8. When you double-click the Recycle Bin (top), its window (bottom) displays information about each folder and file that it holds. To sort its contents in Details view, making it easier to find a deleted icon, click the gray column heading for the type of sort you need.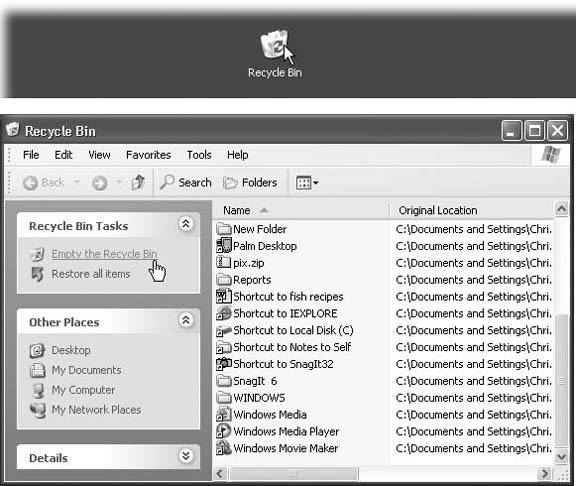 To restore a selected file or a folderor a bunch of themclick the "Restore the selected items" link in the task pane, or choose File Restored means returned to the folder from whence it camewherever it was on your hard drive when deleted. If you restore an icon whose original folder has been deleted in the meantime, Windows XP even recreates that folder to hold the restored file. (You don't have to put icons back into their original folders. By dragging them out of the Recycle Bin window, you can drop them into any folder you like.) 4.5.2. Emptying the Recycle BinWhile there's an advantage to the Recycle Bin (you get to undo your mistakes), there's also a downside: the files in the Recycle Bin occupy as much disk space as they did when they were stored in folders. Deleting files doesn't gain you additional disk space until you empty the Recycle Bin. That's why most people, sooner or later, follow up an icon's journey to the Recycle Bin with one of these cleanup operations:
The first three procedures above produce an "Are you sure?" message. To avoid the hassle of emptying the Recycle Bin on a one-shot basis, press the Shift key while you delete a file. Doing soand then clicking Yes in the confirmation boxdeletes the file permanently, skipping its layover in the Recycle Bin. Tip: The Shift-key trick works for every method of deleting a file: pressing the Delete key, choosing Delete from the shortcut menu, and so on. |
 Delete.
 EAN: 2147483647
Pages: 162
- Using SQL Data Definition Language (DDL) to Create Data Tables and Other Database Objects
- Using SQL Data Manipulation Language (DML) to Insert and Manipulate Data Within SQL Tables
- Retrieving and Manipulating Data Through Cursors
- Repairing and Maintaining MS-SQL Server Database Files
- Writing Advanced Queries and Subqueries