23.3. Local Accounts: All Versions This section is dedicated to computers in a workgroup networkor no network at all. If your computer is a member of a corporate domain, skip to "Local Accounts on a Domain Computer," later in this chapter. To see what accounts are already on your PC, choose Start  Control Panel, and then, under User Accounts and Family Safety, click "Add or remove user accounts." Control Panel, and then, under User Accounts and Family Safety, click "Add or remove user accounts." You're asked to authenticate yourself (page 191), and then you see a list of existing accounts (Figure 23-1). 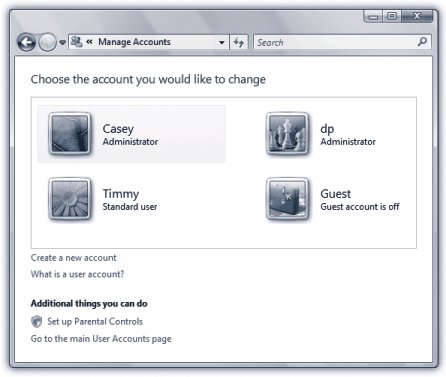 | Figure 23-1. This screen lists everyone for whom you've created an account. From here, you can create new accounts or change people's passwords. (Hint: To change account settings, just click the person's name on the bottom half of the screen. Clicking the "Change an account" link at the top requires an extra click.) | |
If you see more than one account herenot just yoursthen one of these situations probably applies: -
You created them when you installed Windows Vista, as described in Appendix A. -
You bought a new computer with Vista preinstalled , and created several accounts when asked to do so the first time you turned on the machine. -
You upgraded the machine from an earlier version of Windows. Vista gracefully imports all of your existing accounts. If you're new at this, there's probably just one account listed here: yours. This is the account that Windows created when you first installed it. 23.3.1. Administrator vs. Standard Accounts It's important to understand the phrase that appears just under each person's name. On your own personal PC, the word Administrator probably appears underneath yours. Because you're the person who installed Vista, the PC assumes that you're one of its administrators the technical wizards who will be in charge of it. You're the teacher, the parent, the resident guru. You're the one who will maintain this PC and who will be permitted to make system-wide changes to it. You'll find settings all over Windows (and all over this book) that only people with Administrator accounts can change. For example, only an administrator is allowed to: -
Create or delete accounts and passwords on the PC. -
Install new programs (and certain hardware components ). -
Make changes to certain Control Panel programs that are off limits to non-administrators. -
See and manipulate any file on the machine. There's another kind of account, too, for people who don't have to make those kinds of changes: the Standard account. Now, until Vista came along, people doled out Administrator accounts pretty freely . You know: the parents got Administrator accounts, the kids got Standard ones. The trouble is, an Administrator account itself is a kind of security hole. Any time you're logged in with this kind of account, any nasty software you may have caught from the Internet is also , in effect, logged inand can make changes to important underlying settings on your PC, just the way a human administrator can. Put another way: If a Standard account holder manages to download a computer virus, its infection will be confined to his account. If an administrator catches a virus, on the other hand, every file on the machine is at risk. In Vista, therefore, Microsoft recommends that everyone use Standard accountseven you, the wise master and owner of the computer! So how are you supposed to make important Control Panel changes, install new programs, and so on? That's gotten a lot easier in Vista. Using a Standard account no longer means that you can't make important changes. In fact, you can do just about everything on the PC that an Administrator account can if you know the name and password of a true Administrator account.
Note: Every Vista PC can (and must) keep at least one Administrator account on hand, even if you rarely log in with that account.
Whenever you try to make a big change, you're asked to authenticate yourself. As described on page 191, that means supplying an Administrator account's name and password, even though you, the currently logged-in person, are a lowly Standard account holder (Figure 23-2). 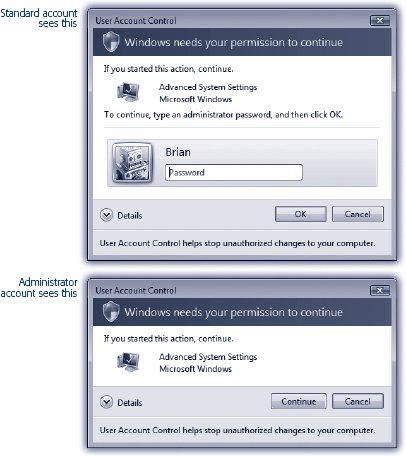 | Figure 23-2. Top: If you're a Standard account holder, installing a program or making PC-wide changes in the Control Panel requires your filling in this dialog box with an Administrator's name and password .
Bottom: If you're logged in as an Administrator, you can just click Continue to get past the box. You've already supplied your name and password (when you logged in!) . | |
The idea is that if you really are a Standard account holder, you can call over an Administrator to approve the change you're making. And if you really are the PC's owner, you know the Administrator account's password anyway, so it's no big deal. Now, making broad changes to a PC when you're an Administrator still presents you with those " prove yourself worthy" authentication dialog boxes. The only difference is that you, the Administrator, can click Continue to bypass them, rather than having to type in a name and password. You'll have to weigh this security/convenience tradeoff . But you've been warned : the least vulnerable PC is one where everyone uses Standard accounts. 23.3.2. Adding an Account Once you've opened the Manage Accounts window in the Control Panel, it's easy to create a new account: click the "Create a new account" link shown in Figure 23-1. (You see this link only if you are, in fact, an administrator.) The next screen asks you to name the account and choose an account type: Administrator or Standard (Figure 23-3). 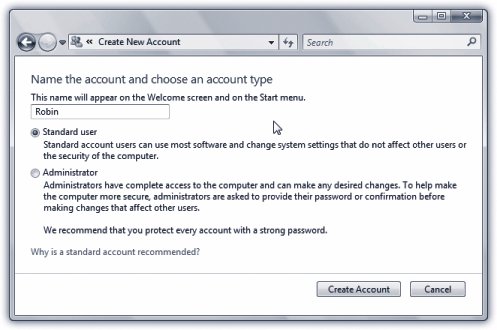 | Figure 23-3. If it's all in the family, the account's name could be Chris or Robin. If it's a corporation or school, you'll probably want to use both first and last names . Capitalization doesn't matter, but most punctuation is forbidden. This is also where you specify whether or not this unsuspecting computer user will be a computer administrator, as described above . | |
When you're finished with the settings, click Create Account (or press Enter). After a moment, you return to the User Accounts screen (Figure 23-1), where the new person's name joins whatever names were already there. You can continue adding new accounts forever or until your hard drive is full, whichever comes first.
Tip: If you never had the opportunity to set up a user account when installing Windows Vistaif you bought a PC with Windows already on it, for exampleyou may see an account named Owner already in place. Nobody can use Windows at all unless there's at least one Administrator account on it, so Microsoft is doing you a favor here.Just use the User Accounts program in the Control Panel to change the name Owner to one that suits you better. Make that account your own using the steps in the following paragraphs.
23.3.3. Editing an Account Although the process of creating a new account is swift and simple, it doesn't offer you much in the way of flexibility. You don't even have a chance to specify the new person's password, let alone the tiny picture that appears next to the person's name and at the top of the Start menu (rubber ducky, flower, or whatever). That's why the next step in creating an account is usually editing the one you just set up. To do so, once you've returned to the main User Accounts screen (Figure 23-1), click the name or icon of the freshly created account. You arrive at the screen shown at the top in Figure 23-4, whereif you are an administratoryou can choose from any of these options: 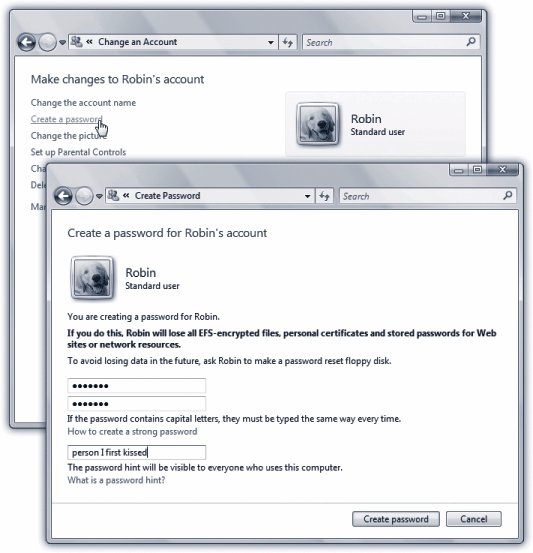 | Figure 23-4. Top: Here's the master menu of account-changing options that you can see .
Bottom: You're supposed to type your password twice, to make sure you didn't introduce a typo the first time. (The PC shows only dots as you type, to guard against the possibility that some villain is snooping over your shoulder.) | |
-
Change the name . Click "Change the account name." You'll be offered the opportunity to type in a new name for this person and then click the Change Name buttonjust the ticket when one of your co-workers gets married or joins the Witness Protection Program. -
Create a password . Click this link if you'd like to require a password for access to this person's account (Figure 23-4, bottom). Capitalization counts. The usual computer book takes this opportunity to stress the importance of having a long, complex password, such as a phrase that isn't in the dictionary, something made up of mixed letters and numbers , and not , by the way, the word "password." This is excellent advice if you create sensitive documents and work in a corporation. But if you share the PC only with a spouse or a few trusted colleagues in a small office, you may have nothing to hide. You may see the multiple-users feature more as a convenience (for keeping your settings and files separate) than a way of protecting secrecy and security. In these situations, there's no particular need to dream up a convoluted password. In fact, you may want to consider setting up no passwordleaving both password blanks empty. Later, whenever you're asked for your password, just leave the Password box blank. You'll be able to log on and authenticate yourself that much faster each day. If you do decide to provide a password, you can also provide a hint (for yourself or whichever co-worker's account you're operating on). This is a hint that anybody can see (including bad guys trying to log on as you), so choose something meaningful only to you. If your password is the first person who ever kissed you plus your junior-year phone number, for example, your hint might be "first person who ever kissed me plus my junior-year phone number." Later, when you log in and can't remember your password, leave the Password box empty and hit Enter. You'll wind up back at the login screen to try againbut this time, your hint will appear just below the Password box to jog your memory.
Tip: When you're creating accounts that other people will use to access their machines from across the network, set up the same passwords they use when logging onto their own computers. You'll save them time and hassle. Once they've logged onto another machine on the network, they'll be able to connect to their own computer without having to type in another name and password.
-
Remove the password . By removing the password, you open up the opportunity for this person to replace it with something better. By the way, be careful when you remove someone else's password after they've been using the computer for a while. If you do, you'll wipe out various internal security features of their accounts, including encrypted files, access to their stored Web site passwords, and stored passwords for shared folders and disks on the network (Chapter 26). See the box on page 676 for details. -
Change the picture . The usual sign-in screen (Figure 23-1) displays each account holder's name, accompanied by a little picture. When you first create the account, however, it assigns a picture to you at randomand not all of the pictures are necessarily appropriate for your personality. Not every extreme-sport headbanger, for example, is crazy about being represented by a dainty flower or kitten. If you like one of the selections that Microsoft has provided, just click it to select it as the replacement graphic. If you'd rather use some other graphics file on the hard drive insteada digital photo of your own face, for exampleyou can click the "Browse for more pictures" link (Figure 23-5). You'll be shown a list of the graphics files on your hard drive so you can choose one, which Windows then automatically scales down to postage -stamp size (48 pixels square). 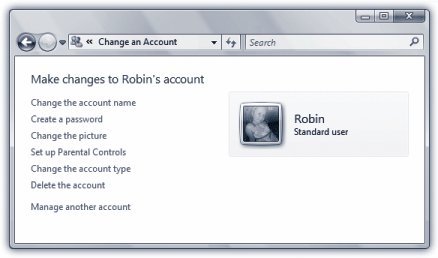 | Figure 23-5. Here's where you change your account picture. If a camera or scanner is attached, you get an extra link here, "Get a picture from a camera or scanner"instant picture . | |
-
Set up Parental Controls . Whenever you edit a Standard account, this link is available, on the premise that this person is either a child or someone who acts like one. See page 361 for the Parental Controls details. -
Change the account type . Click this link to change a Standard account into an Administrator account, or vice versa. -
Delete the account . See page 676. You're free to make any of these changes to any account at any time; you don't have to do it immediately after creating the account.
Tip: The Start menu offers a big, fat shortcut to the Edit Account dialog box shown in Figure 23-4: just click your picture at the top of the open Start menu.
23.3.4. The Forgotten Password Disk As described above, Windows contains a handy hint mechanism for helping you recall your password if you've forgotten it. But what if, having walked into a low-hanging branch, you've completely forgotten both your password and the correct interpretation of your hint? In that disastrous situation, your entire world of work and email would be locked inside the computer forever. (Yes, an administrator could issue you a new passwordbut as noted in the box on page 676, you'd lose all your secondary passwords in the process.) Fortunately, Windows offers a clever solution-in-advance: the Password Reset Disk. It's a CD or USB flash drive (not a floppy, as in Windows XP) that you can use like a physical key to unlock your account, in the event of a forgotten password. The catch is, you have to make this disk now , while you still remember your password. To create this disk, insert a blank CD or a USB flash drive. Then open the Start menu and click your picture (top right). The "Make changes to your account" window opens (Figure 23-4). The first link in the task pane says, "Create a password reset disk." Click that to open the Forgotten Password Wizard shown in Figure 23-6. Click through it, supplying your current password when you're asked for it. When you click Finish, remove the CD or flash drive. Label it, and don't lose it! 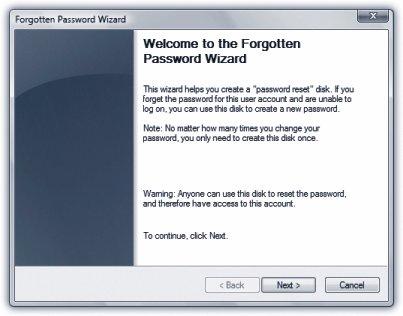 | Figure 23-6. The screens of this wizard guide you through the process of inserting a blank CD or flash drive and preparing it to be your skeleton key. If you forget your passwordor if some administrator has changed your passwordyou can use this disk to reinstate it without the risk of losing all of your secondary passwords (memorized Web passwords, encrypted files, and so on) . | |
Tip: Behind the scenes, Vista saves a file onto the CD or flash drive called userkey.psw . You can guess what that is.
When the day comes that you can't remember your password, leave the Password box empty and hit Enter. You'll wind up back at the login screen; this time, in addition to your password hint, you'll see a link called "Reset password." Insert your Password Reset CD or flash drive and then click that link. A Password Reset Wizard now helps you create a new password (and a new hint to remind you of it). You're in. Even though you now have a new password, your existing Password Reset Disk is still good. Keep it in a drawer somewhere, for use the next time you experience a temporarily blank brain. 23.3.5. Deleting User Accounts It happenssomebody graduates, somebody gets fired , somebody dumps you. Sooner or later, you may need to delete an account from your PC. To delete a user account, open the User Accounts program, click the appropriate account name, and then click "Delete the account." Windows now asks you if you want to preserve the contents of this person's Documents folder. If you click the Keep Files button, you'll find a new folder, named for the dearly departed, on your desktop. (As noted in the dialog box, only the documents, the contents of the desktop, and the Documents folder are preservedbut not programs, email, or even Web favorites.) If that person ever returns to your life, you can create a new account for him and copy these files into the appropriate folder locations. UP TO SPEED
Passwords Within Passwords | | The primary password that you or your administrator sets up in the User Accounts program has two functions. You already know that it lets you log on each day, so you can enter your Windows world of desktop clutter, Start menu tailoring, Web bookmarks, and so on. But what you may not realize is that it's also the master key that unlocks all the other passwords associated with your account: the passwords that Internet Explorer memorizes for certain Web sites, the passwords that get you into shared disks and folders on the network, the password that protects your encrypted files, the password that protects your .NET Passport (and its Wallet for electronic payments, if you set one up), and so on. The simple act of logging onto your account also unlocks all of these other secure areas of your PC life. But remember that anyone with an Administrator account can change your password at any time. Does that mean that whoever has an Administrator accountyour teacher, boss, or teenager, for examplehas full access to your private stuff? After you leave the household, company, or school, what's to stop an administrator from changing your password, thereby gaining access to your electronic-brokerage account ( courtesy of its memorized Internet Explorer password), buying stuff with your Passport Wallet, and so on? Fortunately, Microsoft is way ahead of you on this one. The instant an administrator changes somebody else's password, Windows wipes out all secondary passwords associated with the account. That administrator can log onto your account and see your everyday files, but not Web sites with memorized passwords, and so on. Note that if you change your own passwordor if you use a Password Reset Disk, described in these pagesnone of this applies. Your secondary passwords survive intact. It's only when somebody else changes your password that this little-known Windows security feature kicks in, sanitizing the account for your protection. |
If you click the Delete Files button, on the other hand, the documents are gone forever. A few more important points about deleting accounts: -
You can't delete the account you're logged into. -
You can't delete the last Administrator account. One account must always remain . -
You can create a new account with the same name and password as one that you deleted earlier, but in Vista's head, it's still not the same account. As described in the box on the facing page, it won't have any of the original secondary passwords (for Web sites, encrypted files, and so on). -
Don't manipulate accounts manually (by fooling around in the Users folder, for example). Create, delete, and rename them only using the User Accounts program in the Control Panel. Otherwise, you'll wind up with duplicate or triplicate folders in Users, with the PC name tacked onto the end of the original account name (Bob, Bob.DELL, and so on)a sure recipe for confusion.
Tip: If you're an administrator, don't miss the Users tab of the Task Manager dialog box. (Press Ctrl+Alt+Delete to get to the Task Manager.) It offers a handy, centralized list of everybody who's logged into your machine, and buttons that let you log them off, disconnect them, or even make a little message pop up on their screens. All of this can be handy whenever you need some information, a troubleshooting session, or a power trip.
POWER USERS' CLINIC
The Other Administrator Account | | In previous versions of Windows, there's another kind of Administrator account the Administrator account. This is a usually invisible, emergency, backup account with full administrator powers and no password . Even if you delete all of your other accounts, this one still remains, if only to give you some way to get into your machine. It's called Administrator, and it's ordinarily hidden. Most people see it only in times of troubleshooting, when they start up their PCs in Safe Mode (page 656). It's the ideal account to use in those situations. Not only does it come with no password assigned, but also it's not limited in any way. It gives you free powers over every file, which is just what you may need to troubleshoot your computer. The problem is, of course, that anyone who knows about it can get into Windows with full Administrator privilegesand no need to know a password. Your kid, for example, could blow right past your carefully established Parental Controls (page 361)and let's not even consider what a virus could do. So in the more security-minded Vista, the secret Administrator account is still there; you can see it in the Console in Figure 23-8. But it's ordinarily disabled. It comes to life only if (a) you're starting your PC in Safe Mode, and (b) if there are no other, real Administrator accounts on the machine. (That's on a standard home or small-office PC. On a corporate domain network, only a networking geek who's got a Domain Admins account can start up in Safe Mode. You know who you are.) |
23.3.6. Disabling Accounts If you do expect that your colleague may one day return to your life, you might consider disabling the account instead of deleting it. A disabled account doesn't show up on the login screen or in the User Accounts program, but it's still there on the hard drive, and you can bring it back when necessary. There's no pretty Control Panel link for disabling an account; you'll have to get your hands greasy in the power-user underpinnings of Windows. See "Account is disabled" on page 683 for details. NOSTALGIA CORNER
The Secret, Fully Automatic Logon Trick | | You're supposed to do most of your account-editing work in the User Accounts program of the Control Panel, which is basically a wizard that offers one option per screen. That requirement may not thrill veteran Windows 2000 fans, however, who are used to the much more directand more powerfulUser Accounts screen. Actually, it's still in Windows Vista. To make it appear, open the Start menu; type out control Userpasswords2 , authenticate yourself (page 191), and then press Enter. You see the program shown here. Most of the functions here are the same as what you'd find in the User Accounts programit's just that you don't have to slog through several wizard screens to get things done. Here you can add, remove, or edit accounts all in a single screen. This older Control Panel program also offers a few features that you don't get at all in the new one. For example, you can turn off the checkbox called, "Users must enter a user name and password to use this computer." When you do so, you get, when you click OK, a dialog box called Automatically Log On, where you can specify a user name and password of one special person. This lucky individual won't have to specify any name and password at logon time, and can instead turn on the PC and cruise directly to the desktop. (This feature works only at startup time . If you choose Start Log Off, the standard Logon dialog box appears, so that other people have the opportunity to sign in.) This automatic-logon business is ordinarily a luxury enjoyed by solo operators whose PCs have only one account and no password. By using the secret User Accounts method, however, you can set up automatic logon even on a PC with several accounts, provided you recognize the security hole that it leaves open. 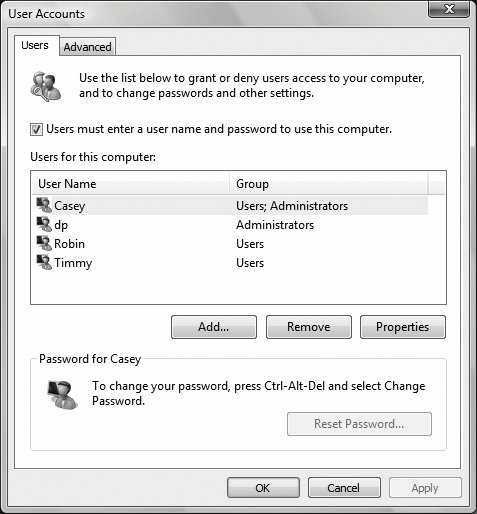 |
23.3.7. The Guest Account Actually, Administrator and Standard aren't the only kinds of accounts you can set up on your PC. A third kind, called the Guest account, is ideal for situations where somebody is just visiting you for the day. Rather than create an entire account for this person, complete with password, hint, little picture, and so on, you can just switch on the Guest account. The on/off switch is a tad buried; you have to open the Microsoft Management Consolea program intended for techies (Figure 23-8). The quickest way to get there is to open the Start menu and type comput . Double-click Computer Management in the search results and then authenticate yourself (page 191). In the list at the left side, expand the Local Users and Groups flippy triangle; click the Users folder inside it. Double-click Guest; in the Properties dialog box, turn off "Account is disabled," and click OK. Now, when the visitor tries to log in, she can choose Guest as the account. She can use the computer, but can't see anyone else's files or make any changes to your settings. When the visitor to your office is finally out of your hair, healthy paranoia suggests that you turn off the Guest account once again. (To do so, follow precisely the same steps, except turn on "Account is disabled" in the final step.) |