22.1. Automatic Backups : All Versions Consider that the proximity of your drive's spinning platters to the head that reads them is roughly the same proportion as the wheels of an airliner flying at 500 miles per hour , 12 inches off the ground. It's amazing that hard drives work as well, and as long, as they do. Still, a hard drive is nothing more than a mass of moving parts in delicate alignment, so it should come as no surprise that every now and then, disaster strikes. That's why backing up your data (making a safety copy) on a regular basis is an essential part of using a PC. Even if computers aren't your career, there's probably a lot of valuable stuff on your hard drive: all of your photos, the addresses and phone numbers you've spent hours typing in, a lifetime's worth of email, the Web sites in your Favorites folder, and so on. If you use Vista in a corporation, you probably don't even have to think about backing up your stuff. A network administrator generally does the backing up for you and your co-workers . But if you use Windows Vista at home, or in a smaller company that doesn't have network nerds running around to ensure your files' safety, you'll be happy to know about the Backup and Restore feature. It's a brand-new Vista feature that makes it simple to do your own backups.
Tip: There was a Backup program included with Windows XP, but it wasn't part of the standard installation, and it couldn't even back up your stuff onto CDs or DVDs.
22.1.1. Backup Hardware If you have a home or small business network, backing up to a folder on another PC on your network is a wise idea. An inexpensive external hard drive makes a super- convenient backup disk, too. The advantage of blank CDs and DVDs, though, is that you can store them somewhere else: in a fireproof box, a safe deposit box at the bank, or the trunk of your car. Keep them anywhere except in your office, so your data is safe even in the case of fire or burglary . UP TO SPEED
Good News, Bad Software News | | There's good news and bad news about Backup and Restore. The good news is that it's very easy to use, and you can also use it to make a backup of your entire PC. If it crashes, you can restore your entire computer, including the operating system, your settings, and your data files. The bad news isthere's no diplomatic way to put thisthat it's not, ahem, Microsoft's finest work. For example, it doesn't let you specify individual files and folders to back uponly broad categories of files like Documents, Pictures, or Music. You therefore have to back up every single file in every single folder that meets those broad categories of the files. If you choose to back up compressed files, not only will you back up your own compressed .zip files, but you'll back up every single compressed file that Windows uses for installation. If you choose Pictures, you wind up backing up every single graphic on your hard disk, including all the graphics that Windows uses itself (icons, dialog box symbols, and so on). So even if there are only, say, 30 megabytes of files from a few folders that you want backed up, you're forced to back up several hundred megabytes of files for which you have absolutely no use. Maybe Microsoft didn't want to offend all the software companies that make good backup software. |
Tip: You can't back up a laptop's files when it's running on battery power. The program won't let youit's too worried about losing juice in the middle of the operation.
22.1.2. Creating a Backup Job Once you've decided to back up your PC and also figured out what you're going to back it up onto , proceed like this: -
Choose Start  Control Panel. Under the System and Maintenance heading, click "Back up your computer." Control Panel. Under the System and Maintenance heading, click "Back up your computer." Now Backup and Restore Center opens (Figure 22-1). 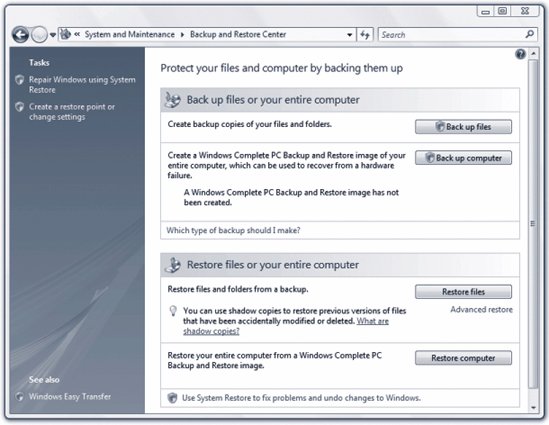 | Figure 22-1. The primary purpose of this screen is to back up and restore your PC. But on the left-hand side, you'll also find links for creating a restore point, and for using System Restore to revert your PC to a previous time . | | -
Click "Back up files." "Back up files" is what most people use most of the time. It can back up your photos, music, videos , email, documents, compressed files, and just about anything else except for your programsand Windows itself. ("Back up computer," the other option you may see here, is described on page 647.) -
Authenticate yourself (page 191) . Now Windows looks through your system, locating hard disks and removable drives. The Back Up Files screen appears, offering you the chance to specify where you want to store the backup copies. -
Choose a backup drive . If you're backing up to a hard disk or removable disk, select "On a hard disk, CD, or DVD." From the drop-down list, choose the drive you want to back up to.
Tip: USB flash drives and memory cards show up in this list, too. Flash drives make particularly handy backup disks because they're small, inexpensive, and can store several gigabytes of data.
If you're backing up to a folder that's shared on a networked PC (page 729), select "On a network," then browse to the folder. You may have to type in a user name and password to use that folder, depending on how you've set up sharing on the PC. If you have more than one hard disk on your PC, you're now asked to choose which ones you want included in the backup. Make your choice. -
Click Next . Now you get to choose which kinds of files to back up: Pictures, Music, Videos, E-mail, Documents, and several others. -
Turn on the checkboxes for the kinds of files you want backed up (Figure 22-2, top). Click Next . 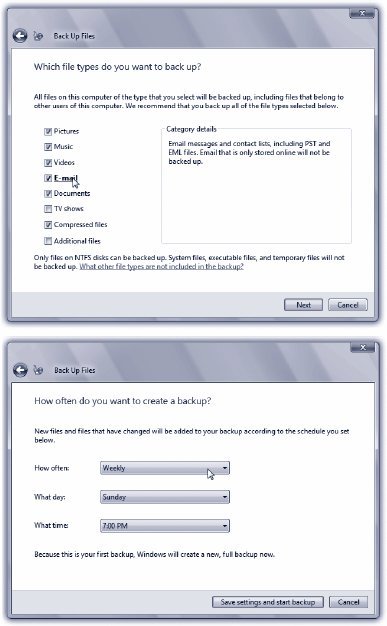 | Figure 22-2. Top: As noted earlier in this chapter, Vista intends to back up all files of that generic file typeso Documents backs up Word .doc files, Excel .xls files, PowerPoint .ppt files, Adobe .pdf files, and others. You can't specify that you want only certain files or folders backed up .
Bottom: Choose a schedule for the automatic backups. For best results, choose times of day when you know that the computer will be turned on . | | You can now set up a schedule for automatic, unattended backups, which should bring enormous peace of mind to anyone who's been, until now, living dangerously (Figure 22-2, bottom). -
Click "Save settings and start backup." Backup goes to work, copying your files to their new backup location. The process may take several seconds or several hours, depending on how much you're copying. You can continue to work on your PC; copying takes place in the background. You'll be notified once the backup is complete. From now on, your PC backs itself up, on the schedule you set for it. When Windows Vista creates a new backup, it only backs up new files or files that have changed since the last backup; it doesn't waste its time backing up files that haven't been touched.
Note: If you've set your PC to back up to CDs or DVDs, make sure that there's a blank disc available at the appointed time; otherwise , the backup won't happen.
If you want to change your backup settingsback up on a different schedule, say, or add or take away file typesreturn to the Backup and Restore Center, and click "Change backup settings." From here, you can change anything about your backup. 22.1.3. Restoring Files from a Backup When your good luck runs out, and you find yourself with a virus/drive crash/meddlesome toddler who threw out an important folder, you'll be glad indeed that you had a backup. This is the payoff. Fortunately, Vista lets you restore individual files and foldersyou don't have to restore all files in one fell swoop.
Tip: Perform regular test restores to make sure your data is retrievable from the backup disks. (Consider restoring your files to a test foldernot the folder where the files came fromso you don't wind up with duplicates.) There's no other way to be absolutely sure that your backups are working properly.
Here are the steps. (They assume that, if your whole hard drive did indeed die, you have already replaced it and reinstalled Windows Vista.) -
Choose Start Control Panel. Under the System and Maintenance heading, click "Back up your computer." You're back at the Backup and Restore Center. -
Click "Restore files." A screen appears, asking whether you want to restore files from your most recent backup, or from a previous backup. -
Click "Files from the latest backup" or "Files from an older backup" and click Next . If you choose to restore from a previous backup, you'll be shown a list of backup dates; choose the one you want. Now you arrive at the weird little screen shown in Figure 22-3. 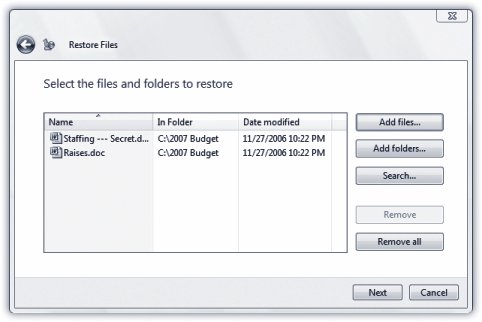 | Figure 22-3. When you restore files, you don't have to restore every single file you've backed up. Click Add Files or Add Folders (shown here), and a screen appears where you can select the specific files or folders you want to restore . | | -
Click "Add files" or "Add folders," and specify what files and folders you want brought back to life from your backup copies . Click "Add files" to restore individual files, or "Add folders" to restore individual folders. Note that at this point, although it may look like you're browsing through your hard disk, you're not. You're only browsing the backup that you made. You can also search for files, if you're not sure where a file is that you want to back up. Click Search, type what you're looking for, and then add the file or files. -
Click Next. Indicate where you want the restored files put . You can restore files to their original locations, or to a different folder on your PC. -
Click "Start restore." Backup now starts copying files and folders back from the backup to your hard drive. If you've chosen to save files to their original locations, you may be asked what you want to happen if the original files are still there . Do you want the backup copies to "win," do you want to keep the originals , or do you want to keep both? If you choose to keep both, the restored file gets a (2) after it. So the original file would be budget.doc, for instance, and the copy would be budget (2).doc.  |