19.1. Laptops: All Versions As you can read on page 298, Vista has a full-blown control panel that's dedicated to managing battery power. You can control the screen brightness, wireless antenna strength, and other features, all in the name of saving juice . That's not the only gift to laptoppers in Vista, however. Read on for all the good stuff. 19.1.1. Battery Meter The notification area (system tray) has always displayed a little battery meter that shows how your laptop's battery charge is doing. Its icon looks like a battery with a plug beside it when it's plugged into a power outlet, or a battery alone when it's not. If you point to this icon without clicking, a tooltip displays the status of your laptop's battery, including the current battery charge and what power plan (page 298) you're using. There's more to it than that, though, as you can see in Figure 19-1. 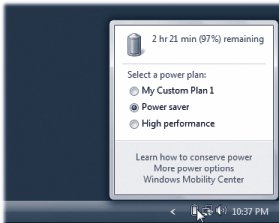 | Figure 19-1. To change the power configuration plan on the fly, click the Battery Meter icon once, and click again on the power plan you'd like to use . | |
If you click the battery meter icon, you can choose these options from the pop-up menu: -
Learn how to conserve power . Opens Windows Help and Support to the "Conserving battery power" page, where you can read how to get the most out of your laptop's battery. -
More power options . Opens Power Options window (in the Control Panel), where you can change the plan on the Battery Meter and change plan settings. -
Windows Mobility Center . Opens the new Mobility Center, described next . 19.1.2. Mobility Center This new Vista program appears in your Start  All Programs Accessories menu no matter what kind of computer you have, but its intended primarily for laptops. It's a handy, centralized hub for everything that makes a laptop a laptop (Figure 19-2): battery, wireless networking, external projector connection, and so on. All Programs Accessories menu no matter what kind of computer you have, but its intended primarily for laptops. It's a handy, centralized hub for everything that makes a laptop a laptop (Figure 19-2): battery, wireless networking, external projector connection, and so on. 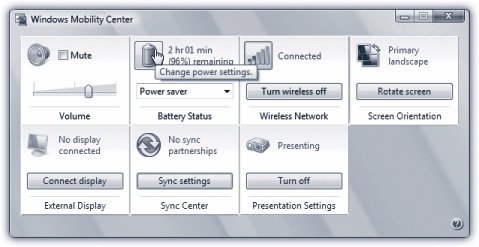 | Figure 19-2. Each tile of this strange new hybrid program/control panel displays the status of a different laptop component: volume, network, battery charge, and so on. Double-click the icon on a tile to open the settings page for that component . | |
Each setting is illustrated with a cute little iconbut don't be fooled. It's so much more than an icon! It's also a button that, when double-clicked, opens up a Control Panel applet or configuration page.
Tip: You can also open one of these icons entirely from the keyboard. See the underlined letter beneath each panel, such as Battery Status or Wireless Network? Press Alt+that letter to highlight the icon, and then press Enter.
Here's the complete list of tiles that might appear in your Mobility Center. (You may not have all of them, depending on what kind of computer you're using and what components it has.) -
Brightness . The slider dims your screen for this work session only, which can save enormous amounts of battery power. Double-click the icon to open the Power Options control panel, where you can make brightness changes that are always in effect. -
Volume . Change your speakers ' volume, or mute them entirely. Double-click the icon to open the Sound control panel (page 307). -
Battery Status . This is your battery's "fuel gauge." The pop-up menu lets you choose a canned setting like "High performance" (your PC doesn't go to sleep, but uses up battery power faster) or "Power saver" (the laptop goes to sleep sooner to conserve juice). Double-click the icon to open the Power Options control panel, where you can change the battery-plan settings for good. -
Wireless Network . Turns your WiFi circuitry on or off (which saves power and makes flight attendants happy), and shows how many bars of signal you have. Double-click the icon to open the "Connect to a network" dialog box, which lists all wireless networks within your range. -
Screen Rotation . This one shows up only on Tablet PCs. It lets you turn the screen image 90 degrees. Double-click the icon to open the Display Settings control panel for additional screen settings. -
External Display . Have you hooked up a second monitor? If so, click "Connect display" to make Vista aware of its new responsibilities. This tile also reveals whether or not Vista "sees" the second screen. Double-click the icon to open the Display Settings control panel, where you can configure the resolution and other settings of the second monitor. -
Sync Center . The Sync Center is the communications hub for palmtops and other gizmos that synchronize their data with Windows. This tile shows you the status of a sync that's already under way. Double-click the icon to open the Sync Center program, where you can set up new sync "partnerships" between your PC and your extra gizmos (page 587). -
Presentation Settings . This feature is the answer to a million PowerPoint pitchers' prayers: it makes sure that your laptop won't do anything embarrassing while you're in the middle of your boardroom presentation. Click "Turn on." When the tile says "Presenting," your laptop won't go to sleep. No alarms or reminder dialog boxes appear. The screen saver doesn't kick in. You're free to give your pitch in peace . Double-click the icon to open the new Presentation Settings dialog box shown in Figure 19-3. 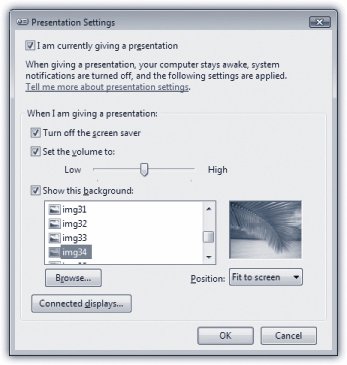 | Figure 19-3. When you're in presentation mode, your screen saver and system notifications won't appear, and your laptop won't go to sleep. You might also want to specify a piece of uncontroversial artwork for your desktop wallpaper, so your bosses and potential employers won't accidentally spot the HotBikiniBabes.com JPEG that you usually use . | |
Note: You also enter presentation mode when you hook up a network projector (page 256), or when you connect an external monitor. (A New Display Detected dialog box appears, complete with an option to turn on presentation mode.)
 |