17.4. Fancy Printer Tricks The masses of Windows users generally slog through life choosing File  Print, clicking OK, and then drumming their fingers as they wait for the paper to slide out of the printer. But your printer can do more than thatmuch more. Here are just a few of the stunts that await the savvy PC fan. Print, clicking OK, and then drumming their fingers as they wait for the paper to slide out of the printer. But your printer can do more than thatmuch more. Here are just a few of the stunts that await the savvy PC fan. 17.4.1. Printing at 39,000 Feet Printing any document is really a two-step procedure. First, Windows converts the document into a seething mass of printer codes in the form of a spool file on your hard drive. Second, it feeds that mass of code to the printer. When you're not connected to your printerfor example, when you're sitting in seat 23B several miles over Detroityou can separate these two tasks . You can do the time-consuming part of the printing operation (creating the spool files) right there on the plane. Then, later, upon your happy reunion with the printer, you can simply unleash the flood of stored spool files, which then print very quickly. To set this up, right-click the icon for your printer in the Printers window (Figure 17-4). From the shortcut menu, choose Pause Printing. That's all there is to it. Now you can merrily "print" your documents, 100 percent free of error messages. Windows quietly stores all the half-finished printouts as files on your hard drive. When the printer is reconnected to your machine, right-click its icon once againbut this time, choose Resume Printing from its shortcut menu. The printer springs to life almost immediately, spewing forth your stored printouts with impressive speed. 17.4.2. Sharing a Printer If you have more than one PC connected to a network, as described in Chapter 24, they all can use the same printer. In the old days, this convenience was restricted to expensive network printers like laser printers. But in Windows Vista, you can share even the cheapest little inkjet that's connected to the USB port of one computer. To begin, sit down at the computer to which the printer is attached. Choose Start Network; in the Network window, click "Network and Sharing Center on the toolbar. Proceed as described in Figure 17-9. 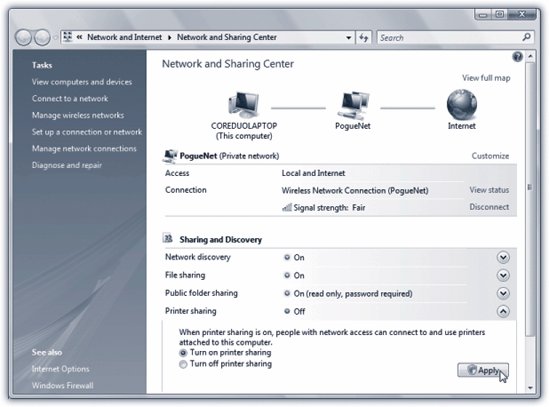 | Figure 17-9. How to turn on printer sharing: Expand the V-shaped arrow where it says "Printer sharing," and click " Turn on printer sharing." Click Apply. Authenticate yourself (page 191) . | |
Note: If you're an old-timer who remembers what it's like to turn on sharing one printer at a time, you should know that that method is still available. In the Printers window, right-click the printer's icon and, from the shortcut menu, choose Sharing. In the resulting dialog box, click Change Sharing Options. Authenticate yourself (page 191), and then turn on "Share this printer."
Once you've shared the printer, other people on the network can add it to their own Printers windows. Before you begin, though, be aware that nobody can hook into the shared-printer PC without an account on that PC (Chapter 23)one with a password. Printer sharing doesn't work with blank-password accounts. -
Choose Start Control Panel. Click "Hardware and Sound," then "Printer," then "Add a printer." The "Choose a local or network printer" window appears. -
Click "Add a network, wireless or Bluetooth printer." After a pause while your PC searches, you see a window populated by all the printers that are available to the other PC. -
Click the icon of the printer you want to use, and then click Next. On the "which driver" page, click Next again. Finally, type a name for the printer (as you want it to appear on your PC), and then click Next. On the final screen, click Finish . The shared printer appears in your Printers window, even though it's not directly connected to your machine. It's now available for any printing you want to do. 17.4.3. Printing to a File When it comes to printing, most of the time you probably think of printing onto paper. In certain circumstances, however, you may not actually want a printout. Instead, you might want to create an electronic printer file on your hard drive, which can be printed later. You might want to do so, for example, when: -
You're working on a document at home, and you've got only a cheesy $49 inkjet printer. By creating a printer file, you can delay printing until tomorrow, in order to use the office's $4,000 color laser printer. -
You plan to send your finished work to a service bureauthat is, a professional typesetting shop. Sending a finished printer file avoids incompatibilities of applications, fonts, layout programs, and so on. -
You want to give a document to someone who doesn't have the program you used to create it, but has the same printer. If you email the printer file to her, she'll get to see your glorious design work slide out of her printer nonetheless. 17.4.3.1. Creating a printer file To create such a printer file, choose File Print, just as you would print any document. The Print dialog box appears; now turn on the "Print to file option. When you then click OK or Print, the Print to File dialog box opens. Some programs let you choose where you want to save the file; others ask you only to name the file itself. In that case, your saved printout goes automatically into your Documents folder. The file type for a document printing to a file is a Printer File, which has the file extension .prn. 17.4.3.2. Printing a printer file To print a printer file, choose Start All Programs Accessories Command Prompt. Youve just started an MS-DOS command session; your cursor is blinking on the command line. Now type this: copy c:\foldername\filename.prn lpt1: /b Here's how this instruction breaks down: -
Copy is the name of the command you use to print the filenotice that it's followed by a space. -
C: is the letter of the drive that contains your printer file. Omit this part if the printer file is on the current drive (usually C:). -
\foldername is the name of the folder into which you saved the printer file (Documents, for example). -
\filename is the name you gave the file. -
.prn is the filename extension (which Windows added to the file automatically when you saved the printer file). -
lpt1: is the port to which the printer is connected. Note the colon following the name, and also note there's a space before this part of the command. If the printer is attached to LPT2, substitute that port name. -
/b tells the Copy command that the file is binary (containing formatting and other codes), not simply text.
Note: A printer file (a .prn file) can only be printed on the same printer model that was selected in the Print dialog box when the file was generated. If you want to create a printer file for that color printer at work, in other words, be sure to first install its driver on your computer.
17.4.4. Limiting Hours of Access If it's just you, your Dell, and a color inkjet, then you're entitled to feel baffled by this feature, which lets you declare your printer off-limits during certain hours of the day. But if you're the manager of some office whose expensive color laser printer makes printouts that cost a dollar apiece, you may welcome a feature that prevents employees from hanging around after hours in order to print out 500 copies of their head shots. To specify such an access schedule for a certain printer, follow the instructions in Figure 17-10. 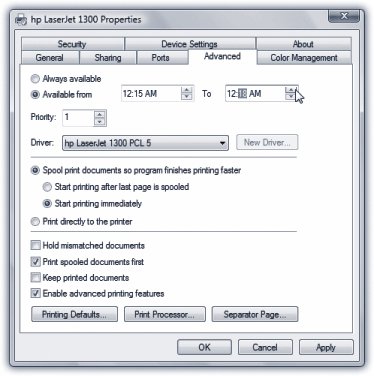 | Figure 17-10. Right-click your printer's icon in the Printers window. From the shortcut menu, choose Properties, and then click the Advanced tab, shown here. Select "Available from," and use the time setting controls to specify when your underlings are allowed to use this printer from across the network. Clicking OK renders the printer inoperable during off-hours . | |
POWER USERS' CLINIC
Color Management | | As you may have discovered through painful experience, computers aren't great with color. That's because each device you use to create and print digital images "sees" color a little bit differently, which explains why the deep amber captured by your scanner may be rendered as brownish on your monitor, but come out as a bit orangey on your Epson inkjet printer. Since every gadget defines and renders color in its own way, colors are often inconsistent as a print job moves from design to proof to press. The Windows color management system (CMS) attempts to sort out this mess, serving as a translator among all the different pieces of hardware in your workflow. For this to work, each device (scanner, monitor, printer, copier , and so on) must be calibrated with a unique CMS profile a file that tells your PC exactly how your particular monitor (or scanner, or printer, or digital camera) defines colors. Armed with the knowledge contained within the profiles, the CMS software can make on-the-fly color corrections, compensating for the various quirks of the different devices. 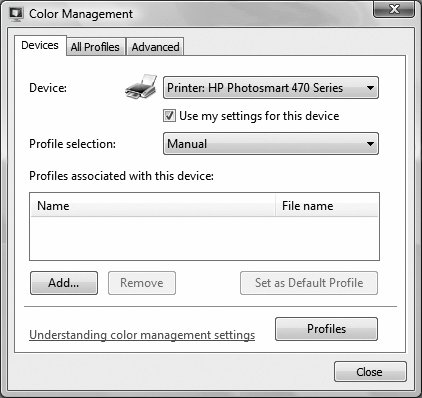 Most of the people who lose sleep over color fidelity do commercial color scanning and printing, where "off" colors are a big dealafter all, a customer might return a product after discovering, for example, that the actual product color doesn't match the photo on a Web site. Furthermore, not every gadget comes with a CMS profile, and not every gadget can even accommodate one. (If yours does, you'll see a tab called Color Management in the Properties dialog box for your printer, as shown here.) If you're interested in this topic, open the Color Management tab for your printer. (Opening the Color Management applet in the Control Panel gets you to the same place, shown here.) The Automatic setting usually means that Windows came with its own profile for your printer, which it has automatically assigned. If you click Manual, you can override this decision and apply a new color profile (that you downloaded from the printer company's Web site, for example). Remember to follow the same procedure for the other pieces of your color chainmonitors, scanners , and so on. Look for the Color Management tab or dialog box, accessible from their respective Properties dialog boxes. |
17.4.5. Add a Separator Page If your PC is on a network whose other members bombard a single laser printer with printouts, you might find separator pages usefulthe printer version of fax cover sheets. A separator page is generated before each printout, identifying the document and its owner. This option, too, is accessible from the Advanced tab of the printer's Properties dialog box (Figure 17-10). Click the Separator Page button at the bottom of the dialog box. In the Separator Page dialog box, click the Browse button to choose a .sep (separator page) file. If you scroll to the very bottom of the resulting list of geeky Windows folder names , you'll find four of them: -
Sysprint.sep is the one you probably want. Not only does this page include the name, date, time, and so on, but it also automatically switches the laser printer to PostScript modeif it's not already in that mode, and if it's a PostScript printer. -
Pcl.sep is the same idea, except that it switches the laser printer to PCL modecommonly found on HP printersbefore printing. (PostScript and PCL are the two most common languages understood by office laser printers.) -
Pscript.sep switches the printer to PostScript mode, but doesn't print out a separator page. -
Sysprtj.sep prints a separator page, switches the printer to PostScript mode, and sets Japanese fonts, if they're available on your printer.  |