17.1. Installing a Printer: All Versions A printer is a peripheral devicesomething outside of the PCand as such, it won't work without a piece of driver software explaining the new hardware to Windows. In general, getting this driver installed is a simple process. It's described in more detail in Chapter 18; here are a few notes on the process to get you started. 17.1.1. USB Printers If the technology gods are smiling, then installing the driver for a typical inkjet USB printer works just as described in Chapter 18: you connect the printer, turn it on, and marvel as Vista autodetects it and autoinstalls the driver, thanks to its secret cache of hundreds of printer drivers (Figure 17-1). 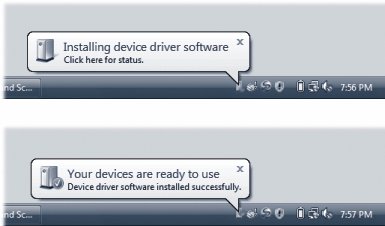 | Figure 17-1. You got lucky. Windows dug into its own bag of included drivers and installed the correct one. Let the printing begin . | |
If you have a really old printer, its drivers might not be Vista-compatible. Check the manufacturer's Web site, such as www. epson .com or www.lexmark.com, or a central driver repository like www.windrivers.com, to see if there's anything newer . 17.1.2. Network Printers If you work in an office where people on the network share a single printer (usually a laser printer), the printer usually isn't connected directly to your computer. Instead, it's elsewhere on the network; your PC's Ethernet cable or wireless antenna connects you to it indirectly. In general, there's very little involved in ensuring that your PC "sees" this printer. Its icon simply shows up in the Start  Control Panel Printer folder. (If you dont see it, click "Add a printer" in the toolbar. On the wizard's second screen, you're offered the chance to "Add a network, wireless or Bluetooth printer." That's the one you want.) Control Panel Printer folder. (If you dont see it, click "Add a printer" in the toolbar. On the wizard's second screen, you're offered the chance to "Add a network, wireless or Bluetooth printer." That's the one you want.)
Note: As you've probably guessed, that's also how you install a wireless or Bluetooth printer.
17.1.3. Parallel, Serial, and Infrared Printers Although USB printers are the world's most popular type today, there was, believe it or not, a time before USB. In those days, most home printers fell into one of these categories: -
Parallel . Before USB changed the world, most printers connected to PCs using a printer cable or parallel cable . The cable connects to your PC's parallel port, which Microsoft's help screens call the LPT1 porta 25-pin, D-shaped jack. (On many PCs, this connector is marked with a printer icon on the back panel.) -
Serial . Other older printers use a cable connected to one of your computer's serial (or COM ) ports, the connectors that often accommodate an external modem. The primary advantage of a serial connection is the extended cable lengthparallel cables must be no more than nine feet long, while serial cables up to 50 feet long work fine.
Tip: To protect its innards, turn off the PC before connecting or disconnecting a parallel or serial cable.
-
Infrared . Certain printers from HP, Canon, Citizen, and other companies print using infrared technologythat is, there's no cable at all. Instead, if your PC has an infrared lens (a few aging laptops may still have them), it can communicate with the printer's similar lens wirelessly , as long as the printer and PC are within sight of, and relatively close to, each other. Sometimes you get lucky, and these printers work just like modern USB printers: you connect the printer, turn on your PC, and delight in the "Found new hardware" message that appears on your taskbar. You're ready to print. But if Windows doesn't recognize the printer model you've hooked up, it can't install its drivers automatically. In that case, you'll have to call upon the mighty powers of the Add Printer Wizard (Figure 17-2). Choose Start Control Panel; click Classic View Printers, and click "Add a printer on the toolbarif indeed the Add Printer wizard hasn't appeared automatically. Click Next to walk through the questions until you've correctly identified your printer (Figure 17-3), told Windows which it's connected to, and installed the appropriate software. 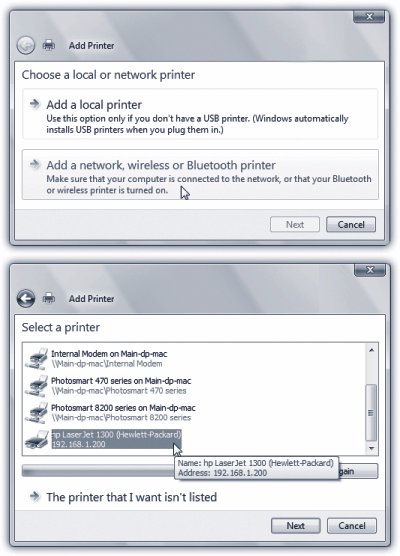 | Figure 17-2. Top: As the note explains, use the Add Printer Wizard only if your printer doesn't connect to your USB port .
Bottom: Hurrah! Windows has found the laser printer on the network. In the following screens, you're asked to name the printer and offered the chance to print a test page . | |
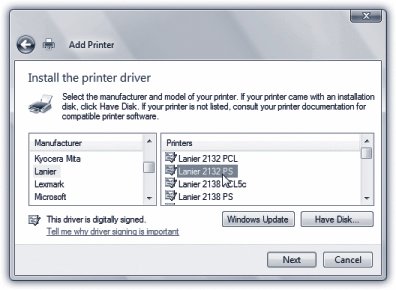 | Figure 17-3. The left pane lists every printer manufacturer Microsoft has ever heard of. Once you've selected your printer's manufacturer, a list of all the printer models from that manufacturer (that Windows knows about) appears in the right pane. Click the Have Disk button if your printer's driver is on a disc supplied by the manufacturer . | |
TROUBLESHOOTING MOMENT
If Your Printer Model Isn't Listed | | If your printer model isn't in the list of printers (Figure 17-3), then Windows doesn't have a driver for it. Your printer model may be very new (more recent than Windows Vista, that is) or very old. You have two choices for getting around this roadblock. First, you can contact the manufacturer (or its Web site) to get the drivers. Then install the driver software as described in the previous section. Second, you can use the printer emulation feature. As it turns out, many printers work with one of several standard drivers that come from other companies. For example, many laser printers work fine with the HP LaserJet driver. (These laser printers are not, in fact, HP LaserJets, but they emulate one.) The instructions that came with your printer should have a section on emulation; the manufacturer's help line can also tell you which popular printer yours can impersonate. |
17.1.4. The Printer Icon If your driver-installation efforts are ultimately successful, you're rewarded by the appearance of an icon that represents your printer. This icon appears in the Printers windowan important window that you'll be reading about over and over again in this chapter. Exactly how you arrive there depends on how you've set up Vista: -
If you've set up your Start menu to display a submenu for the Control Panel (page 45), just choose Start Control Panel Printers. -
Choose Start Control Panel, then click Printer (in the Hardware and Sound category). -
If you view your Control Panel in Classic view (page 281), choose Start Control Panel, and then open the Printers icon. -
You can also make the Printers window show up in your Start menu, which saves you some burrowing if you use this feature a lot. To put it there, right-click the Start button. From the shortcut menu, choose Properties. On the Start Menu tab, click Customize. Scroll down in the list of checkboxes, and finally turn on the Printers checkbox. Click OK twice. GEM IN THE ROUGH
Installing Fake Printers | | If your printer has two paper trays, switching to the secondary one is something of a hassle. You must spend time making the changes in the Print dialog box, as described later in this chapter. Similarly, switching the printout resolution from, say, 300 dpi to 600 dpi when printing important graphic documents is a multistep procedure. That's why you may find it useful to create several different icons for the same printer . The beauty of this stunt is that you can set up different settings for each of these icons. One might store canned settings for 600 dpi printouts from the top paper tray, another might represent 300 dpi printouts from the bottom one, and so on. When it comes time to print, you can switch between these virtual printers quickly and easily. To create another icon, just run the Add Printer Wizard a second time, as described on the preceding pages. At the point in the installation where you name the printer, invent a name that describes this printer's alternate settings, like HP6-600 dpi or Lexmark-Legal Size . When the installation process is complete, you'll see both printer iconsthe old and the newin the Printers window. Right-click the new "printer" icon, choose Printing Preferences from the shortcut menu, and change the settings to match its role. To specify which one you want as your default printerthe one you use most of the timeright-click the appropriate icon and choose Set as Default Printer from the shortcut menu. Thereafter, whenever you want to switch to the other set of printer settingswhen you need better graphics, a different paper tray, or other special options for a documentjust select the appropriate printer from the Printer Name drop-down list in the Print dialog box (Figure 17-5, top). You've just saved yourself a half- dozen additional mouse clicks and settings changes. |
In any case, the Printers window now contains an icon bearing the name you gave your printer during installation (Figure 17-4). This printer icon comes in handy in several different situations, as the rest of this chapter clarifies.  | Figure 17-4. At first, the toolbar in the Printers window offers few commands. But when you click a particular printer icon, many more useful options appear, as shown here. Many of them duplicate the options that appear when you right-click a printer icon . | |
 |