14.1. The Lay of the Land: All Versions The modern Media Player looks quite a bit different from its predecessors. In fact, if you've perused the previous chapter, you'll realize that Media Player and Photo Gallery share a very similar design. Down the left side of the window is a Navigation treea list of the music, videos , and playlists in your collection. The flippy triangles next to the major headings make it easy to collapse sections of the list. Under the Library headings, you can click Artist, Album, Songs, Genre, or whatever, to see your entire music library sorted by that criterion (Figure 14-1). (The Navigation tree isn't visible in some viewsmore on this in a moment.) 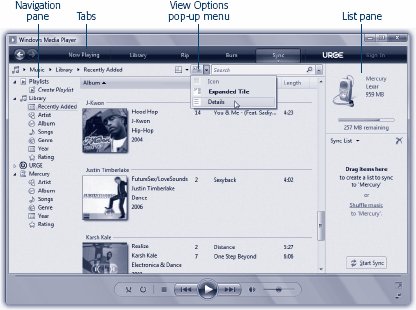 | Figure 14-1. When you click a label at left, the main portion of the window changes to show you your music collection, using the actual album-cover artwork as their icons. It's very visual, but not especially stingy with screen space. Fortunately, you also have a more compact list view availablechoose Details from the View Options pop-up menu identified here . | |
Media Player's top edge, as you may have noticed, offers several primary tabs, which cover the essential functions of Media Player. They're described in more detail in the following pages, but here's a quick overview: -
Now Playing . Click this tab while music or video is playing from any source. This is where you can see a list of songs on the CD, a graphic equalizer, and a wild, psychedelic screen saver that pulses in time to the music. Here, too, is where you change the volume and other audio settings.
Tip: To start playing a song, album, playlist, or whatever, just double-click its name . You can use the Space bar to pause or resume playback.
UP TO SPEED
Custom Express | | The first time you open Media Player, a welcome message appears. It offers you two choices: Express Settings . This option is "Recommended" because it makes Media Player the main music and video player for your PC; sends Microsoft anonymous details about what you buy and listen to; and downloads track lists and other details from the Internet when you insert a CD or DVD. Custom Settings. If you'd rather be a little less free with your private information, or you'd like Media Player not to do quite such a big land grab of your multimedia playback rights, choose this option. You're taken to settings screens where you can tone down Media Player's ambitions. |
-
Library . This screen lists every piece of music or video your copy of Media Player " knows about" on your hard drive; use the Navigation tree to sort and group the lists. This is also where you can sort your songs into subsets called playlists . NOSTALGIA CORNER
Returning to the Classic Menus | | In an attempt to make Media Player less intimidating, Microsoft gave it a makeover in version 11. It basically went through the menus and hid a lot of the commands that it felt people didn't use much. The remaining commands still appear as menus that pop out of the six main tabs (Now Playing, Library, and so on). Unfortunately, some really nice features got completely hidden in the processlike Skins. In this chapter, you'll read several references to the Classic menus. That's where you'll find the complete list of Media Player functions. To make the old menu bar return, press the Alt key. The Classic menu bar returns for the moment, although in a vertical orientation at the left side of the screen. If you'd rather bring the Classic menu back for good, click the little icon shown here; from the shortcut menu, choose Show Classic Menus. Now the old menu bar is backin its former horizontal orientation, just as in the good old days. 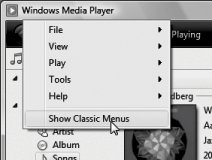 |
-
Rip . Use this screen to copy songs from one of your music CDs onto your hard drive, as described later in this chapter. -
Burn . After transferring some songs to your hard drivefrom the Internet or your own music CD collectionyou can then burn your own CDs. This screen is the loading dock. -
Sync . Here's where you line up music or video that you'd like transferred to a portable music or video player, if you have one that Media Player understands. -
Urge . This page is a rabbit hole into Alice in Marketingland. It's the gateway to online music storesMTV's Urge store is, obviously, the featured onewhere you can buy songs for $1 each, or download all you want for $15 a month, with the understanding that you're just renting them; when you stop paying, you lose them all. 14.1.1. Playing Music CDs For its first trick, Media Player can simulate a $25 CD player. To fire it up, just insert an audio CD into your computer's CD or DVD drive. If this is the first time you've ever taken this dramatic action, you see the dialog box shown in Figure 14-2. It asks how you want Windows to handle inserted CDs. Do you want it to play them? Or rip them (start copying their songs to your hard drive)? And if you said "play," do you want to use Media Player or Media Center , if you have it? 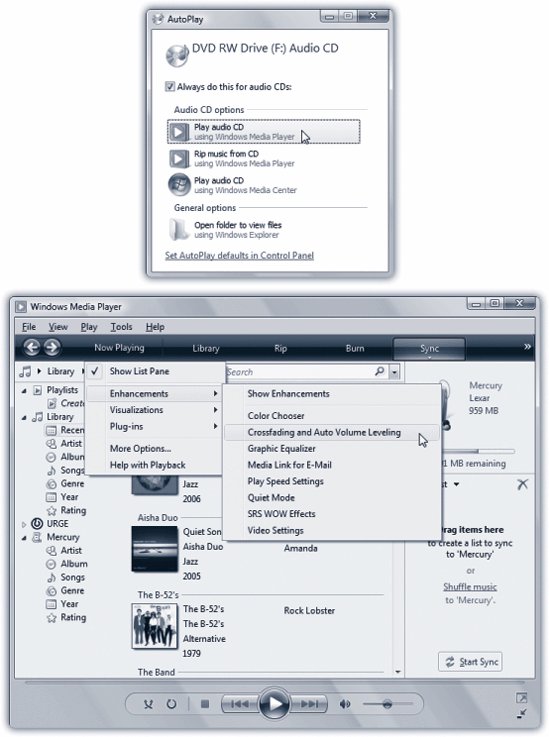 | Figure 14-2. Top: Windows may ask what you want it to do with a music CD. If you accept the "Play Audio CD using Windows Media Player" option by clicking OK or pressing Enter, Media Player opens automatically and begins to play the songs on your CD .
Bottom: Most of the menu commands you'll need are hiding under the names of the main tabs (Now Playing, Library, and so on); click the tiny  buttons to open the menus. There is, however, a proper menu barits just hidden. Tap the Alt key to make it appear. Or, if you ache for the comfort of the traditional menu bar, press Ctrl+M . buttons to open the menus. There is, however, a proper menu barits just hidden. Tap the Alt key to make it appear. Or, if you ache for the comfort of the traditional menu bar, press Ctrl+M . | |
For now, click "Play audio CD using Windows Media Player." Media Player opens and the CD begins to play automatically. The screen even fills with a shimmering, laser-light show (called a visualization) that pulses along with the music. Ta-da!
Tip: If all the fancy dancy graphics are slowing down your machine as you try to work in other programs, you can always turn them off. Click the tiny button under the words Now Playing to open the Now Playing menu. Choose Visualizations  No Visualization. No Visualization.
14.1.1.1. Fun with Media Player When your everyday work leaves you uninspired, here are a few of the experiments you can conduct on the Media Player screen design: -
Switch visualizations . To try a different visualization, Ctrl-click the window (to see the next style) or Shift+Ctrl-click (for the previous one). And if you tire of the displays built into Windows, simply download more of them from the Internet by choosing Now Playing Visualizations Download Visualizations.
-
Shrink the window to show some skin . If the Media Player window is taking up too much screen space, making it harder for you to work on that crucial business plan as you listen to Eminem, press Ctrl+2 to shrink the window (Figure 14-4), or choose View Skin Mode from the Classic menu (page 465). Press Ctrl+1 to return the Media Player window to its full- sized glory .
Tip: Of course, you can also just minimize Media Player, as you would any window. In fact, the first time you do so, Vista offers to turn on the Media Player toolbar , shown in Figure 14-3.
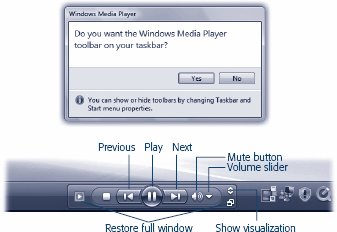 | Figure 14-3. When the Media Player toolbar is on your screen, you have a very tiny set of playback controls available at all times, no matter what program you're using . | |
-
Expand the window . On the other hand, if your PC is briefly serving as a glorified stereo system at a cocktail party, double-click the visualization display itself (or press Alt+Enter). The screen saver effect now fills the entire screen, hiding all text, buttons, and controls. If you have an available laptop and a coffee table to put it on, you've got yourself a great atmospheric effect. (When the party's over, just double-click again, or press Alt+Enter again, to make the standard controls reappear.) -
Change the skin . In hopes of riding the world's craze for MP3 files, Microsoft has helped itself to one of WinAmp's most interesting features: skins . Definitions: An MP3 file (MPEG Audio Layer-3) is a compact, downloadable, CD-quality sound file format. WinAmp is a popular MP3-playing program. And a skin is a design scheme that completely changes the look of Windows Media Player, as shown in Figure 14-4. 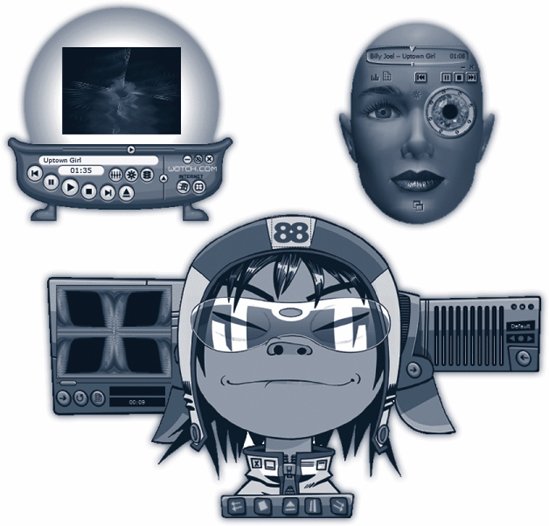 | Figure 14-4. In Skin Mode, Media Player takes up less space on your screen and can use radical new design schemes. To return to the full- size window, press Ctrl+1, or hunt through the buttons on your skin until you find the Return to Full Mode button .
To change the skin, choose View Skin Chooser from the Classic menu (page 465). A directory of available skins appears; its empty at the outset. Click More Skins; Windows sends you online to Microsoft's grisly-sounding Skin Gallery .
Not all skins are, shall we say, masterpieces of intuitive design; it may take you several minutes just to find the Stop button. When you find a skin you like, click Apply Skin (above the list) . | |
GEM IN THE ROUGH
Playing Across the Network | | If you've taken the trouble to set up a home network, you can share songs and playlists with other networked Windows Vista computers. You could, for example, tap into your roommates' jazz collection without getting up from your desk, and they can sample the zydeco and tejano tunes from your world beat playlist. The music you decide to share is streamed over the network to the other computeror even an XBox 360. Even store-bought , copy-protected songs are OK to share. You can't share music across the Internet, only within your own home or office network. (Technically speaking, the computers must be on the same subnet . And you must have designated your network as private [page 359].) To make your music available to others, choose Library Media Sharing. In the dialog box, turn on "Share my media." When you click OK, your buddies will find your Media Player collection listed in their Navigation trees, ready to play. (Thats if they have turned on "Find media that others are sharing" in the same dialog box.) If you don't want to share with everyone , re-choose the Library Media Sharing command. This time, youll see icons that represent the individual PCs on your network. Click a PC's icon and then click either Allow or Deny. While you're fooling around with the settings, click Settings. You'll see options that let you limit the kind of stuff you share (music, photos, videos); restrict the sharing to stuff with a certain star rating or parental rating; or confirm sharing on a PC-by-PC basis. (To set up the last, turn off "Allow new devices and computers automatically." Happy sharing! 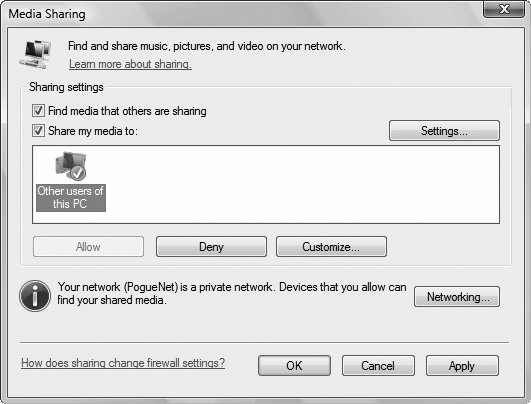 |
To choose a new skin, choose View Skin Chooser from the Classic menu (page 465). Then click each of the available skins, listed down the left side, to see a preview of its appearance. When you click the Apply Skin button (at the top-left corner of the window), your player takes on the look of the skin you chose and shrinks down into the compact Skin mode, as described in the previous tip. -
Fool around with the playback sequence . You can make the songs on the CD play back in a random order, just as though you'd pushed the Shuffle button on a CD player. To do this, click the Shuffle button or press Ctrl+H. And if you love a particular CD so much that you'd like to hear it over and over again (instead of stopping at the end), press Ctrl+Tthe shortcut for Repeat.
Tip: These tricks work for whatever playlist you've currently selectednot just an audio CD. (Playlists are described later in this chapter.)
-
Fool around with the sound . Don't miss the graphic equalizer, a little row of sliders that lets you adjust the bass, treble, and other frequencies to suit your particular speakers and your particular ears. Choose Now Playing Enhancements Graphic Equalizer. GEM IN THE ROUGH
Filling in Track Names | | Precious few audio CDs come programmed to know their own names (and song titles). Every day, millions of people insert music CDs into their computers and see the songs listed as nothing more than "Track 1," "Track 2," and so onand the album itself goes by the catchy name Unknown Album. Fix #1 . If your PC is online when you insert a certain music CDyou lucky thingyou'll bypass that entire situation. Windows takes a quick glance at your CD, sends a query to www.allmusic.com (a massive database on the Web containing information on over 200,000 CDs), and downloads the track list and a picture of the album cover for your particular disc. Fix #2 . If allmusic.com draws a blank, as it often does for classical recordings, no big deal. Media Player makes it easy to search the Web for this information at a later time. On the Library tab, right-click an album cover, and then, from the shortcut menu, choose Find Album Info . (Alternatively, you can highlight the names of the tracks with missing information; right-click one and then choose Find Album Info.) Fix #3 . You can also type in the names of your songs manually. Once again, begin on the Library tab. Select the tracks you want to edit. (By Shift-clicking or Ctrl-clicking, you can add information to multiple tracks simultaneouslyfor example, if they all came from the same album.) Now right-click the specific column you want to editArtist, Album, or whatever. See the box on page 74 for details on hiding or showing columns , and remember that you may have to scroll horizontally to see them all. From the shortcut menu, choose Edit. A little text box opens so that you can type in the track information manually. Fix #4 . This is pretty cool: In the Navigation tree (Library tab), click the criterion that's missing, like Artist or Album. Now you can drag an incorrectly labeled track or album onto one with the correct labelingand marvel as Media Player copies the correct info onto the dragged item. No matter how the track names and album art get onto your PC, Windows saves this information in your music library (see "Ripping CDs to Your Hard Drive" earlier in this chapter). Therefore, the next time you insert this CD, the Media Player will recognize it and display the track names and album information automatically. |
The same submenu offers a number of other audio effects, including Quiet Mode (smoothes out the highs and the lows so that sudden blasts don't wake up the kids ) and something called SRS WOW, which simulates a 3-D sound experience through nothing more than stereo speakers or headphones. -
Fool around with the speed . If you're in a hurry to get through an album, or just think the tempo's too slow, right-click the Play/Pause button below the screen. You're offered commands that speed up or slow down your musica weird and wonderful feature. (This shortcut menu also lets you know that there are keyboard shortcuts for these commands, like Ctrl+Shift+G for faster playback.) 14.1.2. Ripping CDs to Your Hard Drive You can copy an album, or selected tracks, to your hard drive in the form of standalone music files that play when double-clicked. The process is called ripping , much to the consternation of sleepless record executives who think that it's short for ripping off . Having CD songs on your hard drive is handy because: -
You can listen to your songs without having to hunt for the CDs they came from. -
You can listen to music even if you're using the CD-ROM drive for something else (like a CD-based game). -
You can build your own playlists (sets of favorite songs) consisting of tracks from different albums. -
You can compress the file in the process, so that each song takes up much less disk space. -
You can transfer the songs to a portable player or burn them onto a homemade CD. If you're sold on the idea, open the Rip tab's pop-up menu. Inspect your settings. For example, unless you intervene by clicking the Change button near the top, Windows copies your song files into your Personal Music folder. Note, too, that Microsoft has designed Windows Media Player to generate files in the company's own format, called Windows Media Audio (.wma) format. But many people prefer, and even require, MP3 files. For example, most recent CD players and portable music players (including the iPod) can play back MP3 filesbut won't know what to do with WMA files. If you'd prefer the more universally compatible MP3 files, Rip Format MP3 (Figure 14-5). 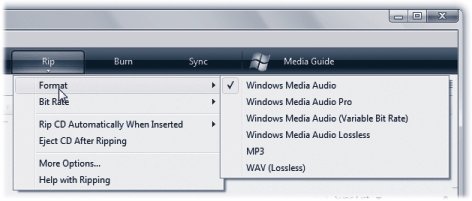 | Figure 14-5. Using this submenu, tell Windows how much to compress the song files (and sacrifice sound quality). If you don't need MP3 compatibility, Windows Media Audio (Variable Bit Rate) maximizes quality and minimizes file size by continuously adjusting the data rate along the song's length . | |
Tip: If you have a stack of CDs to rip, don't miss the two commands in the Rip menu: "Rip CD Automatically When Inserted Always and "Eject CD After Ripping." Together, they turn your PC into an automated ripping machine, leaving nothing for you to do but feed it CDs and watch TV.
Finally, the Rip Bit Rate submenu controls the tradeoff , in the resulting sound files, between audio quality and file size. At 128 kbps, for example, a three-minute MP3 file might consume about 2.8 megabytes. At 192 kbps, the same file sounds much better, but it eats up about 4.2 MB. And at a full 320 kbps, the files roughly 7 MB. These are important considerations if you're ripping for a portable MP3 player, like the iPod. For instance, if your music player contains a 20 GB hard drive, it can hold 142 hours of music you've ripped at 320 kbps, or 357 hours at 128 kbps. For MP3 files, most people find the 192 Kbps setting (on the "Audio quality" slider) to produce great-sounding, relatively compact files. For WMA, 128 Kbps might be a good starting point. Needless to say, let your ears (and the capacity of your portable music player) be your guide. Here's how you rip: -
Insert the music CD. Click the Rip tab in Media Player . The list of songs on the CD appears. -
Turn on the checkboxes of the tracks you want to copy . You've waited all your life for this: at last, you have the power to eliminate any annoying songs and keep only the good ones. -
Click Start Rip . You'll find this button at the lower-right corner of the window. Windows begins to copy the songs onto your hard drive. The Start Rip button changes to Stop Rip, which you can click to interrupt the process. 14.1.3. Organizing Your Music Library Every CD transferred to your hard drive winds up with an entry on the Library tab, visible in Figure 14-6. You can sort your collection by performer, album, year released, or whatever, just by clicking the corresponding icons in the Navigation tree. Whenever you want to play back some music, just double-click its name in this listthere's no need to hunt around in your shoeboxes for the original CD the songs came from. 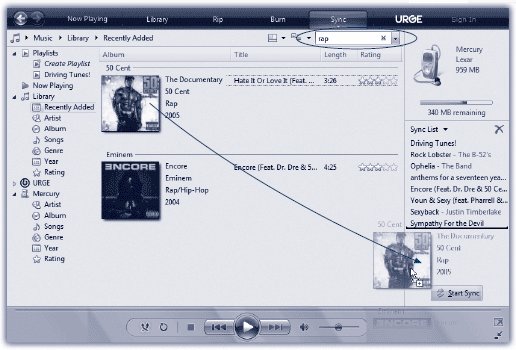 | Figure 14-6. Navigate your library (left and middle panels). Drag each song or CD name into the New Playlist list (right panel). Don't miss the Search box at the top, which searches all text related to your songs and videos as you type, hiding all entries that don't match . | |
But that's just the beginning of Media Player's organizational tools; see Figure 14-6. Transferring CD songs to your hard drive isn't the only way to log your files in the Media Player database. You can also add sound and video files to this master list using any of these methods : -
Use the Library Add to Library command (or press F3). Media Player helps you choose more folders to be "watched foldersthat is, folders whose contents will always be reflected in Media Player's lists.
Note: Any song, video, or photo that you ever play in Media Player gets automatically added to its Library if it's on your hard drive or the Internet. If it's on another PC on the network, or on a removable disk like a CD, Media Player doesn't bother adding it, because it probably won't be there the next time you want it.
-
Drag sound or video files directly from your desktop or folder windows into the Media Player window. -
The Internet is crawling with online music stores that sell music that you can download straight into Media Player. Page 520 has the details. 14.1.3.1. Playlists Microsoft recognizes that you may not want to listen to all your songs every time you need some tunes. That's why Media Player lets you create playlists folders in the Navigation list that contain only certain songs. In effect, you can devise your own albums, mixing and matching songs from different albums for different purposes: one called Downer Tunes, another called Makeout Music, and so on. To create a new playlist, start on the Library tab. The Playlist pane, at the right side of your screen, is empty. It says, "Drag items here to create a playlist." Well, heyit's worth a try. See Figure 14-7. 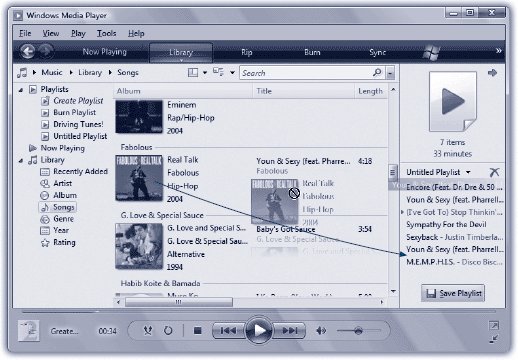 | Figure 14-7. To create a playlist, just start dragging tracks or whole albums to the Playlist pane. Switch views, or use the Search box, as necessary to find the tracks you want. Drag songs up and down in the Playlist pane to reorder them. Use the pop-up menu (where it now says Untitled Playlist) to scramble, sort, rename, or save the playlist . | |
Once you've created a playlist, click Save Playlist at the bottom of the pane. Type a name for your playlist, and thrill to the appearance of a new icon in My Playlists "category" of the Navigation tree.
Note: To create another playlist right away, close the first one by clicking the red X beside its name.
14.1.3.2. Deleting things Whenever you want to delete a selected song, playlist, or almost anything else, press the Delete key. Media Player generally asks if you want it deleted only from the library, or if you really want it gone from your computer. 14.1.4. Burning Your Own CDs: All Versions The beauty of a CD burner is that it frees you from the stifling restrictions put on your musical tastes by the record companies. You can create your own "best of" CDs that play in any CD playerand that contain only your favorite songs in your favorite order. The procedure goes like this: -
Click the Burn tab. Insert a blank CD . On the right side of the screen, the Burn pane appears. If your PC has more than one disc burner, click Next Drive until Media Player identifies the correct one.
Note: If you've inserted a rewriteable disc like a CD-RW, and you've burned it before, right-click its icon in the Navigation tree, and then, from the shortcut menu, choose "Erase disc" before you proceed.
-
Specify which songs you want to burn by dragging them into the Burn List (where it says "Drag items here" in the Burn pane) . You can add music to your CD-to-be in just about any kind of chunk : individual songs, whole albums, playlists, random audio files on your hard drive, and so on; see Figure 14-8. 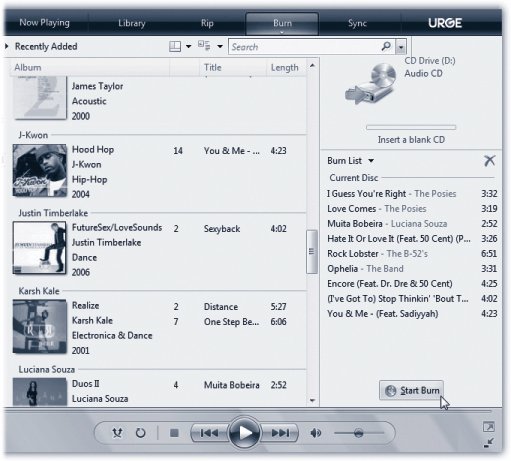 | Figure 14-8. Use the Navigation tree to pull up the display you want. For example, to see a complete list of your songs or albums, click Songs or Albums, and then drag individual songs or albums directly into the Burn list. To add a playlist to the Burn List, drag the name of the playlist right across the screen from the Navigation tree. To add a file that's not already in Media Player, drag it out of its Explorer window directly into the Burn List . | | As you go, keep an eye on the "time remaining" readout at the top of the Burn List. It lets you know how much more your CD can hold. If you go over the limit, Media Player will burn additional CDs as necessary.
Tip: Media Player adds two seconds of silence between each song, which might explain why you may not be able to fit that one last song onto the disc even though it seems like it should fit.
-
Click Start Burn . It takes a while to burn a CD. To wind up with the fewest "coasters" (mis-burned CDs that you have to throw away), allow your PC's full attention to focus on the task. Don't play music, for example. 14.1.5. Copying Music or Video to a Portable Player If you have a pocket gizmo that's capable of playing music (like a SanDisk Sansa or a Pocket PC) or even videos (like a Portable Media Center), the process for loading your favorite material onto it is very similar to burning your own CD. The only difference in the procedure is that you do your work on the Sync tab instead of the Burn tab. If you attach a player with a capacity greater than 4 gigabytes, Media Player automatically copies your entire collection onto it ( assuming it will fit). If it's smaller, or if your whole library won't fit, Media Player switches into manual-sync mode, in which you hand-pick what gets copied . | POWER USERS' CLINIC: CD and DVD Format Fun | | Most of the time, you'll probably want to burn a regular audio CD, of the type that plays in the world's 687 quintillion CD players. But you can also use the Burn tab to make a data CD or DVDa disc designed to play in computers . That's a good way, for example, to make a backup of your tunes. Actually, some modern CD players can also play MP3 CDs , which are basically data CDs filled with MP3 files. That's a great feature, because a single MP3 CD can hold 100 songs or more. (A few can even play WMA CDs , meaning CDs containing files in Microsoft's own audio format.) You specify what kind of disc you intend to burn by choosing its name from the Burn menu (top of the screen). If you're ever in doubt about how you burned a certain CD (audio or data?), here's a trick: insert it into your PC, open its window, and examine its contents. If you see files with the suffix .cda, you've got yourself an audio CD; if it's full of other kinds of files, like .mp3, .wma, or even .jpg and .doc, it's a data CD. And now, some other notes about burning discs: CD-RW . Erasable discs like CD-RW are super-handy, but not all CD players can play them when you've burned them as audio CDs. Test and beware. DVD . Remember that there are, annoyingly, two different kinds of blank DVD, called DVD+R and DVD-R. Buy the kind that matches your PC's burner, or you'll be making a trip back to the store with your receipt. |
Tip: Media Player can play videos with the extensions .wmv, .wvx, .avi, .mpeg, .mpg, .mpe, .m1v, .mp2, .mpa, and .ivf.As you may have noticed, this list doesn't recognize two of the most popular video-file formats, QuickTime and RealVideo. To play these files, you'll need the free QuickTime Player (available from www.apple.com/quicktime) or RealPlayer (from www.real.com).
14.1.5.1. Automatic sync Connect the player. Media Player announces that it will perform an automatic sync. Click Finish. Smile. Wait. From now on, just connecting the player to Media Player brings it up-to-date with whatever songs you've added or deleted on your PC. As your library grows, shrinks, or gets edited, you can sleep soundly, knowing that your portable gadget's contents will be updated automatically the next time you hook it up to your PC's USB port. 14.1.5.2. Manual sync Connect the player. Read the dialog box. Click Finish. In Media Player, click the Sync tab. Drag songs, videos, playlists, or albums into the List pane, exactly as you would do when preparing to burn a CD (something like Figure 14-8). Click Start Sync.
Tip: If you'd like to surrender to the serendipity of Shuffle mode, you can let Media Player choose the songs you get. From the Sync menu, choose the name of your player; from the submenu, choose Shuffle. Each time you sync, you'll get a different random selection from your collection.
 |