Using the ARM API in Robot scripts
|
| < Day Day Up > |
|
Rational Robot uses the SQABasic script language, which is a superset of Visual Basic. Since the ARM API is a set of C functions, these functions must be declared to Robot before they can be used to define measurement points in SQABasic scripts.
This is best illustrated with an example. We used Robot to record a simple user transaction: opening Windows Notepad, adding some text, and closing the window. This created the following script, which contains the end user actions:
Sub Main Dim Result As Integer 'Initially Recorded: 1/31/2003 4:12:02 PM 'Script Name: test1 Window SetContext, "Class=Shell_TrayWnd", "" Toolbar Click, "ObjectIndex=2;\;ItemText=Notepad", "Coords=10,17" Window SetContext, "Caption=Untitled - Notepad", "" InputKeys "hello" MenuSelect "File->Exit" Window SetContext, "Caption=Notepad", "" PushButton Click, "Text=No" End Sub
We added the following code to the script.
-
Load the DLL in which the ARM API functions reside, and declare those functions. This must be done right at the top of the script. Note that the first line here is preceded by a single quote; it is a comment line.
'Declare ARM API functions. arm_update is not declared, since TMTP doesn't use it. Declare Function arm_init Lib "libarm32" (ByVal appl_name As String,ByVal appl_userid As String,ByVal flags As Long,ByVal data As String,ByVal data_size As Long) As Long Declare Function arm_getid Lib "libarm32" (ByVal appl_id As Long,ByVal tran_name As String,ByVal tran_detail As String,ByVal flags As Long,ByVal data As String,ByVal data_size As Long) As Long Declare Function arm_start Lib "libarm32" (ByVal tran_id As Long,ByVal flags As Long,ByVal data As String,ByVal data_size As Long) As Long Declare Function arm_stop Lib "libarm32" (ByVal start_handle As Long,ByVal tran_status As Long,ByVal flags As Long,ByVal data As String,ByVal data_size As Long) As Long Declare Function arm_end Lib "libarm32" (ByVal appl_id As Long,ByVal flags As Long,ByVal data As String,ByVal data_size As Long) As Long
-
Then declare variables to hold the returns from the ARM API calls. Again, note the comment line preceded by a single quote mark.
'Declare variables to hold returns from ARM API calls Dim appl_handle As Long Dim getid_handle As Long Dim start_handle As Long Dim stop_rc As Long Dim end_rc As Long
-
Next, we added the ARM API calls to the script. Note that even though they are C functions, they are not terminated with a semicolon.
'Make ARM API setup calls, and display the return from each one. appl_handle = arm_init("Rational_tests","*",0,"0",0) 'Remove line below when you put this in production MsgBox "The return value from the arm_init call is: " & appl_handle getid_handle = arm_getid(appl_handle,"Notepad","Windows",0,"0",0) 'Remove line below when you put this in production MsgBox "The return value from the arm_getid call is: " & getid_handle 'Start clock start_handle = arm_start(getid_handle,0,"0",0) 'Remove line below when you put this in production MsgBox "The return value from the arm_start call is: " & start_handleThe arm_init and arm_getid calls define the application and transaction name. The application name used must match what is set up for collection in TMTP.
The arm_start call is used to start the response time clock, just before the transaction starts.
-
Finally, after the business transaction steps, we added the following:
'Stop clock stop_rc = arm_stop(start_handle,0,0,"0",0) 'Remove line below when you put this in production MsgBox "The return value from the arm_stop call is: " & stop_rc 'Make ARM API cleanup call end_rc = arm_end(appl_handle,0,"0",0) 'Remove line below when you put this in production MsgBox "The return value from the arm_end call is: " & end_rc
The arm_stop call is made after the transaction completes.
The arm_end call is used to clean up the ARM environment, at the end of the script.
For the purposes of testing, we used MsgBox statements to display the return of each of the ARM API calls. The returns should be:
| arm_init | positive integer |
| arm_getid | positive integer |
| arm_start | positive integer |
| arm_stop | 0 (zero) |
| arm_end | 0 (zero) |
In production, you will want to comment out these MsgBox statements.
Here is the script file that we ended up with:
'Version 1.1 - Some declarations modified 'Declare ARM API functions. arm_update is not declared, since TMTP doesn't use it. Declare Function arm_init Lib "libarm32" (ByVal appl_name As String,ByVal appl_userid As String,ByVal flags As Long,ByVal data As String,ByVal data_size As Long) As Long Declare Function arm_getid Lib "libarm32" (ByVal appl_id As Long,ByVal tran_name As String,ByVal tran_detail As String,ByVal flags As Long,ByVal data As String,ByVal data_size As Long) As Long Declare Function arm_start Lib "libarm32" (ByVal tran_id As Long,ByVal flags As Long,ByVal data As String,ByVal data_size As Long) As Long Declare Function arm_stop Lib "libarm32" (ByVal start_handle As Long,ByVal tran_status As Long,ByVal flags As Long,ByVal data As String,ByVal data_size As Long) As Long Declare Function arm_end Lib "libarm32" (ByVal appl_id As Long,ByVal flags As Long,ByVal data As String,ByVal data_size As Long) As Long Sub Main Dim Result As Integer 'Initially Recorded: 1/31/2003 4:12:02 PM 'Script Name: test1 'Declare variables to hold returns from ARM API calls Dim appl_handle As Long Dim getid_handle As Long Dim start_handle As Long Dim stop_rc As Long Dim end_rc As Long 'Make ARM API setup calls, and display the return from each one. appl_handle = arm_init("Rational_tests","*",0,"0",0) 'Remove line below when you put this in production MsgBox "The return value from the arm_init call is: " & appl_handle getid_handle = arm_getid(appl_handle,"Notepad","Windows",0,"0",0) 'Remove line below when you put this in production MsgBox "The return value from the arm_getid call is: " & getid_handle 'Start clock start_handle = arm_start(getid_handle,0,"0",0) 'Remove line below when you put this in production MsgBox "The return value from the arm_start call is: " & start_handle 'Window SetContext, "Class=Shell_TrayWnd", "" 'Toolbar Click, "ObjectIndex=2;\;ItemText=Notepad", "Coords=10,17" 'Window SetContext, "Caption=Untitled - Notepad", "" 'InputKeys "hello" 'MenuSelect "File->Exit" 'Window SetContext, "Caption=Notepad", "" 'PushButton Click, "Text=No" 'Stop clock stop_rc = arm_stop(start_handle,0,0,"0",0) 'Remove line below when you put this in production MsgBox "The return value from the arm_stop call is: " & stop_rc 'Make ARM API cleanup call end_rc = arm_end(appl_handle,0,"0",0) 'Remove line below when you put this in production MsgBox "The return value from the arm_end call is: " & end_rc End Sub
Scheduling execution of the script
You will probably want to run the script at regular intervals throughout the day. There is no standard way to schedule this using the ETP component of TMTP, but you can do it quite easily using the local scheduler in Windows NT/2000. The NT Task Scheduler was introduced with an NT 4.0 Service Pack or Internet Explorer 5.01, but on Windows 2000 systems, it is typically already installed.
The Windows scheduler can be set up using the command line interface, but it is easier and more flexible to use the graphical Task Scheduler utility, which you can find in the Windows Control Panel as the Scheduled Tasks icon (see Figure B-10).
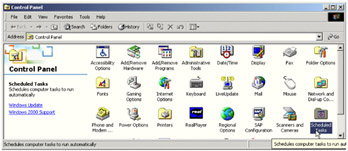
Figure B-10: Scheduler
A wizard will guide you through the addition of a new scheduled task. Select Rational Robot as the program you want to run (Figure B-11 on page 455).
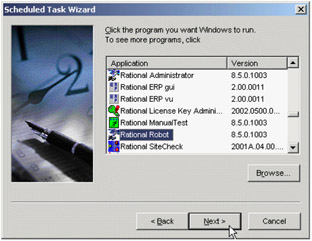
Figure B-11: Scheduling wizard
Name the task and set it to repeat daily (Figure B-12 on page 456). You can set how often it repeats during the day later.

Figure B-12: Scheduler frequency
Set up the start time and date (Figure B-13 on page 457).
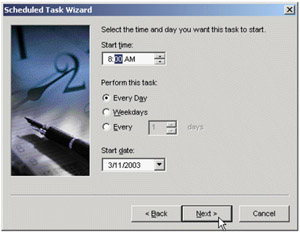
Figure B-13: Schedule start time
The task will need to run with the authority of some user ID on the machine, so enter the relevant user ID and password (Figure B-14 on page 458).
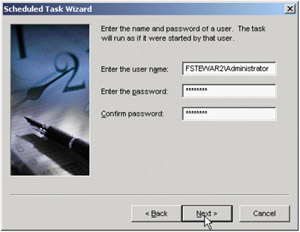
Figure B-14: Schedule user
Check the box in the window shown in Figure B-15 on page 459 in order to get to the advanced scheduling options.
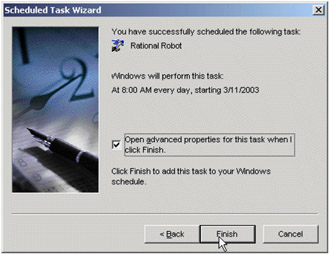
Figure B-15: Select schedule advanced properties
Edit the contents of the Run option to use the Robot command line interface. For example:
"C:\Program Files\Rational\Rational Test\rtrobo.exe" ARM_example /user Admin /project C:\TEMP\rationaltest\ScriptTest.rsp /play /build Build 1 /nolog /close
Details of the command line options can be found in the Robot Help topic, but are also included at the end of this document.
Set the Start in directory to the installation location; typically, this is Program Files\Rational\Rational Test (see Figure B-16 on page 460).
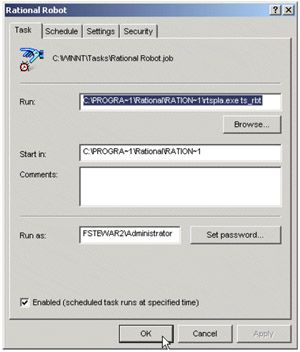
Figure B-16: Enable scheduled task
Select the Schedule tab and click on the Advanced button (see Figure B-17 on page 461).
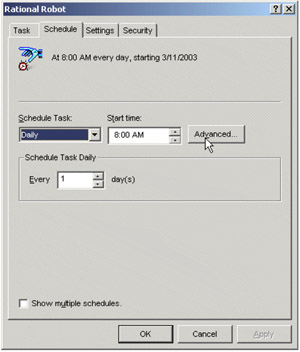
Figure B-17: Viewing schedule frequency
You can schedule the task to run every 15 minutes and set a date on which it will stop running (see Figure B-18 on page 462).
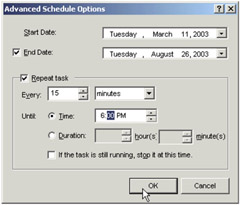
Figure B-18: Advanced scheduling options
It is also possible to schedule the execution of the Rational Robot using other framework functionality, such as scheduled Tivoli Tasks or custom monitors. These other mechanisms may have the benefit of allowing schedules to be managed centrally.
Rational Robot command line options
You can use the Rational Robot command line options to log in, open a script, and play back the script. The syntax is as follows:
rtrobo.exe [scriptname] [/user userid] [/password password] [/project full path and full projectname] [/play] [/purify] [/quantify] [/coverage][/build build] [/logfolder foldername] [/log logname] [/nolog] [/close]
The options are defined in Table B-1.
| Syntax element | Description |
|---|---|
| rtrobo.exe | Rational Robot executable file. |
| scriptname | Name of the script to run. |
| /user user ID | User name for login. |
| /password password | Optional password for login. Do not use this parameter if there is no password. |
| /project full path and full projectname | Name of the project that contains the script referenced in scriptname preceded by its full path. |
| /play | If this keyword is specified, plays the script referenced in scriptname. If not specified, the script opens in the editor. |
| /purify | Used with /play. Plays back the script referenced in scriptname under Rational Purify®. |
| /quantify | Used with /play. Plays back the script referenced in scriptname under Rational Quantify®. |
| /coverage | Used with /play. Plays back the script referenced in scriptname under Rational PureCoverage®. |
| /build build | Name of the build associated with the script. |
| /logfolder foldername | The name of the log folder where the test log is located. The log folder is associated with the build. |
| /log logname | The name of the log |
| /nolog | Does not log any output while playing back the script. |
| /close |
Some items to be aware of:
-
Use a space between each keyword and between each variable.
-
If a variable contains spaces, enclose the variable in quotation marks.
-
Specifying log information on the command line overrides log data specified in the Log tab of the GUI Playback Options dialog box.
-
If you intend to run Robot unattended in batch mode, be sure to specify the following options to get past the Rational Test Login dialog box:
/user userid /password password /project full path and full projectname
Also, when running Robot unattended in batch mode, you should specify the following options:
/log logname /build build /logfolder foldername
An example of these options is as follows:
rtrobo.exe VBMenus /user admin /project "C:\Sample Files\Projects\Default.rsp" /play /build"Build1"/logfolder Default /log MyLog /close
In this example, the user admin opens the script VBMenus, which is in the project file Default.rsp located in the directory c:\Sample Files\Projects. The script is opened for playback, and then it is closed when playback ends. The results are recorded in the MyLog log located in the Default directory.
Obfuscating embedded passwords in Rational Scripts
Often, when recording Rational Scripts, it is necessary to record user IDs and passwords. This has the obvious security exposure that if your script is viewed, the password will be viewable in clear text. This section describes a mechanism for obfuscating the password in the script.
This mechanism relies on the use of an encryption library. The encryption library that we used is available on the redbook Web site. The exact link can be found in Appendix C, "Additional material" on page 473.
First, the encryption library must be registered with the operating system. For our encryption library, this was achieved by running the command:
regsvr32.exe EncryptionAlgorithms.dll
Once you have run this command, you must encrypt your password to a file for later use in your Rational Robot scripts. This can be achieved by creating a Rational Robot Script from the text in Example B-1 and then running the resulting script.
Example B-1: Stashing obfuscated password to file
Sub Main Dim Result As Integer Dim bf As Object Dim answer As Integer ' Create the Encryption Engine and store a key Set bf = CreateObject("EncryptionAlgorithms.BlowFish") bf.key = "ibm" Begin Dialog UserDialog 180, 90, "Password Encryption" Text 10, 10, 100, 13, "Password: ", .lblPwd Text 10, 50, 100, 13, "Filename: ", .lblFile TextBox 10, 20, 100, 13, .txtPwd TextBox 10, 60, 100, 13, .txtFile OKButton 131, 8, 42, 13 CancelButton 131, 27, 42, 13 End Dialog Dim myDialog As UserDialog DialogErr: answer = Dialog(myDialog) If answer <> -1 Then Exit Sub End If If Len(myDialog.txtPwd) < 3 then MsgBox "Password must have more than 3 characters!", 64, "Password Encryption" GoTo DialogErr End If ' Encrypt strEncrypt = bf.EncryptString(myDialog.txtPwd, "rational") ' Save to file 'Open "C:\secure.txt" For Output Access Write As #1 'Write #1, strEncrypt Open myDialog.txtFile For Output As #1 If Err <> 0 Then MsgBox "Cannot create file", 64, "Password Encryption" GoTo DialogErr End If Print #1, strEncrypt Close #1 If Err <> 0 Then MsgBox "An Error occurred while storing the encrypted password", 64, "Password Encryption" GoTo DialogErr End If MsgBox "Password successfully stored!", 64, "Password Encryption" End Sub Running this script will generate the pop-up window shown in Figure B-19, which asks for the password and name of a file to store the encrypted version of that password within.
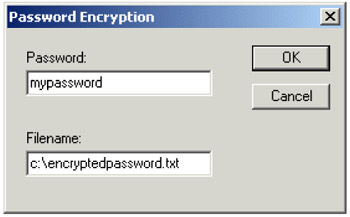
Figure B-19: Entering the password for use in Rational Scripts
Once this script has run, the file you specified above will contain an encrypted version of your password. The password may be retrieved within your Rational Script, as shown in Example B-2.
Example B-2: Retrieving the password
Sub Main Dim Result As Integer Dim bf As Object Dim strPasswd As String Dim fchar() Dim x As Integer ' Create the Encryption Engine and store a key Set bf = CreateObject("EncryptionAlgorithms.BlowFish") bf.key = "ibm" ' Open file and read encrypted password Open "C:\encryptedpassword.txt" For Input Access Read As #1 Redim fchar(Lof(1)) For x = 1 to Lof(1)-2 fchar(x) = Input (1, #1) strPasswd = strPasswd & fchar(x) Next x ' Decrypt strPasswd = bf.DecryptString(strPasswd, "rational") SQAConsoleWrite "Decrypt: " & strPasswd End Sub The resulting unencrypted password has been retrieved from the encrypted file (in our case, we used the encryptedpassword.txt file) and placed into the variable strPasswd, and the variable may be used in place of the password where required. A complete example of how this may be used in a Rational Script is shown in Example B-3.
Example B-3: Using the retrieved password
Sub Main 'Initially Recorded: 10/1/2003 11:18:08 AM 'Script Name: TestEncryptedPassword Dim Result As Integer Dim bf As Object Dim strPasswd As String Dim fchar() Dim x As Integer ' Create the Encryption Engine and store a key Set bf = CreateObject("EncryptionAlgorithms.BlowFish") bf.key = "ibm" ' Open file and read encrypted password Open "C:\encryptedpassword.txt" For Input Access Read As #1 Redim fchar(Lof(1)) For x = 1 to Lof(1)-2 fchar(x) = Input (1, #1) strPasswd = strPasswd & fchar(x) Next x ' Decrypt the password into variable strPasswd = bf.DecryptString(strPasswd, "rational") Window SetContext, "Caption=Program Manager", "" ListView DblClick, "ObjectIndex=1;\;ItemText=Internet Explorer", "Coords=20,30" Window SetContext, "Caption=IBM Intranet - Microsoft Internet Explorer", "" ComboEditBox Click, "ObjectIndex=2", "Coords=61,5" InputKeys "http://9.3.4.230:9082/tmtpUI{ENTER}" InputKeys "root{TAB}^+{LEFT}" ' use the un-encrypted password retrieved from the encrypted file. InputKeys strPasswd PushButton Click, "HTMLText=Log On" Toolbar Click, "ObjectIndex=4;\;ItemID=32768", "Coords=20,5" PopupMenuSelect "Close" End Sub
Rational Robot screen locking solution
Some users of TMTP have expressed a desire to be able to lock the screen while the Rational Robot is playing. The best and most secure solution to this problem is to lock the endpoint running simulations in a secure cabinet. There is no easy alternative solution, as the Rational Robot requires access to the screen context while it is playing back. During the writing of this redbook, we attempted a number of mechanisms to achieve this result, including use of Windows XP Switch User functionality, without success. The following Terminal Server solution implemented at one IBM customer site was suggested to us. We were unable to verify it ourselves, but we considered it useful information to provide as a potential solution to this problem.
This solution relies on the use of Windows Terminal Server, which is shipped with the Windows 2000 Server. When a user runs an application on Terminal Server, the application execution takes place on the server, and only the keyboard, mouse, and display information is transmitted over the network. This solution relies on running a Terminal Server Session back to the same machine and running the Rational Robot within the Terminal Server session. This allows the screen to be locked and the simulation to continue running.
-
Ensure that the Windows Terminal Server component is installed. If it is not, it can be obtained from the Windows 2000 Server installation CD from the Add On components dialog box (see Figure B-20 on page 469).
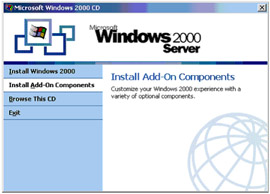
Figure B-20: Terminal Server Add-On ComponentAs the Terminal Server session will be back on the local machine, there is no reason to install the Terminal Server Licensing feature. Due to this fact, you should also select the Remote Administration mode option during Terminal Server install.
After the Terminal Server component is installed, you will need to reboot your machine.
-
Install the Terminal Server client on the local machine. The Terminal Server install provides a facility to create client installation diskettes. This same source can be used to install the Terminal Server client locally (Figure B-21 on page 470) by running the setup.exe (the path to this setup.exe is, by default, c:\winnt\system32\clients\tsclient\win32\disks\disk1).
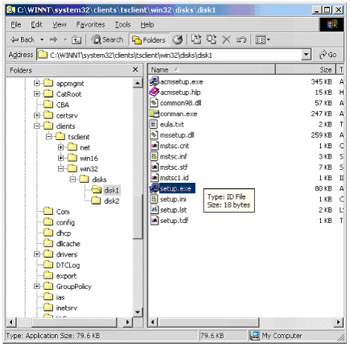
Figure B-21: Setup for Terminal Server client -
Once you have installed the client, you may start a client session from the appropriate menu option. You will be presented with the dialog shown in Figure B-22 on page 471. From this dialog, you should select the local machine as the server you wish to connect to.
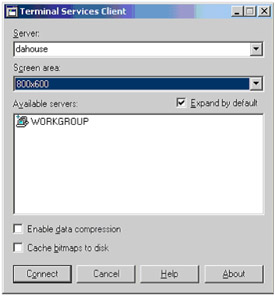
Figure B-22: Terminal Client Connection DialogNote It is useful to set the resolution to one lower than that used by the workstation you are connecting from. This allows the full Terminal Client session to be seen from the workstation screen.
-
Once you have connected, you will be presented with a standard Windows 2000 logon screen for the local machine within your client session. Log on as normal.
-
Now you can run your Rational Robot scripts using whichever method you would normally do this, with the exception of via GenWin. You may now lock the host screen and the Rational Robot will continue to run in the client session.
|
| < Day Day Up > |
|
EAN: 2147483647
Pages: 105