6.5 Uninstalling the TMTP Management Server
|
| < Day Day Up > |
|
6.5 Uninstalling the TMTP Management Server
De-installing TMTP is generally straightforward and well covered in the TMTP manuals. Uninstallation on the UNIX/Linux platform is a little more problematic, so we have included some information below to make this easier.
6.5.1 The right way to uninstall on UNIX
The following steps are required to uninstall TMTP after completing a typical install (that is, an embedded install). The uninstall program for the TMTP Management Server will not uninstall the WebSphere and DB2 installations that were installed by the embedded install, that is, they will have to be performed using their own native uninstallation procedures.
-
Uninstall the TMTP Management Server by running the following command:
$MS_HOME/_uninst52/uninstall.bin
-
Uninstall WebSphere by running the following commands (by default, WebSphere is installed in a subdirectory of the Management Server home directory by the embedded install process):
$MS_HOME/WAS/bin/stopServer.sh server1 -user userid -password password $MS_HOME/WAS/_uninst/uninstall
-
Uninstall DB2:
-
Source the DB2 profile; this will set the appropriate environment variables.
. $INSTDIR/sqllib/db2profile
$INSTDIR is the db2 instance home directory.
-
Drop the administrative instance.
$DB2DIR/instance/dasdrop
-
List the db2 instances.
$DB2DIR/bin/db2ilist
-
For each instance listed above, run:
$DB2DIR/instance/db2idrop <instance>
-
From the DB2 install directory, run the db2 deinstall script:
db2_deinstall
-
Remove the DB2 admin, instance, and fence users, and delete their home directories. On many UNIX platforms, you can delete users with the following command:
userdel -r <login name> # -r removes home directory
This should remove entries from /etc/passwd and /etc/shadow.
-
Remove /var/db2 if no other version of DB2 is installed.
-
Delete any DB2-related lines from /etc/services.
-
On Solaris, check the size of textfile /var/adm/messages; DB2 can sometimes increase it to hundreds of megabytes. Truncate this file if required.
-
Remove any old db2 related files in /tmp (there will be some log files and other nonessential files here).
-
6.5.2 The wrong way to uninstall on UNIX
Experienced UNIX administrators are often tempted to uninstall using a brute force method, that is, deleting the directories associated with the installs. This will work, but you should keep the following points in mind:
-
The DB2 installation will create several new users (generally, db2inst1, db2fenc1, and so on), which will need to be deleted (see the procedure for removing DB2 above).
-
IBM Tivoli keeps a record of each product it has installed in a file named vpd.properties. This file is located in the home directory of the user used for the installation (in our case, /root). If this file is not modified, it will prevent later reinstall attempts for TMTP, as it may indicate to the installation process that a particular product is already installed. Generally, you will only need to remove entries in this file that relate to products you have manually deleted. In our test environment, it was generally safe to delete the file, as the only IBM Tivoli product we had installed was TMTP.
-
On UNIX platforms, WebSphere Application Server and DB2 will generally use native package install processes, for example, RPM on Linux. This means that a brute force install may leave the package manager information in an inconsistent state.
6.5.3 Removing GenWin from a Management Agent
Chapter 6, "Removing a Component" of the IBM Tivoli Monitoring for Transaction Performance Installation Guide Version 5.2.0, SC32-1385 covers uninstalling the GenWin behavior from a Management Agent. One of the points it highlights is that you must delete the Rational Robot project that you are using for the GenWin behavior prior to removing the GenWin behavior. This point is important, as removing the GenWin behavior will delete the directory used by the Rational Robot project associated with that GenWin behavior. The ramification of this is that if you have not previously deleted the Rational Robot project, you will not be able to create a new Rational Robot project with the same name as this project (you will get the error message shown in Figure 6-5 on page 196), that is, you end up with an orphan project that is not displayed in the Rational Administrator tool, and the name of which cannot be reused.
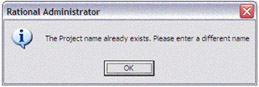
Figure 6-5: Rational Project exists error message
If you find yourself in this unfortunate position, the following procedure may help. The Rational Administrator maintains its project list under the following registry key:
HKEY_CURRENT_USER\Software\Rational Software\Rational Administrator\ProjectList
If you delete the "orphan" project name from this key, you should now be able to reuse it.
6.5.4 Removing the J2EE component manually
In most instances, you should use the Management Server interface to remove the J2EE component from a Management Agent. Doing this will remove the J2EE instrumentation from the Web Application Server correctly. Occasionally, you may find yourself in a situation where the Management Agent is unable to communicate with the Management Server when you need to remove the J2EE component. The best way of removing the J2EE component in this situation is to just uninstall the Management Agent, as this will also remove the J2EE instrumentation from your Web Application Server. Very occasionally, you may get yourself into the position where you need to remove the J2EE instrumentation from the Web Application Server manually. If this happens, you can use the following procedure as a last resort.
| Important: | You should only use this procedure when all else fails. |
Manual J2EE uninstall on WebSphere 4.0
-
Start the WebSphere 4 Advanced Administrative Console on the computer on which the instrumented application server resides. Expand the "WebSphere Administrative Domain" tree on the left and select the application server that has been instrumented (see Figure 6-6 on page 197).
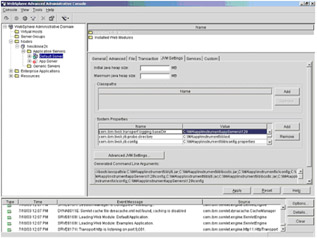
Figure 6-6: WebSphere 4 Admin Console -
On the right panel, select the tab labeled JVM Settings. Under the System Properties table, remove each of the following eight properties:
-
jlog.propertyFileDir
-
com.ibm.tivoli.transperf.logging.baseDir
-
com.ibm.tivoli.jiti.probe.directory
-
com.ibm.tivoli.jiti.config
-
com.ibm.tivoli.jiti.logging.FileLoggingImpl.logFileName
-
com.ibm.tivoli.jiti.registry.Registry.serializedFileName
-
com.ibm.tivoli.jiti.logging.IloggingImpl
-
com.ibm.tivoli.jiti.logging.NativeFileLoggingImpl.logFileName
-
-
Click the Advanced JMV Settings… button, which opens the Advanced JVM Settings window. In the Command line arguments text box, remove the entry -Xrunijitipi:<MA>\app\instrument\lib\jiti.properties. In the Boot classpath (append) text box, remove the following entries:
-
<MA>\app\instrument\lib\jiti.jar, <MA>\app\instrument\lib\bootic.jar
-
<MA>\app\instrument\ic\config
-
<MA>\app\instrument\appServers\<n>\config
-
<MA>\app\instrument\lib\jiti.jar
-
<MA>\app\instrument\lib\bootic.jar
-
<MA>\app\instrument\ic\config
-
<MA>\app\instrument\appServers\<n>\config
where <MA> represents the root directory where the TMTP Version 5.2 Management Agent has been installed, and <n> will be a random number.
-
-
Click the OK button, which will close the Advanced JVM Settings window.
-
Back in the main WebSphere Advanced Administrative Console window, click the Apply button.
-
The administrative node on which the instrumented application server is installed must be shut down so that the TMTP files that have been installed under the WebSphere Application Server directory may be removed. On the WebSphere Administrative Domain tree on the left, select the node on which the instrumented application server is installed. Right-click on the node, and select Stop.
Warning This will stop all application servers running on that node.
-
After the administrative node is stopped, remove the following nine files from the directory <WAS_HOME>\AppServer\lib\ext, where <WAS_HOME> is the home directory where WebSphere Application Server Advanced Edition is installed:
-
armjni.jar
-
copyright. jar
-
core_util.jar
-
ejflt.jar
-
eppam.jar
-
jffdc.jar
-
jflt.jar
-
jlog.jar
-
probes.jar
-
-
Remove the file <WAS_HOME>\AppServer\bin\ijitipi.dll.
-
The administrative node and application server may now be restarted.
Manual J2EE uninstall on WebSphere 5.0
-
Start the WebSphere 5 Application Server Administrative Console on the computer on which the instrumented application server resides, or on the Network Deployment server.
-
In the navigation tree on the left, expand Servers. Click on the Application Servers link.
-
In the Application Servers table on the right, click on the application server that has been instrumented.
-
Under the Additional Properties table, click the Process Definition link.
-
Under the Additional Properties table, click the Java Virtual Machine link.
-
Under the General Properties table, look for the Generic JVM Argument field (see Figure 6-7).
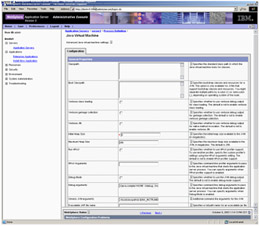
Figure 6-7: Removing the JVM Generic Arguments -
Remove all of the following entries from this field:
-
Xbootclasspath/a:${MA_INSTRUMENT}\lib\jiti.jar; ${MA_INSTRUMENT}\lib\bootic.jar; ${MA_INSTRUMENT}\ic\config; ${MA_INSTRUMENT_APPSERVER_CONFIG}
-
Xrunijitipi:${MA_INSTRUMENT}\lib\jiti.properties
-
Dcom.ibm.tivoli.jiti.config=${MA_INSTRUMENT}\lib\config.properties
-
Dcom.ibm.tivoli.transperf.logging.baseDir=${MA_INSTRUMENT}\appServers\130
-
Dcom.ibm.tivoli.jiti.logging.ILoggingImpl = com.ibm.tivoli.transperf.instr.controller.TMTPConsoleLoggingImpl
-
Dcom.ibm.tivoli.jiti.logging.FileLoggingImpl.logFileName = ${MA_INSTRUMENT}\BWM\logs\jiti.log
-
Dcom.ibm.tivoli.jiti.logging.NativeFileLoggingImpl.logFileName = ${MA_INSTRUMENT}\BWM\logs\native.log
-
Dcom.ibm.tivoli.jiti.probe.directory=E:\MA\app\instrument\appServers\lib
-
Dcom.ibm.tivoli.jiti.registry.Registry.serializedFileName = ${MA_INSTRUMENT}\lib\registry.ser
-
Djlog.propertyFileDir = ${MA_INSTRUMENT_APPSERVER_CONFIG}
-
Dws.ext.dirs = E:\MA\app\instrument\appServers\lib
-
-
Click the OK button.
-
Click the Save Configuration link at the top of the page.
-
Click the Save button on the new page that appears.
-
In order to remove TMTP files that have been installed under the WebSphere Application Server directory, all application servers running on this node must be shutdown. Stop each application server with the stopServer command.
-
After each application server has been stopped, remove the following nine files from the directory <WAS_HOME>\AppServer\lib\ext, where <WAS_HOME> is the home directory where WebSphere Application Server is installed:
-
armjni.jar
-
copyright. jar
-
core_util.jar
-
ejflt.jar
-
eppam.jar
-
jffdc.jar
-
jflt.jar
-
jlog.jar
-
probes.jar
-
-
Remove the file <WAS_HOME>\AppServer\bin\ijitipi.dll.
-
The application servers running on this node may now be started.
Manual uninstall of J2EE component on Weblogic 7
The following procedure outlines the steps needed to perform a manual uninstall of the TMTP J2EE component from a Weblogic server.
-
The WebLogic 7 installation has two options: "A script starts this server" and "Node Manager Starts this server". One or both of those options can be selected when J2EE Instrumentation is installed. If J2EE Instrumentation was installed with "A script starts this server", follow steps 2 and 3. If the J2EE Instrumentation used "Node Manager starts this server", follow steps 4 through 7. Finally, follow steps 8-10 to clean up any files that were used by J2EE Instrumentation.
-
Edit the script that starts the WebLogic 7 server. The script is a parameter to the installation, which may be something similar to C:\beaHome701\user_projectsAJL\mydomain\startPetStore.cmd.
-
In the script, remove the lines from @rem Begin TMTP AppIDnnn to @rem End TMTP AppIDnnn, where nnn is a UUID, such as 101, 102, and so on. The text to be removed will be similar to Example 6-4.
Example 6-4: Weblogic TMTP script entry

@rem Begin TMTP AppID169 if "%SERVER_NAME%"=="thinkAndy" set PATH=C:\\ma.2003.07.03.0015\app\instrument\\lib\windows;%PATH% if "%SERVER_NAME%"=="thinkAndy" set MA=C:\\ma.2003.07.03.0015 if "%SERVER_NAME%"=="thinkAndy" set MA_INSTRUMENT=%MA%\app\instrument if "%SERVER_NAME%"=="thinkAndy" set JITI_OPTIONS=-Xbootclasspath/a:%MA_INSTRUMENT%\lib\jiti.jar;%MA_INSTRUMENT%\lib \bootic.jar;%MA_INSTRUMENT%\ic\config;%MA_INSTRUMENT%\appServers\169\config -Xrunjitipi:%MA_INSTRUMENT%\lib\jiti.properties -Dcom.ibm.tivoli.jiti.config=%MA_INSTRUMENT%\\lib\config.properties -Dcom.ibm.tivoli.transperf.logging.baseDir=%MA_INSTRUMENT%\appServers\169 -Dcom.ibm.tivoli.jiti.logging.ILoggingImpl=com.ibm.tivoli.transperf.instr.contr oller.TMTPConsoleLoggingImpl -Dcom.ibm.tivoli.jiti.logging.FileLoggingImpl.logFileName=%MA_INSTRUMENT%\BWM\l ogs\jiti.log -Dcom.ibm.tivoli.jiti.logging.NativeFileLoggingImpl.logFileName=%MA_INSTRUMENT% \BWM\logs\native.log -Dcom.ibm.tivoli.jiti.registry.Registry.serializedFileName=%MA_INSTRUMENT%\lib\ WLRegistry.ser -Djlog.propertyFileDir=%MA_INSTRUMENT%\appServers\169\config if "%SERVER_NAME%"=="thinkAndy" set JAVA_OPTIONS=%JITI_OPTIONS% %JAVA_OPTIONS% if "%SERVER_NAME%"=="thinkAndy" set CLASSPATH=%CLASSPATH%;C:\beaHome701\weblogic700\server\lib\ext\probes.jar;C:\be aHome701\weblogic700\server\lib\ext\ejflt.jar;C:\beaHome701\weblogic700\server\ lib\ext\jflt.jar;C:\beaHome701\weblogic700\server\lib\ext\jffdc.jar;C:\beaHome7 01\weblogic700\server\lib\ext\jlog.jar;C:\beaHome701\weblogic700\server\lib\ext \copyright.jar;C:\beaHome701\weblogic700\server\lib\ext\core_util.jar;C:\beaHom e701\weblogic700\server\lib\ext\armjni.jar;C:\beaHome701\weblogic700\server\lib \ext\eppam.jar @rem End TMTP AppID169
-
Point a Web browser to the WebLogic Server Console. The address will be something similar to http://myHostname.com:7001/console.
-
In the left hand applet frame, select the domain and server that was configured with J2EE Instrumentation. Click on the Remote Start tab of the configuration for the server (see Figure 6-8).
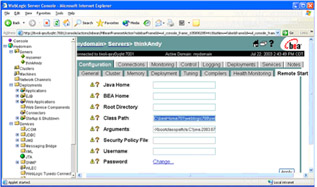
Figure 6-8: WebLogic class path and argument settings -
Edit the Class Path and Arguments fields to restore them to the original value before deploying J2EE Instrumentation. If these two fields were blank before installing J2EE Instrumentation, then they should be reverted to being blank. If these two fields had configuration not related to J2EE Instrumentation, only remove the values that were added by J2EE Instrumentation. The values added by the J2EE Instrumentation install will be similar to those values shown in Example 6-5.
Example 6-5: Weblogic Class Path and Arguments fields
Class Path: C:\beaHome701\weblogic700\server\lib\ext\probes.jar;C:\beaHome701\weblogic700\s erver\lib\ext\ejflt.jar;C:\beaHome701\weblogic700\server\lib\ext\jflt.jar;C:\be aHome701\weblogic700\server\lib\ext\jffdc.jar;C:\beaHome701\weblogic700\server\ lib\ext\jlog.jar;C:\beaHome701\weblogic700\server\lib\ext\copyright.jar;C:\beaH ome701\weblogic700\server\lib\ext\core_util.jar;C:\beaHome701\weblogic700\serve r\lib\ext\armjni.jar;C:\beaHome701\weblogic700\server\lib\ext\eppam.jar Arguments: -Xbootclasspath/a:C:\\ma.2003.07.03.0015\app\instrument\lib\jiti.jar; C:\\ma.2003.07.03.0015\app\instrument\lib\bootic.jar;C:\\ma.2003.07.03.0015\app \instrument\ic\config;C:\\ma.2003.07.03.0015\app\instrument\appServers\178\conf ig -Xrunjitipi:C:\\ma.2003.07.03.0015\app\instrument\lib\jiti.properties -Dcom.ibm.tivoli.jiti.config=C:\\ma.2003.07.03.0015\app\instrument\\lib\config. properties -Dcom.ibm.tivoli.transperf.logging.baseDir=C:\\ma.2003.07.03.0015\app\instrumen t\appServers\178 -Dcom.ibm.tivoli.jiti.logging.ILoggingImpl=com.ibm.tivoli.transperf.instr.contr oller.TMTPConsoleLoggingImpl -Dcom.ibm.tivoli.jiti.logging.FileLoggingImpl.logFileName=C:\\ma.2003.07.03.001 5\app\instrument\BWM\logs\jiti.log -Dcom.ibm.tivoli.jiti.logging.NativeFileLoggingImpl.logFileName=C:\\ma.2003.07. 03.0015\app\instrument\BWM\logs\native.log -Dcom.ibm.tivoli.jiti.registry.Registry.serializedFileName=C:\\ma.2003.07.03.00 15\app\instrument\lib\WLRegistry.ser -Djlog.propertyFileDir=C:\\ma.2003.07.03.0015\app\instrument\appServers\178\con fig
-
Click Apply to apply the changes to the Class Path and Arguments fields.
-
Stop the WebLogic Application Server that was instrumented with J2EE Instrumentation.
-
After the application server has been stopped, remove the following nine files from the directory <WL7_HOME>\server\lib\ext, where <WL7_HOME> is the home directory of the WebLogic 7 Application Server:
-
armjni.jar
-
copyright.jar
-
core_util.jar
-
ejflt.jar
-
eppam.jar
-
jffdc.jar
-
jflt.jar
-
jlog.jar
-
probes.jar.
After those nine files are removed, remove the empty <WL7_HOME>\server\lib\ext directory.
-
-
Remove the file <WL7_HOME>\server\bin\jitipi.dll or <WL7_HOME>\server\bin\ijitipi.dll file, if it exists. Some OS platforms use jitipi.dll and some OS platforms use ijitipi.dll.
Note The [i]jitipi.dll file may not exist in <WL7_HOME>\server\bin, depending on the version of J2EE Instrumentation. If it does not exist in this directory, it is in the Management Agent's directory, and can be left in the Management Agent's directory without any harm.
|
| < Day Day Up > |
|
EAN: 2147483647
Pages: 105