12.11. Six Mac OS X Security Shields By the beginning of 2005, Mac OS X already had a spectacular reputation for stability and security. Not a single Mac OS X virus had emerged ”a spectacular feature that makes Windows look like a waste of time. There's no Windows-esque plague of spyware, either (downloaded programs that do something sneaky behind your back). In fact, there isn't any Mac spyware. The usual rap is, "Well, that's because Windows is a much bigger target. What virus writer is going to waste his time on a computer with five percent market share?" That may be part of the reason Mac OS X is virus-free. But Mac OS X has also been built more intelligently from the ground up. Listed below are a few of the many drafty corners of a typical operating system that Apple has solidly plugged: -
The original Windows XP came with five of its ports open . Mac OS X has always come with all of them shut and locked. (Ports are back-door channels to the Internet: one for instant-messaging, one for Windows XP's remote-control feature and so on.) These ports are precisely what permitted viruses like Blaster to infiltrate millions of PCs. Microsoft didn't close those ports until the Windows XP Service Pack 2. -
When a program tries to install itself in Mac OS X, a dialog box interrupts your work and asks you permission for that installation. In fact, it requires your account password. (Windows XP goes ahead and installs it, potentially without your awareness.) In Tiger, you can expand the dialog box to see which program is doing the asking, which ensures that you can't be tricked into granting permission to a piece of spyware (Figure 12-15). -
Unlike certain other operating systems, Mac OS X doesn't even let an administrator touch the files that drive the operating system itself. A Mac OS X virus (if there were such a thing) could theoretically wipe out all of your files, but wouldn't be able to access anyone else's stuff ”and couldn't touch the operating system itself. 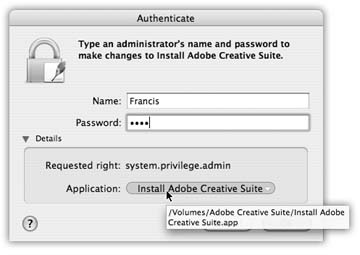 | Figure 12-15. Click the Details triangle to fi nd out which program is actually asking permission to install something. And if you don't recognize its name, you can either point to it to reveal, in a tooltip, its folder path , or click its name to jump to its Finder icon. The bottom line: If it's spyware trying to trick you, you'll fi nd out right away. | |
-
Here's another new Tiger feature: Every time you try to download something, either in Safari or Mail, that contains executable code (a program, in other words), a dialog box warns you that it could conceivably harbor a virus ”even if your download is compressed as a .zip or .sit file. True, there's not yet such a thing as a Mac OS X virus. With these little warnings ”occasionally annoying though they can be ”Apple is just hedging its bet against the future. -
You probably already know about the Finder's Secure Empty Trash option (Section 2.7.4). But a new option on the Erase tab of the Disk Utility program can do the same super-erasing of all free space on your hard drive. We're talking not just erasing, but recording gibberish over the spots where your files once were ”once, seven times, or thirty-five times ”utterly shattering any hope any hard-disk recovery firm (or spy) might have had of recovering passwords or files from your hard drive. -
Safari's new Private Browsing mode means that you can freely visit Web sites without leaving any digital tracks ”no history, no cookies, no nothing (Section 21.1.4.6). Those are only a few tiny examples. Here are a few of Mac OS X's big-ticket defenses. 12.11.1. The Firewall If you have a broadband, always-on connection (cable modem or DSL), you're connected to the Internet 24 hours a day. It's theoretically possible for some cretin to use automated hacking software to flood you with files or take control of your machine. Fortunately, Mac OS X's firewall feature puts up a barrier to such mischief. Open the Sharing panel of System Preferences. Click the Firewall tab (Figure 12-16), and then click Start. That's it ”you're protected. 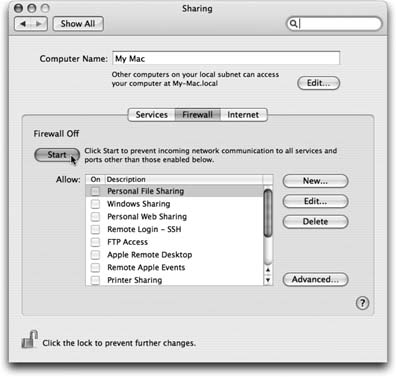 | Figure 12-16. This simple firewall doesn't allow you to create complex rules (preprogrammed guidelines that permit or deny certain kinds of Internet traffic). For that degree of flexibility, install a shareware program like Firewalk or Brickhouse (available from (www.missingmanuals.com, for example). | |
There are a few footnotes regarding Tigers firewall: -
If you're using Mac OS X's Internet connection sharing feature (Section 19.7), then it's important to turn on the firewall only for the first Mac ”the one that's the gateway to the Internet. Leave the firewall turned off on all the Mac'S "downstream" from it. -
Similarly, if you've bought a router to distribute your Internet connection to multiple computers, it probably has its own firewall circuitry built in. In that case, you can turn off Tiger's own firewall. -
Three new and useful features are hiding behind the Advanced button (shown in Figure 12-16). - Block UDP Traffic applies the same kind of rules to UDP traffic that the main pane does for TCP traffic. (UDP ”User Datagram Protocol ”is a network communication protocol, along the same lines as TCP/IP. Some streaming video and network games use it, because it flings data faster down the network pipes, though with less attention to accuracy.) Since UDP is a lot harder to hack than TCP is, this new option doesn't throw a staggering amount of new armor around your Mac; on the other hand, every little bit helps.
- Enable Stealth Mode is designed to slam shut the Mac's back door to the Internet. See, hackers often use automated hacker tools that send out "Are you there?" messages. They're hoping to find computers that are turned on and connected full-time to the Internet. If your machine responds, and they can figure out how to get into it, they'll use it, without your knowledge, as a relay station for pumping out spam or masking their hacking footsteps.
- Enable Stealth Mode, then, makes your Mac even more invisible on the network; it means that your Mac wont respond to the electronic signal called a ping. (On the other hand, you wont be able to ping your machine, either, when you're on the road and want to know if it's turned on and online.)
-
Enable Firewall Logging creates a little text fi le where Tiger records every attempt that anyone from the outside makes to infiltrate your Mac. (To view the log, click the Open Log button. The file opens in Console for your inspection.) 12.11.2. FileVault The Security pane of System Preferences is one of Tiger's most powerful security features. Understanding what it does, however, may take a little slogging. As you know, the Mac OS X accounts system is designed to keep people out of each other's stuff. Ordinarily, for example, Chris isn't allowed to go rooting through Robin's stuff. Until FileVault came along, though, there were all kinds of ways to circumvent this protection system. A sneak or a showoff could start up your Mac (if it's a pre-2003 model) in Mac OS 9, which knows nothing about Mac OS X permissions, or start up the Mac in FireWire disk mode (Section 7.2.1) using a different copy of Mac OS X, or even remove the hard drive and hook it up to a Mac OS 9 machine. In each case, they'd then be able to run rampant through everybody's files, changing or trashing them with abandon. For people with sensitive or private files, the result was a security hole bigger than Steve Jobs' bank account. FileVault is an extra line of defense. When you turn on this feature, your Mac automatically encrypts (scrambles) everything in your Home folder, using somethingcalled AES-128 encryption. (How secure is that? It would take a password-guessing computer 149 trillion years before hitting paydirt. Or, in more human terms, slightly longer than two back-to-back Kevin Costner movies.) This means that unless someone knows (or can figure out) your password, FileVault renders your files unreadable for anyone but you and your computer's administrator ”no matter what sneaky tricks they try to pull. You won't notice much difference when FileVault is turned on. You log in as usual, clicking your name and typing your password. Only a slight pause indicates that Mac OS X is decoding your entire Home folder.
Tip: This feature is especially useful for laptop owners . If someone swipes or "borrows" your PowerBook or iBook, they can't get into your stuff without the password.
Here are some things you should know about FileVault's protection: -
It's useful only if you've logged out . Once you're logged in, your files are not encrypted. If you want the protection, log out before you wander away from the Mac. (Or let the screen saver close your account for you; see Section 12.11.3.) -
It covers only your Home folder . Anything in your Applications, System, or Library folders is exempt from protection.
Tip: If you've got programs you don't want anyone else to see, store them in your Home folder and put aliases of them in your Applications folder. That way, you get the security of FileVault and the convenience of your Applications folder.
-
An administrator can access your files, too . According to Mac OS X's caste system, anyone with an administrator's account can have virtually unhindered access to his peasants'files ”even with FileVault on ”because the administrator has the master password described below. -
It doesn't let you access your files from anything other than Mac OS X . In exchange for protection against evildoers , Mac OS X doesn't let you get to the stuff in your Home folder when the Mac starts up in Mac OS 9, or when you access it via FireWire disk mode. (That, after all, is the whole point.) -
It keeps other people from opening your files, not from deleting them . It's still possible for someone to trash all your files, without ever seeing what they are. There's not much you can do about this with FileVault on or off. -
Any shared folders in your Home folder will no longer be available on the network . That is, any folders you've shared won't be available to your co-workers except when you're at your Mac and logged in. -
Backup programs may throw a tizzy . FileVaults job is to "stuff" and "unstuff" your Home folder as you log in and out. Backup programs that work by backing up files and folders that have changed since the last backup may therefore get very confused . -
It's only as secure as your password . If someone can figure out your accounts password, they can bypass FileVault for your account. Even more seriously, if someone can figure out the master password (see below), they can bypass FileVault for every account on your computer. -
If you forget your password and your administrator forgets the master password, you're toast . If this happens, your data is permanently lost . You'Ll have no choice but to erase your hard drive and start from scratch. To turn FileVault on, proceed like this: -
In System Preferences, click Security. Click Set Master Password . 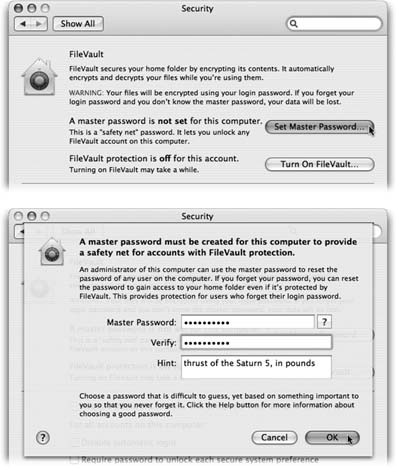 | Figure 12-17. Top: The Security pane is the gateway to Tiger's beefed-up security features.
Bottom: Type in your master password twice, and give yourself a hint. (In the event of an emergency, the hint appears with the third unsuccessful attempt to type in the master password.) When you click OK, you see that the Security dialog box now says, "A master password is set for this com-puter." | | If you're the first person to try to turn on FileVault, you need to create a master password first . The master password is an override password that gives an administrator full power to access any account, even without knowing the account holder's password, or to turn off FileVault for any account. The thinking goes like this: Yeah, yeah, the peons with Standard accounts forget their account passwords all the time. But with FileVault, a forgotten password would mean the entire Home folder is locked forever ”so Apple gave you, the technically savvy administrator, a back door. (And you, the omniscient administrator, would never forget the master password ”right?) When you click Set Master Password, the dialog box shown at top in Figure 12-17 appears. -
Click Turn On FileVault . Some time passes as Mac OS X tries to figure out whether or not you have enough free disk space to encrypt your Home folder. (Remember, it's essentially going to duplicate everything in your Home folder ”all of your photos, movies, and so on ”encoding it in the process. It then deletes the originals .) If you don't have enough space (20 GB, 30 GB, or more may be necessary), you get only an error message. You also see an error message if other account holders are simultaneously logged in (using Fast User Switching). UP TO SPEED
Password Hell | | With the introduction of the master password, you now have quite a few different passwords to keep straight. Each one, however, has a specifi c purpose: Account password . You type this password in at the normal login screen. You can't get into anyone else's account with it “only yours. Entering this password unlocks FileVault, too. Administrator password . You're asked to enter this password whenever you try to install new software or modify certain system settings. If you're the only one who uses your computer (or you're the one who controls it), your administrator password is your account password. Otherwise, you're supposed to go fi nd an administrator, and ask him to type in his name and password once he's assessed what you're trying to do. Master password . Think of this password as a master key. If anyone with FileVault forgets her account password, the administrator who knows the master password can unlock the account. The master password also lets an administrator change an account's password right at the sign-in screen, whether FileVault is turned on or not. Root password . This password is rarely useful for anything other than Unix hackery, as described earlier in this chapter. | If you do have enough space, an explanatory dialog box appears. -
Click Turn on FileVault in the dialog box . Now Mac OS x logs you out of your own account. (It can't encrypt a folder that's in use.) Some time will pass while it converts your Home folder into a protected state, during which you can't do anything but wait. After a few minutes, you arrive at the standard login window, where you can see that your account picture is now adorned by the FileVault logo. Sign in as usual, confident that your stuff is securely locked away from anyone who tries to get at it when you're not logged in.
Note: To turn off FileVault, open System Preferences, click Security, and click Turn Off FileVault. Enter your password and click OK. (The master password sticks around once you've created it, however, in case you ever want to turn FileVault on again.)
12.11.3. Logout Options As you read earlier in this chapter, the usual procedure for finishing up a work session is for each person to choose a Log Out. After you confirm your intention to log out, the sign-in screen appears, ready for the next victim. But sometimes people forget. You might wander off to the bathroom for a minute, run into a colleague there who breathlessly begins describing last night's date and proposes finishing the conversation over pizza. The next thing you know, you've left your Mac unattended but logged in, with all your life's secrets accessible to anyone who walks by your desk. You can prevent that situation using either of two checkboxes, both in the Security panel of System Preferences: -
Require password to wake this computer from sleep or screen saver . This option gives you a password-protected screen saver that locks your Mac after a few minutes of inactivity. Now, whenever somebody tries to wake up your Mac after the screen saver has appeared (or when the Mac has simply gone to sleep according to your settings in the Energy Saver panel of System Preferences), the "Enter your password" dialog box appears. No password? No access. -
Log out after__minutes of inactivity . If you prefer, you can make the Mac sign out of your account completely if it figures out that you've wandered off (and it's been, say, 15 minutes since the last time you touched the mouse or keyboard). Instead, it presents the standard Login screen.
Note: Beware! If there are open, unsaved documents at the moment of truth, the Mac is unable to log out.
12.11.4. The Password Assistant Plenty of software features require you to make up a password: Web sites, accounts, networked disks, and so on. No wonder most people wind up trying to use the same password in as many situations as possible. Worse, they use something easily guessable like their names, kid's names, spouse's names , and so on. Even regular English words aren't very secure, because hackers routinely use dictionary attacks ”software that tries to guess your password by running through every word in the dictionary ”to break in. To prevent evildoers from guessing your passwords, Tiger now comes with a good-password suggestion feature called the Password Assistant. It cheerfully generates one suggestion after another for impossible -to-guess passwords. (" recharges8@exchangeability ," anyone?) Fortunately, you won't have to remember most of them, thanks to the Keychain password- memorizing feature described at the end of this chapter. (The only password you have to memorize is your account password.) See Figure 12-18 for details on the new Password Assistant. 12.11.5. The Keychain The information explosion of the computer age may translate into bargains, power, and efficiency, but as noted above, it carries with it a colossal annoyance: the proliferation of passwords we have to memorize. Shared folders on the network, Web sites, your iDisk, FTP sites-each requires another password. 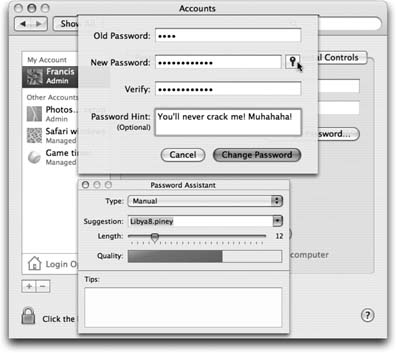 | Figure 12-18. Any place you're supposed to make up a password, including here in the Accounts pane of System Preferences, a key icon appears. When you click it, the Password Assistant opens. Use the pop-up menu and the Length slider to specify how long and unguessable the password is. (FIPS-181, by the way, stands for the Federal InformationProcessing Standards Publication 181, which sets forth the U.S. government's standard for password-generating algorithms.) The Quality graph shows you just how tough it is to crack this password. | |
Apple has done the world a mighty favor with its Keychain feature. The concept is brilliant . Whenever you log into Mac OS X and type in your password, you've typed the master code that tells the computer, "It's really me. I'm at my computer now." From that moment on, the Mac automatically fills in every password blank you encounter, whether it's a Web site in Safari or Opera, a shared disk on your network, a wireless network, an encrypted disk image, or an FTP program like Fetch or RBrowser. With only a few exceptions, you can safely forget all of your passwords except your login password. 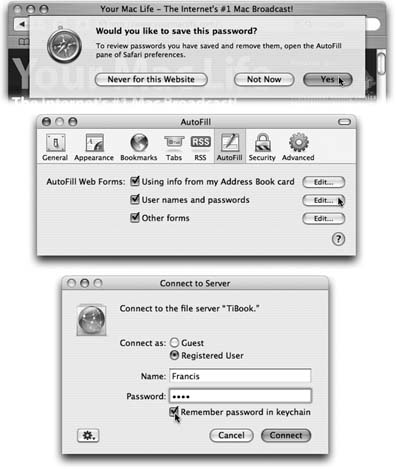 | Figure 12-19. Top: Safari is one of several Internet-based programs that offers to store your passwords in the Keychain; just click Yes. The next time you visit this Web page, you'll find your name and password already typed in.
Middle: At any time, you can see a complete list of the memorized Web passwords by choosing Safari Preferences, clicking AutoFill, and clicking the Edit button next to "User names and passwords." This is also where you can delete a password, thus making Safari forget it.
Bottom: When you connect to a server (a shared disk or folder on the network), just turn on "Remember password in Keychain." | |
These days, all kinds of programs and services know about the Keychain and offer to store your passwords there. For example: -
When you connect to a shared folder or disk on the network, the opportunity to save the password in your Keychain is equally obvious (Figure 12-19, bottom). -
You also see a "Remember password (add to Keychain)" option when you create an encrypted disk image using Disk Utility. -
Apple's Mail program stores your email account passwords in your Keychain. Your .Mac account information is stored there, too (on the .Mac pane of System Preferences). -
Microsoft's Entourage program offers to store your passwords. So do FTP (filetransfer) programs like RBrowser Lite and Fetch (check their Preferences dialog boxes). -
A "Remember password" option appears when you type in the password for a wireless network or AirPort base station. -
The iTunes program memorizes your Apple Music Store password, too. 12.11.5.1. Locking and unlocking the Keychain If you work alone, the Keychain is automatic, invisible, and generally wonderful. Logging in is the only time you have to type a password. After that, the Mac figures: "Hey, I know it's you; you proved it by entering your account password. That ID is good enough for me. I'll fill in all your other passwords automatically." In Apple parlance, you've unlocked your Keychain just by logging in. But there may be times when you want the Keychain to stop filling in all of your passwords, perhaps only temporarily. Maybe you work in an office where someone else might sit down at your Mac while you're getting a candy bar. Of course, you can have Mac OS X can lock your Mac ”Keychain and all ”after a specified period of inactivity (Section 12.11.3). If you want to lock the Keychain manually , so that no passwords are autofilled in until you unlock it again, you can use any of these methods . Each requires the Keychain Access program (in your Applications Utilities folder): -
Lock the Keychain manually . In the Keychain Access program, choose File Lock Keychain [Your Name] (c-L), or just click the big padlock at upper left. Click the Lock button in the toolbar of the Keychain Access window (see Figure 12-20). -
Choose Lock Keychain [Your Name] from the Keychain menulet . To put the Keychain menulet on your menu bar, open Keychain Access, choose Keychain Access Preferences, click General, and turn on Show Status in Menu Bar. -
Lock the Keychain automatically . In the Keychain Access program, choose Edit Change Settings for Keychain [your name]. The resulting dialog box lets you set up the Keychain to lock itself, say, five minutes after the last time you used your Mac, or whenever the Mac goes to sleep. When you return to the Mac, you're asked to re-enter your account password in order to unlock the Keychain, restoring your automatic-password feature. Whenever the Keychain is locked, Mac OS X no longer fills in your passwords.
Note: As noted above, you unlock your Keychain using the same password you used to log into Mac OS X, but that's just a convenience. If you're really worried about security, you can choose Edit Change Password for Keychain [your name], thereby establishing a different password for your Keychain, so that it no longer matches your login password.
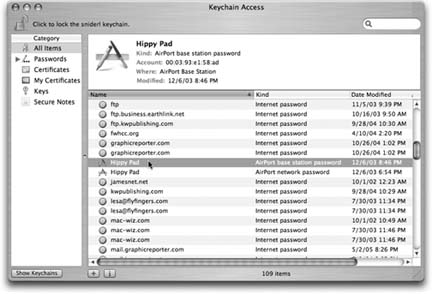 | Figure 12-20. In the main Keychain list, you can click the ^ button for more details about a certain password-including the actual password it's storing. To see the password, turn on "Show password." You're asked to prove your worthiness by entering your Keychain password (usually your account password). If you then click Always Allow, you won't be bothered for a password-to-see-this-password again. | |
Of course, doing so also turns off the automatic-Keychain-unlocking-when-you-log-in feature. 12.11.5.2. Managing Keychains To take a look at your Keychain, open the Keychain Access program. By clicking one of the password rows, you get to see its attributes ”name, kind, account, and so on (Figure 12-20).
Tip: The primary purpose of the Keychain is, of course, to type in passwords for you automatically. However, it's also an excellent place to record all kinds of private information just for your own reference: credit card numbers, ATM numbers , and so on. Simply choose File New Password Item (if it's a name and password) or File New Secure Note (if you just want to type a blob of very, very private text).No, the Mac won't type them in for you automatically anywhere , but it does maintain them in one central location that is, itself, password-protected.
12.11.5.3. Multiple Keychains By choosing File New Keychain, you can create more than one Keychain, each with its own master password. On one hand, this might defeat the simplicity goal of the Keychain. On the other hand, it's conceivable that you might want to encrypt all of your business documents with one master password, and all of your personal stuff with another, for example. If you do have more than one Keychain, you can view all of them by clicking the little Show Keychains button at the lower-left corner of the Keychain Access window; now you see a list of all your Keychains (including some maintained by Microsoft Office and Mac OS X itself). Click their names to switch among them. 12.11.5.4. Keychain Files Keychains are represented by separate files in your Home Library Keychains folder. Knowing that can be handy when you want to delete a Keychain or copy it to another Mac ”your laptop, for example. (Then again, the File Export command may be even more convenient .) 12.11.6. Secure Virtual Memory Heres another new security feature in Tiger: secure virtual memory . Virtual memory is a trick that computers use to keep a lot of programs open at once ”more, in fact, than they technically have enough memory (RAM) for. How do they manage keeping so many software balls in the air? Easy: They set some of them down on the hard drive. When you bring Photoshop to the front, Mac OS X frees up the necessary memory for it by storing some of the background programs' code on the hard drive. When you switch back to, say, Safari, Mac OS X swaps Photoshop for the Safari code it |