10.14. Internet Connect
| < Day Day Up > |
10.13. iMovieIf you have a digital camcorder and a few hours of free timeall right, a few weekends of itiMovie helps you make astonishingly high-quality , fully edited movies. Digital video is great: You can transfer the footage back and forth between the Mac and the camcorder a hundred times, and never see any deterioration in quality. The latest version of iMovie can even edit high-definition footage (from HDV camcorders like Sony's HDR-HC1). Note: Although this writeup covers iMovie HD, other versions of iMovie work similarly.
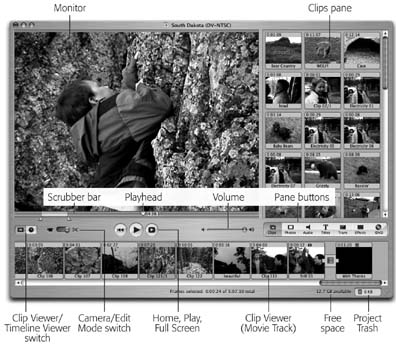
10.13.1. Phase 1: Set Up iMovieThe first time you run iMovie, it asks you whether you want to open an existing iMovie file (called a project ) or start a new one. After that, each time you launch iMovie, it automatically opens up the movie you most recently worked on. If you click Create Project, you're asked to select a name and location for the movie you're about to make. (You can ignore the "Video format" pop-up menu; iMovie auto-detects what kind of camcorder you have once you begin importing footage.) Once you've saved your project, you finally arrive at the main iMovie window (Figure 10-16). 10.13.2. Phase 2: Import Camcorder FootageAfter you've shot some footage, connect the camcorder to the Mac using a FireWire cable. If you have the proper cable, the six-pin connector fits your Mac, and the much smaller end (the four-pin connector) goes into the FireWire connector on your camcorder, which, depending on the brand, may be labeled FireWire, i.Link, DV In/Out, or IEEE 1394. Put the camcorder into VTR mode, also known as VCR or Playback mode. If necessary, click iMovie's Camera button, identified in Figure 10-16. The Monitor window says, "Camera Connected." Now you can click the Play, Rewind, Fast Forward, and other buttons on the screen to control the camcorder. Scan your tape to find the sections that you want to include in your edited movie. Every time you click the Import buttonor tap the Space bariMovie imports the footage you're watching, saving it as a series of digital-video movie files on the Mac's hard drive. For each scene, iMovie creates what looks like a slide in the Clips pane, as shown in Figure 10-16. That's a clip a single piece of footage that makes up one of the building blocks of an iMovie movie. Its icon is a picture of the first frame. On the clip's upper-left corner, you can see the length of the clip expressed as "seconds: frames ." (There are roughly 30 frames per second in North American video or HDTV; 25 in the European format.)
10.13.2.1. How iMovie organizes its filesEvery time you save a project file, iMovie creates an icon that bears your project's name. But it's not really a document icon. It's a package icon, which, to Mac OS X aficionados, is code for "a thinly disguised folder." It opens up like a document when double-clickedbut if you Control-click it and, from the shortcut menu, choose Show Package Contents, you can open it instead like a folder and survey the pieces that make up an iMovie movie. (Don't move, rename, or delete the components , however.) If you open, edit, and even save a project made by a previous iMovie version, though, it remains in the older project format: a regular folder (called, for example, Disney Trip) containing an iMovie document (with the same name) and a Media folder that contains all of your video clips. You can turn such a project into the newer package format for convenience, if you like, by choosing File 10.13.2.2. Phase 3: Arrange the ClipsAs you're building your movie, you can store your clips in either of two places: the Clips pane or the storyboard stripthe Movie Track , for want of an official nameat the bottom of the window (Figure 10-16). You put clips on the Clips pane before deciding what to do with them and drag them down to the Movie Track once you've decided where they fit into your movie. The Movie Track can appear in either of two ways, depending on which button you click (the film strip or the clock):
You can do several things to a clip, whether it's in the Clips pane or the Movie Track. For example:
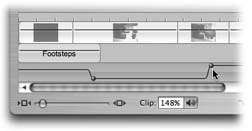
10.13.3. Phase 4: Assemble the MovieDrag the edited clips out of the Clips pane and into the correct order on the Movie Track, exactly as though you're building a storyboard or timeline. (To magnify the Timeline Viewer for a better look, drag the slider at the lower-left corner of the window. It adjusts the relative sizes of the bars that represent your clips.) 10.13.3.1. Play as you goAs you work, you'll want to play back your movie to check its flow. You may discover that, in the context of the whole movie, some clips are too long, too short, in the wrong order, and so on.
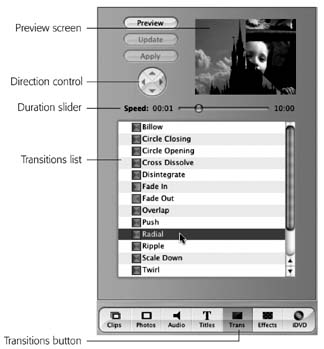
Note: The quality of the full-screen playback may look a tad grainy. Don't panic. When you transfer your finished movie back to your camcorder for TV playback, you get crystal-clear playback. 10.13.4. Phase 5: Transitions, Effects, Titles, Audio, and PhotosProfessional film and video editors have at their disposal a wide range of transitions special effects that smooth the juncture between one clip and the next. For example, apart from a simple cut , the world's most popular transition is the crossfade or dissolve , in which the end of one clip gradually fades away as the next one fades in. iMovie offers a long list of transitions, of which crossfades are only the beginning. To see them, click the Trans button (Figure 10-17).
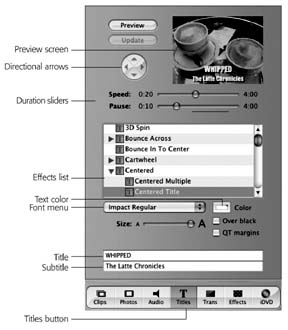
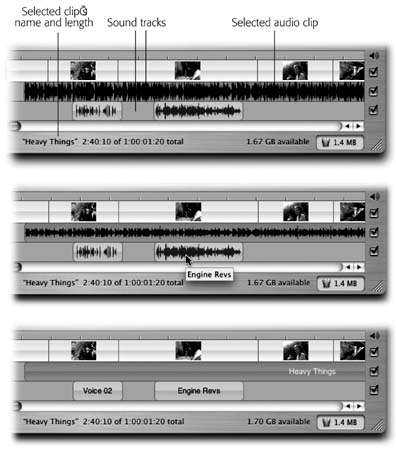
When you drag a transition into your Movie Track, the Mac now creates the crossfade renders itby superimposing the end of one clip with the beginning of the next. When the red progress bar is finished, click in your timeline just before the transition, press the Space bar to play, and marvel in your new ability to make home movies look pro. Tip: You can continue working on other parts of your movie, or even switch into another Mac OS X program, while the rendering is going on. To delete a transition, click its icon in the timeline and then press Delete. To edit it (by changing its length, for example), click its icon, return to the Transitions palette, make the adjustment, and then click Update. 10.13.4.1. EffectsThe Effects button summons a panel full of additional visual effects. Most are designed to create actual special effects that simulate fog, rain, earthquakes, lightning, flashbulbs, and bad LSD. (Most are weird and distracting. Use sparingly.) To apply an effect, first specify which region of footage you want to be affected. iMovie can apply effects only to entire clips. It may have to split your clip at the endpoints of the selection and then apply the effect to the central clip. Then, on the Effects pane, specify when the effect should begin and end (use the Effect In and Effect Out sliders), its intensity, and so on. Finally, click Apply. As usual, the rendering telegraphs its progress with a miniature red progress bar on the selected clip. If you click a clip and then press the Delete key, you're saying: "Throw away the effect. Bring back my original, unmodified clip." To adjust the start time, stop time, or other parameters of a special effect, you must first delete the effect altogether, and then reapply it using new settings. Tip: It's perfectly possible to combine effects by applying first one, and then another. For example, after using the Black & White effect, you may want to use the Brightness & Contrast control to adjust its gray tones. You can even apply a single effect repeatedly, intensifying its effect. For instance, you could apply Rain twice at different intensities to add depth to your simulated deluge.If you click such a clip, you can retrace your steps, removing one effect after another with each press of the Delete key. 10.13.4.2. Titles and creditsTo add rolling credits, opening titles, subtitles , or MTV-style music video credits to your masterpiece, start by clicking the Titles button. A list of title animation styles pops up. In the tiny text box underneath the list, type the text you want to appear. (Some of the effects, like Rolling Credits, offer pairs of text blobs; see Figure 10-18.) If you want to insert this title before or after a clip (as credits, say), so that the text appears on a black background, turn on the Over Black checkbox. If you'd rather have the text appear on top of the video, leave that box unchecked. (Superimposing a title usually breaks the clip in half. The part with the title superimposed is now one clip, and the unaffected part is separate.) Click the Preview button to see what the title will look like. Adjust the timing slider above the list, and then drag the name of the title type (such as Centered Title) into the Movie Track. To eliminate a title, click its icon in the timeline and then press Delete. To edit, click its icon, make changes in the Titles palette, and then click Update. 10.13.4.3. AudioThe top horizontal band of the Timeline Viewer displays the video component of your movie. For the most part, you won't do much with this strip when you're editing audio; its primary purpose is to show where you are in the movie. The two skinnier horizontal strips underneath it are your playground for audio clips (Figure 10-19); they play in tandem. Each audio track can hold sound from any of these sources:
Tip: You can use the three checkboxes at the right end of these tracks to control which ones play back. When you want to isolate only one track for playback, turn off the other two checkboxes.
Fortunately, you can do more with your audio clips than just insert them into the Timeline Viewer. You can lengthen them or shorten them, make them fade in or out, shift them to play earlier or later in time, and even superimpose them. Best of all, you can make their volume rise and fall over the length of the clip.
Note: When Show Clip Volume Levels is turned on, you can't drag clips' edges to shorten or lengthen them in the Timeline Viewer.
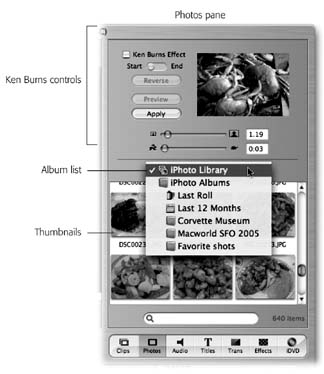
10.13.4.4. PhotosYou might want to import a graphics file into iMovie for any number of reasonsto use as a less distracting still image behind your titles and credits, for example, or to create a video photo album. If you keep your pictures in iPhoto, a useful feature awaits. When you click the Photos button (Figure 10-21), you're shown the contents of your entire iPhoto Library. Using the pop-up menu, you can even limit your view to the contents of one iPhoto album or another. Once you've pinpointed the picture you want, use the controls at the top of the Photos palette to specify the amount of time the photo will remain on the screen. If you like, you can also turn the Ken Burns effect , where the "movie camera" pans and zooms smoothly across photos, in essence animating them and directing the viewer's attention. (Ken Burns is the creator of PBS documentaries like The Civil War and Baseball , which use this effect in abundance .) Finally, drag the photo out of the thumbnail palette and into the Movie Track. The other clips scoot out of the way to make room, and the photo becomes, in effect, a new silent video clip with the duration you specified. (If you turned on the Ken Burns effect, iMovie takes a few moments to render the animation. The familiar red progress bar inches across the face of the clip.) Note: If you don't routinely keep your photos in iPhoto, you can also import a graphics file, or even a QuickTime movie, from your hard drive by choosing File  Import. Import. | |||||||||||||||||||
|
10.13.5. Phase 6: Meet Your Public
When the movie's looking good on your Mac screen, you're ready to distribute it to the adoring masses. iMovie offers three ways to do that:
-
Export it as a QuickTime movie . Choose File
Share. Click QuickTime at the top of the dialog box, and choose a quality setting from the pop-up menu: Email, CD-ROM, or Expert (that is, manual settings for compression, frame rate, and size). -
Play it back to your camcorder . Put the camcorder into VTR or VCR mode, connect the FireWire cable to your Mac, choose File
Share, and click the Videocamera button. From there, by connecting your camcorder to a VCR, you can copy the movie onto a regular VHS tape for submission to the Sundance film festival, Cannes, or your mother.
-
Email it . The movie you export with these settings is fairly blurry, and the size of the QuickTime screen is closer in size to a Wheat Thin than a Cineplex.
Still, the resulting QuickTime file is relatively tiny. At about 1 MB for a minutelong movie, it's within the realm of possibility that you could email this thing to somebody without incurring their wrath. And iMovie makes it easy for you; after compressing the movie, it opens your email program (whichever one you've selected in the Share dialog box's pop-up menu), creates a new outgoing message, and attaches the movie. Address and send.
-
Post it on the Web . By far the easiest way to post your movies on the Internet is to use one of Apple's $100-per-year .Mac accounts (Chapter 19). In iMovie, you can post your finished masterpiece on a .Mac Web page with little more than a couple of clicks. Choose File
Share; in the resulting dialog box, click HomePage. Type a name for your movie and then click Share. iMovie springs into action, compressing your movie to Web proportions and uploading it to the .Mac Web site. (This is not a particularly quick process.)
When the uploading is complete, you're asked for your .Mac name and password and offered about a dozen standard iMovie Web-page templates, such as Invite, Baby, and so on; click the "theater" style you prefer. Finally, on the "Edit your page" page, fill in the movie title, description underneath the movie, and so on. Your movie is now live on the Web!
-
Turn it into a DVD . If your Mac came equipped with a SuperDrive (a drive that reads and records both CDs and DVDs), you can create professional-quality DVD discs just like the ones that come out of Hollywood. See "iDVD," earlier in this chapter, for complete instructions.
| < Day Day Up > |
EAN: 2147483647
Pages: 506