5.4. Transposing Notes or Regions To transpose music means to shift it up or down into a different key, raising or lowering its pitch. The ability to transpose recordings and loops is a key advantage that Software Instruments (green) have over digital recordings from a microphone. You can also transpose Apple's own digital recordings (blue loops ), although they sound funny if you move them too far from their originally recorded pitches. Transposing is a very useful feature. For example, it lets you: -
Adapt a song that was in the perfect singing key for somebody else into the perfect singing key for you , without rerecording it. -
Reuse Apple's canned loops in other keys, greatly expanding your palette of chords and harmonies (see Figure 5-4). -
Quickly create an "echo" of a certain musical lick that plays back an octave higher or lower than the first occurrence of that melody. Now, if you want to transpose only some of the notes in a green Software Instrument region, open the Track Editor and use any of the selection techniques described in the previous section. Then drag them up or down, using any one of them as a handle. The official GarageBand Transpose slider, though, works only on entire regions . It goes like this: -
Select the region you want to transpose . If you've opened a region for editing in the Track Editor, GarageBand will transpose all of it, regardless of which notes are selected. You can click a region in the timeline, select a number of regions simultaneously (Shift-click them in the timeline), select all the regions in a track (click the track header), or select the entire piece at once (click in the timeline area and then choose Edit  Select All, or press -A). Select All, or press -A). 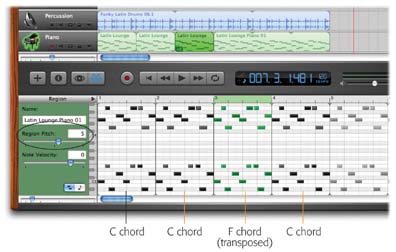 | Figure 5-4. The loop called Latin Lounge Piano 01 is a great lick. The only problem is that it's a C major chord, now and forever. By transposing copies of this loop, though, you can turn it into any other major chordF and G, for exampleand thereby make it fit the harmonies of many simple pieces.
Note, by the way, the little "+5" indicator, above, on the region itself. | | -
Specify how far you want to transpose the region(s) . Use the Region Pitch sliderdrag right to transpose the notes higher, left to make them play loweror type a number into the box just above the slider. Both of these controls display the number of half steps by which you're about to transpose the selected notes. (A half-step is one piano key to the right or left.) For example, typing 1 here would transpose a middle C up to C sharp, which is the black key just to its right. If you type 2 here, you'd transpose a middle C up to D, the white key just to its right. If you know a little bit about music, you may find the following equivalents handy. To transpose up a major third, enter 4 ; up a fourth, enter 5 ; up a perfect fifth, type 7 ; up an octave, enter 12 . And to transpose the selection down , either drag the slider handle to the left, or type a negative number into the box ( -12 for an octave down, for example). You can transpose green Software Instrument regions up to 36 half-steps in either direction (that is, three octaves up or down). You can transpose blue Real Instrument loops 12 half-steps up or down (one octave).
Tip: If you transpose a Real Instrument loop upward and it sounds a little funnybecause you've shifted it out of its natural rangetry transposing it down a whole octave, so that it lands on the same pitch but in a lower register.For example, suppose you transpose a bass lick down 4 half-steps, from C to A flat, and it winds up sounding muddy. Think to yourself: I transposed it by -4; what would be the equivalent pitch 12 half-steps higher? Well, -5 plus 12 = 8 . Drag the slider to 8, and sure enough, you get the same notes, but in a more natural-sounding range.
-
Remain calm . You might expect to see the note bars move higher on the Editor grid when you transpose them upward, or lower when you transpose downward. But instead, the note bars or noteheads remain exactly where they are. (Figure 5-4 proves the point.) Blue loops don't look any different, either. Even though they don't look different, they do sound different. Play back a section that you transposed, and you'll hear the difference immediately. Furthermore, you can see that a region has been transposed by the little "+5" tag at the lower-left corner of the region in the timeline (a new GarageBand 2 feature). The number there indicates how much the region has been transposed. If you ever want to restore a region to its original recorded pitch, select it and set the Region Pitch slider to its center position (or type into the box above it). |