| The doorway to all of this editing magic is the Track Editor, shown in Figure 5-1. You can open this window in any of several ways: -
Double-click a green region in the timeline . This is the best way to open the Track Editor, because it appears prescrolled to the notes in the region you clicked. -
Click the scissors icon (  ) beneath the track headers . The Track Editor opens to the beginning of the first region on the track. ) beneath the track headers . The Track Editor opens to the beginning of the first region on the track. -
Choose Control  Show Editor, or press -E . Once again, the Track Editor opens to the beginning of the track. Show Editor, or press -E . Once again, the Track Editor opens to the beginning of the track.
Tip: When the Editor window first appears, it shows only about an octave's worth of vertical space. Fortunately, you can drag upward on GarageBand's dark gray "brushed metal" divider strip (Figure 5-1) to double the Editor's height. (You might remember having to do this when using the Loop browser, too. Unfortunately, you'll have to do it again each time you open GarageBand.)
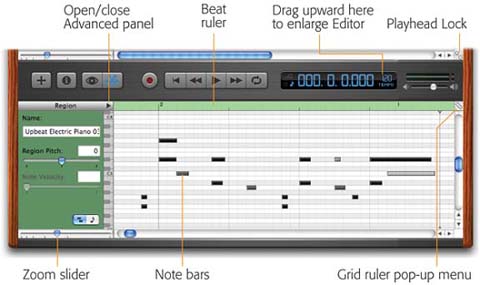 | Figure 5-1. The Track Editor reveals a closeup of your MIDI performance. Like an old-time piano roll, it resembles a grid. Time goes by horizontally, while the bars indicate the recorded notes on a vertical grid representing pitch. (The little piano-keys "ruler" at left should help you gain your bearings.) | |
Once you know your way around the Editor window, the editing itself is very easy. You can tug on the little note bars with your mouse to move, stretch, or shrink them. More about this in a moment. For now, gain your bearings by noticing these controls: -
Note bars . These are the notes in the green MIDI region. (MIDI regions can be either GarageBand loops or music you've recorded yourself, as described in this chapter.) Longer bars represent longer notes. Darker bars represent notes with greater key velocity that is, keys that were hit harder (see the box on Section 4.2). The lighter the shade of gray, the lighter that note was played . This startup viewpiano-roll view, for want of a better term is only one of two editing views in GarageBand 2. You can, if you prefer, view your masterpiece in traditional musical notation, as described in the next section. -
Beat ruler . These are the same measures of your piece that are represented by the beat ruler at the top of the GarageBand window. But in designing the Track Editor, Apple's programmers faced a quandary . Should this Track Editor window be matched to the timeline area above it, so that when you scroll the top window, the Track Editor scrolls too? Or should you be able to scroll the top and bottom parts of the GarageBand window independently? As it turns out, Apple gives you a choice. -
Playhead Lock button . When this little icon looks like this  , you can scroll the Track Editor independently of the main GarageBand window. In fact, during playback, the Playhead in the Track Editor screen may chug merrily right off the screen. In this situation, GarageBand scrolls automatically only when the upper Playhead hits the edge of your window. , you can scroll the Track Editor independently of the main GarageBand window. In fact, during playback, the Playhead in the Track Editor screen may chug merrily right off the screen. In this situation, GarageBand scrolls automatically only when the upper Playhead hits the edge of your window. But when you click the icon so that it looks like this  , both parts of the window scroll together. The Playhead line moves across (and autoscrolls) both parts of the window. , both parts of the window scroll together. The Playhead line moves across (and autoscrolls) both parts of the window. -
Zoom slider . You can see more of the song at once in the Time Editor by dragging this slider to the left, which causes the beat ruler (and all the notes) to get smaller. To zoom in for finer editing, drag the slider handle to the right, which makes the ruler and the note bars grow.
Tip: You don't have to drag the little slider's handle. It's often faster simply to click in the slider. The handle jumps to the spot of your click. (In fact, this tip applies to all GarageBand sliders.)
-
Scroll bars . These scroll bars work like any Macintosh scroll bars, but they're especially important in the Track Editor. If you open the Editor using either the scissors icon or the Show Editor command, the Track Editor window often appears to be completely blank . It opens to some portion of the track that has no notes in it. You're left to wonder whether the notes are higher or lower than what's currently on display, or sooner or later. In both of those situations, you'll wind up doing a lot of scrolling. This sense of Editor disorientation is a good argument for opening it using the first method described above: by double-clicking a region in the timeline.
Tip: You can also scroll the Track Editor by dragging your cursor through it in the direction you want to go. (Avoid beginning your drag directly on a note bar, though.)
-
Advanced panel . You can read about the editing controls of this panel in the following pages. For now, just note the tiny triangle that opens andwhen you need more space closes it, as identified in Figure 5-1. -
Grid ruler pop-up menu . This little menu works just as it does in the Timeline window. It's a list of basic rhythmic values (1/4 Note, 1/2 Note, and so on) that adjusts the fine vertical grid lines in the Track Editor. This rhythmic grid comes into play in several situations. First, the beginnings and endings of your note bars automatically snap against these gridlines when you drag, as described below. Second, GarageBand makes all selected notes snap to the nearest gridline when you use the Align To command (Section 5.5.2). Third, this setting determines the value of any new notes you create by  -clicking, as described in the next section. -clicking, as described in the next section. |