| The next step toward creating the final mix is to fix any problems in the recordings or tracks. Now that you've mixed the volume and pan levels for the song, it'll be easier to hear any mistakes and take care of them. There are no glaring mistakes, but when I listen to the song, I notice that the timing of some of the notes in the Strings track seems a little off. These notes are off because that's how I recorded them. Fortunately, you can fix the timing of the notes in any Software Instrument region. Evaluating Timing in the Track Editor To appreciate timing that is not right, it's a good idea to look at an example of timing that is perfect. Let's examine one of the drum regions in the Track Editor. This is a prerecorded Apple Loop, and it has perfect timing. Then we'll take a look at a Hollywood Strings region where the timing is a little off. 1. | Double-click the first region in the first (highest) Drum Kit track to open it in the Track Editor.
A dialog window appears, telling you that the track you have selected is locked. Fortunately, you can use the dialog window to unlock the selected track, while leaving the others locked and rendered.
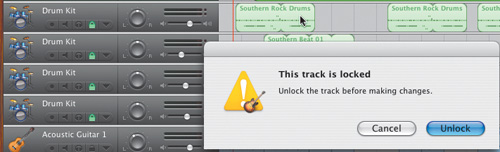 | 2. | Click Unlock in the dialog window to unlock that track.
You can also unlock a track anytime by clicking the Lock button on the track header.
| 3. | Double-click the Southern Rock Drums region to reopen it in the Track Editor.
Now, let's resize the Track Editor for a larger view of the Southern Rock Drums region. You can resize the Track Editor the same way you resize the Loop Browser.
| 4. | Click-drag the gray space to the left of the Record button and drag upward to make the Track Editor larger.
 | 5. | Click-drag the scroller on the right side of the Track Editor to move the note events into view.
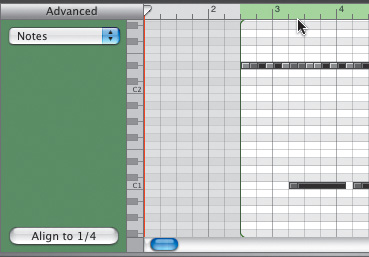
 | 6. | Click-drag the Track Editor's Zoom slider to the right to zoom in on the region.
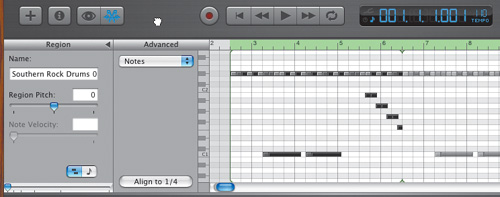
The note events in the Track Editor move farther apart as you zoom in on the region. Each MIDI note event in the Track Editor is perfectly aligned to the grid. This means that each note is perfectly in time with the grid and the song.
Let's take a closer look at the grid.
 | 7. | Locate the grid timing information in the Advanced section of the Track Editor.
The ruler and grid are currently set at 1/32 notes. Notice how detailed the grid is at that level, and how many lines there are in the ruler for 1 measure.
| 8. | Click-drag the Track Editor's Zoom slider to the left until the Align to button in the Track Editor changes to 1/4 notes.
When you have zoomed out of the Track Editor, the Region section of the Track Editor will indicate that the ruler grid is at 1/4.
 Now let's evaluate the timing of the first Hollywood Strings region.
| 9. | Double-click the first Hollywood Strings region in the Hollywood Strings track to open it in the Track Editor.
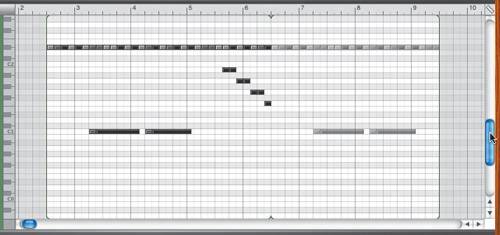
| 10. | Click-drag the scroller at the bottom of the Track Editor to view the note at the beginning of the 9th measure.
The timing looks OK when you are zoomed out of the Track Editor. Now let's zoom in to see how well aligned it really is.
| 11. | Drag the Track Editor's Zoom slider to the right until the grid is set to 1/32-note detail. Then move the scroller to view the note at the beginning of the 9th measure.
Note You can zoom in as far as 1/64 notes for the finest detail, but 1/32 is plenty for this exercise. |
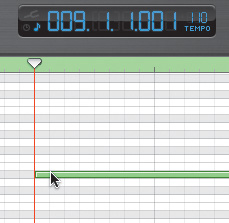
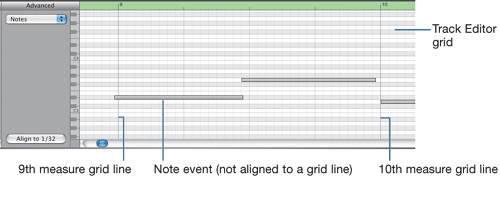 Notice that the note doesn't start exactly on the grid line. If you use the scroller to view some of the other notes in the region, you notice the same thing. Many of them are close to the grid lines, but most of them are slightly off. Fixing the Timing of a Note Now that you know how to use the Track Editor to tell if the timing is off, it's time to fix it. To fix the timing of a note, all you need to do is click-drag the note to the nearest gridline. Let's fix the note at the beginning of the 9th measure. 1. | Click-drag the scroller in the Track Editor to view the 9th measure (if you're not already there).
| 2. | Move your playhead to the beginning of the 9th measure to use as a guide for aligning the note.
| 3. | Click-drag the note event to the right so it lines up with the playhead and the grid line at the start of the 9th measure.
 |
As you can see, to adjust the timing of a single note in a Software Instrument region, all you have to do is move the note. Instead of manually adjusting every note in both Hollywood Strings regions, wouldn't it be nice if you could do it all automatically? Well, you can. First, let's turn the two Hollywood Strings regions into one long region. Joining Regions Sometimes you split a region into smaller segments as you arrange a song. The Hollywood Strings regions in this song were once part of one long region that was split into two regions. Anytime you split a region, you can join that region back to its original parts again. To rejoin separate regions, all you need to do is select the two regions (they must be touching) and then press Cmd-J (for Join). Let's try it. 1. | Shift-click the second Hollywood Strings region in the Timeline to select it.
 Both of the Hollywood Strings regions should be selected. If not, Shift-click the one that is not selected to select it.
| 2. | Press Cmd-J to join the two regions into one long region.
 There is now only one long Hollywood Strings region. There is now only one long Hollywood Strings region.
| 3. | Press Cmd-S to save your work.
|
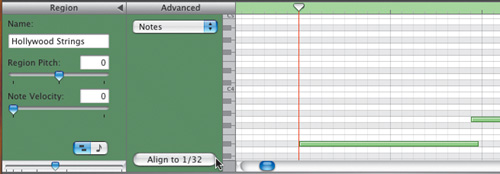
Fixing the Timing of an Entire Region Now that you've joined the two separate Hollywood Strings regions, you can fix the timing for all of the notes at one time. Keep in mind that very few people (if any) can play an instrument in perfect time. So you probably wouldn't want to do this on a lead guitar region or on other instrument that was played with feeling. The music will sound like it was performed by a computer. To fix the timing of an entire region, you must first load the region into the Track Editor. 1. | Double-click the Hollywood Strings region to load it into the Track Editor.
| 2. | Click the region in the Track Editor to select it.
The Track Editor turns green when the Software Instrument region is selected.
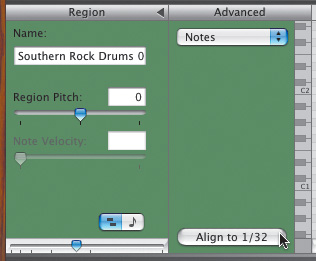
| 3. | Locate the Align to 1/32 button in the Advanced section of the Track Editor, and make sure the grid is set to 1/32 notes.
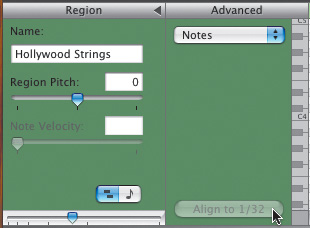 The Align to 1/32 button is grayed out, making it unavailable. Why? Because you must first select a note or group of notes to align.
| 4. | Choose Edit > Select All or press Cmd-A to select all of the note events in the region.
 The note events in the Track Editor turn green to indicate that they have been selected. The note events in the Track Editor turn green to indicate that they have been selected.
| 5. | Drag the scroller in the Track Editor to the right to view the 14th measure.
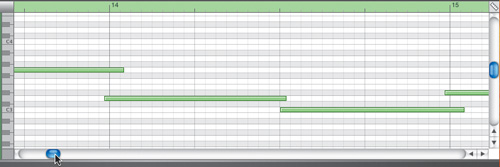 Notice that the note at the beginning of the 14th measure is not aligned with the grid. The note at the beginning of the 15th measure is off as well. Notice that the note at the beginning of the 14th measure is not aligned with the grid. The note at the beginning of the 15th measure is off as well.
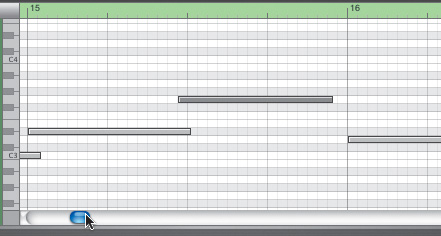
| 6. | Click the Align to 1/32 button to fix all of the notes in the entire region.
Notice that the notes at the beginning of the 14th and 15th measures are now both aligned to the grid.
| 7. | Click in the empty space near any of the note events in the Track Editor to deselect all of the note events.
|
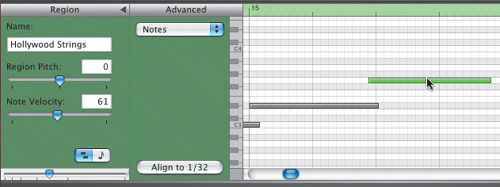
The Align to button will align the beginning of every note in the region to the nearest grid line. When you set up the grid to 64th notes, the grid is at the finest level of detail, with the most lines per measure, and the notes will move the shortest distance to the nearest grid line. If you moved to the nearest 8th note, the notes that are off would have to move farther to a grid line. This, in turn, would move them farther from the original place in the song at which you wanted them to play. The moral here is that you need to be careful when you use the Align to button. If you move the notes too far when you are adjusting the timing, they will play at the wrong time in the song, and it will sound terrible even if they are aligned to the grid. Changing Velocity for an Entire Region Now that the timing is right for the Hollywood Strings region, I noticed that the notes are a very light shade of gray. This means that they were recorded at a very low velocity. Just as you adjust the timing of note events, you can change the velocity for one note or all of them at once. In Lesson 7, you changed the velocity of one note in a region by clicking the note event to select it and then dragging the Velocity slider. To change all of the notes at once, you first need to select them all. 1. | Move the scroller in the Track Editor until you can see the 15th measure.
 Notice that the different note events are different shades of gray.
| 2. | Click the first note event in the 15th measure to hear it, and check the velocity in the Note Velocity field in the Track Editor.
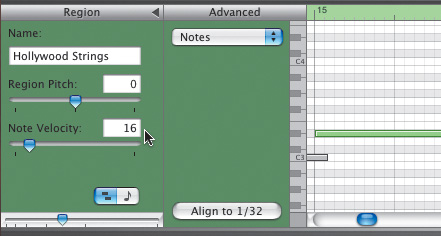 The velocity of the note is 16. That's pretty low considering that 0 is the lowest and 127 is the highest.
| 3. | Click the 2nd note in the 15th measure to check the velocity.
The velocity is 41. This note is definitely played with more intensity than the first note, but it's still relatively low.
Let's raise the velocity for all of the notes in this region simultaneously.
| 4. | Press Cmd-A to select all the notes in the region.
All the notes turn green to indicate that they have been selected.
The Velocity field shows the level of the last note that you selected. That level is 41. With all of the note events selected, you will raise the velocity of each note by the same relative amount. Let's raise the velocity from 41 to 61. This will also raise the velocity of every note in the region by the same relative amount (in this case, 20).
| 5. | Type 61 in the Velocity field and press Return.
The velocity of each note in the region has been raised by 20.
| 6. | Click the empty track space above a note in the Track Editor to deselect all of the notes.
| 7. | Click the 2nd note in the 15th measure.
 The velocity of this note had been 41 and was raised by 20. The velocity is now 61. The velocity of this note had been 41 and was raised by 20. The velocity is now 61.
| 8. | Click the 1st note in the 15th measure.
The velocity was originally 16 and now reads 36, which means it was also raised by 20.
| 9. | Press Cmd-E to close the Track Editor, then press Cmd-S to save the project.
| 10. | Listen to the first half of the song to hear the new and improved Hollywood Strings in the mix.
|
You've fixed various problems in the timing and note velocity for the song, and in doing so, you have just completed the third step in the mixing process. Now you can move on to the next stepadding effects. |