| Now that you have collected all of the musical parts, it's time to build the song. Along the way you'll learn a few new tricks of the trade, like doubling a part with another instrument and transposing a region a full octave. Starting with the Melody There are different ways to begin a song. Many songs are built on a rhythm foundation. For this piece, you will start with the piano melody because it also has a solid rhythm, and all of the other parts work off the piano. 1. | Click-drag the 70s Ballad Piano 01 loop from the Loop Browser to the 1st measure of the Grand Piano track in the Timeline.
 | 2. | Press the spacebar to listen to the first track in the Timeline.
When you hear this piano melody, does it make you want to pick up an instrument and play along? Which instrument? Bass? Drums? Guitar? Whichever instrument you imagined, I strongly encourage you to try this exercise again later and record the part you imagine with your instrument of choice. For this exercise, we'll pretend it's a keyboard player who joins in with some strings.
Strings? Don't worry if you didn't select any string parts in your loop favorites. Many string parts mirror the lead instrument. That's exactly what you are going to do here. There are three ways to double this track to create a strings track that mirrors the piano part.
Create a new Software Instrument track, make the track instrument Strings, and duplicate the region from the Piano track into the new track. Create a new Software instrument track, make the new track Piano, duplicate the region from the original Piano track to the new track, and change the original track to Strings. Click-drag the 70s Ballad Piano 01 loop from the browser to the empty space below the first track to create a new Software Instrument Piano track. Change one of the two Piano tracks to Strings.
Since this is a lesson about working with Apple Loops, let's use the third method and create a new Software Instrument track by dragging the loop to the Timeline.
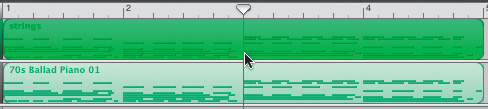
| 3. | Click-drag the 70s Ballad Piano 01 loop from the browser to the 1st measure of the empty space below the first track.
 A new Piano Software Instrument track appears below the top track in the Timeline. A new Piano Software Instrument track appears below the top track in the Timeline.
| 4. | Double-click the Grand Piano track header (the top track) to open the Track Info window.
| 5. | Select Strings > Hollywood Strings. Then close the Track Info window.
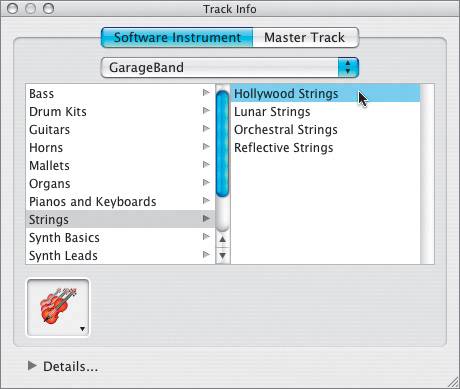 The track name changes to Hollywood Strings.
The region is still named 70s Ballad Piano 01.
| 6. | Double-click the region on the Hollywood Strings track to open it in the Track Editor.
| 7. | Type strings in the Name field to change the name of the region in the Timeline.
 | 8. | Click the Loop Browser button to close the Track Editor and open the Loop Browser.
| 9. | Play the doubled piano and strings part in the Timeline to hear how they sound together.
I think they sound pretty good. As I mentioned before, many string parts mirror the lead instrument melody. When you are working with Software Instruments in GarageBand, it's easy to double your lead part with strings.
|
Splitting a Software Instrument Region Now that you've doubled the piano part with strings, there's a slight problem. If this song is really supposed to resemble a jam session, the strings can't start with the piano. The strings have to join in, after a few measures. All you need to do is cut off the first half of the strings region. So how do you go about cutting off the first half of the Software Instrument region you want to trim? You can't click and drag the beginning of the region (the left edge) to shorten it because Software Instrument regions like to maintain the integrity of the beginning of the region. You can only shorten a prerecorded Software Instrument region from the right side. 1. | Click-drag the lower-right corner of the strings region in the top track to the left until it ends at the 3rd measure.
 The region is now half the length, but it's the first half of the region instead of the second half. Chances are if you try to use the first half of the region with the second half, it will not sound very good. Let's try it anyway. The region is now half the length, but it's the first half of the region instead of the second half. Chances are if you try to use the first half of the region with the second half, it will not sound very good. Let's try it anyway.
| 2. | Click-drag the resized strings region to the right so it begins at the 3rd measure.
| 3. | Play the song in the Timeline to hear how it sounds.
Yikes. It's worse than I expected. Remember, if your strings section is going to mirror the lead instrument, it needs to play the same notes at the same time. Let's extend the region again and do it the right way.
| 4. | Move the full strings region back so that it lines up with the beginning of the piano region.
It's a good idea to zoom in to the Timeline a bit for a better view.
| 5. | Press Ctrlright arrow once to zoom in.
Note If you need to zoom in further to see the region better in the Timeline, press Ctrlright arrow again. If you were already zoomed in to the Timeline, you may not need to zoom in further. Just make sure you have a clear view of the regions. | 6. | Click-drag the lower-right edge of the strings region to extend it back to the original full region.
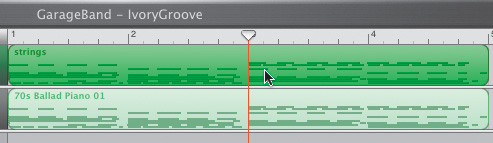
| 7. | Move your playhead to the beginning of the 3rd measure.
 Notice the break in the note events that happens in the middle of the region at the beginning of the 3rd measure. That is where you will split the region.
| 8. | Click the strings region to select it in the Timeline, if it is not already selected.
 | 9. | Press Cmd-T to split the selected region.
The original region splits into two separate regions. The first is the first half of the loop. The second is the second half of the loop.
| 10. | Press Ctrlleft arrow to zoom out of the Timeline.
| 11. | Click the empty track space on the strings track to deselect the regions in that track.
| 12. | Click the first strings region to select it.
 | 13. | Press Delete to delete the region from the Timeline.
 | 14. | Listen to the edited section in the Timeline.
Mission accomplished! The piano section and strings will work perfectly for the beginning of the song.
|
Now that you have the piano and strings, let's continue building the song. Extending Edited Software Regions The first part of the song works great. The next step is to loop the melody regions to play a second time. Remember, to loop a region, you need to extend the loop from the upper-right corner. 1. | Click-drag the upper-right corner of the piano region to loop the entire region once.
The loop ends at the beginning of the 9th measure.
 | 2. | Click-drag the upper-right corner of the strings region on the top track to loop the region once.
Why is the loop so short? Looping basically clones or duplicates whatever you click and drag with your loop pointer. If the region has been edited, the loops will be identical. The easiest way to get the full loop back is to just get the original loop from the Loop Browser and reinsert it in the Timeline.
| 3. | Press Cmd-Z to undo the loop.
| 4. | Click-drag the 70s Ballad Piano 01 loop from the browser to the Timeline and place it at the beginning of the 5th measure, next to the strings region on the top track.
 Note Since the Software Instrument for the track is Hollywood Strings, any Software Instrument loop you add will automatically be assigned the Hollywood Strings as its instrument, regardless of the original Software Instrument assigned to the loopin this case, a piano. | 5. | Press Cmd-S to save your work.
|
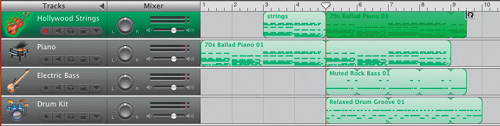
Adding the Rest of the Tracks Now that you've built the melody, it's time to add the other tracks and finish the song. To continue the jam session theme, the drums and the bass will join the song at the end of the first full piano loop. This exercise will help you review many of your new GarageBand skills. 1. | Move your playhead to the beginning of the 5th measure.
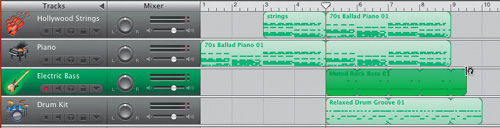
| 2. | Click-drag the Muted Rock Bass 01 loop from the Loop Browser to the playhead position below the second track in the Timeline.
A new track appears in the Timeline with the muted bass region at the playhead position.
| 3. | Click-drag the Relaxed Drum Groove 01 loop from the Loop Browser to the playhead position below the Electric Bass track.
| 4. | Click-drag the upper-right corner of the drum region to loop it until it ends at the beginning of the 10th measure in the Timeline.
 | 5. | Loop the Muted Rock Bass 01 region until it ends on the 3rd beat of the 9th measure (halfway between the 9th and 10th measures).
 Note Remember, each measure has four beats because this project is in 4/4 time. The more you zoom in to the Timeline, the more details you will see in the Beat Ruler. In the previous picture, you see four lines in each measure, representing each of the four beats. Each measure starts on the first beat. | 6. | Loop the second region in the strings track so it ends on the 3rd beat of the 9th measure (the same as the bass loop).
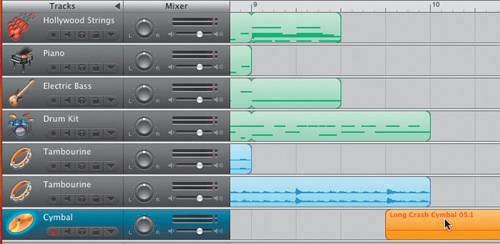
 | 7. | Click-drag the Tambourine 07 loop from the browser to the empty space below the bottom track and release it at the beginning of the 7th measure.
| 8. | Press Ctrlright arrow to zoom in to the Timeline one level.
This will allow you to place the following loops in the Timeline more precisely.
| 9. | Click-drag the Tambourine 01 loop from the browser to the empty space below the bottom track and release it at the beginning of the 8th measure.
| 10. | Click-drag the Long Crash Cymbal 05 loop to the empty space below the bottom track and release it at the beginning of the 10th measure.
| 11. | Press Ctrlright arrow several times to zoom in to the Timeline until you see each beat of each measure in the Beat Ruler.
There are four beats in each measure.
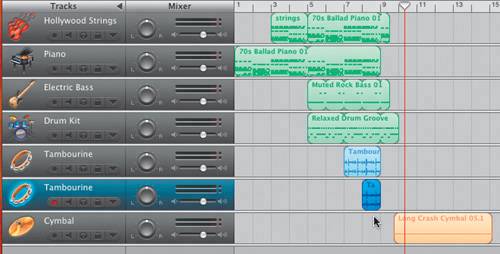
| 12. | Click-drag the Long Crash Cymbal 05 loop toward the left to the 4th beat of the 9th measure.
 The cymbal needs to be precisely placed as the finale of the song. Next you need extend the lower Tambourine region so it ends at the same time as the other tambourine part. The cymbal needs to be precisely placed as the finale of the song. Next you need extend the lower Tambourine region so it ends at the same time as the other tambourine part.
| 13. | Click-drag the lower-right corner of the Tambourine 01 region (the lower tambourine track) to resize it so that it ends at the beginning of the 9th measure.
Notice that the Tambourine regions are blue, which means they are Real Instrument regions.
| 14. | Press Cmd-S to save the finished song.
| 15. | Play the finished song to hear how it sounds.
 |
Now that you've finished the song, you can reset the Loop Browser. Resetting the Keywords in the Loop Browser You can reset the keyword buttons in the Loop Browser by clicking the Reset button in the GarageBand General Preferences window. 1. | Choose GarageBand > Preferences to open the General Preferences window.
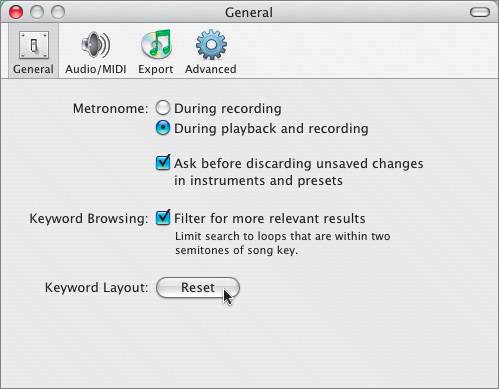 | 2. | Click the Reset button to reset the keyword buttons in the Loop Browser back to the GarageBand default settings.
A dialog box will ask you if you are sure you want to reset the keyword buttons to the default settings.
| 3. | Click Yes to reset the keyword layout.
The Reset button in the Loop Browser will clear any selected buttons, and clear the results list. The Reset button in the General Preferences window resets all of the keyword buttons to their original names and locations in the Loop Browser.
| 4. | Close the General Preferences window.
|
|