Let's take the Track Editor out for a test-drive. In this exercise, you'll change the velocity of one note in the Hollywood Strings track.
1. | Click the Hollywood Strings track header to select that track in the Timeline.
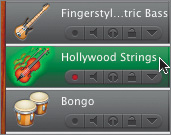 The track header turns green to indicate it has been selected. Note that the green color of the track header also shows that the regions within that track are Software Instrument regions.
Note Selecting a track also selects all of the regions within that track and turns on that track's Record Enable button. |
2. | Click and drag the Timeline Zoom slider to the left so that you can view the entire song in the Timeline.
|
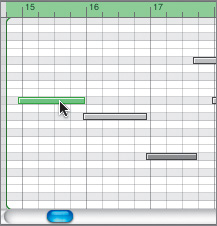
3. | Locate the first Hollywood Strings region on the Hollywood Strings track.
 |
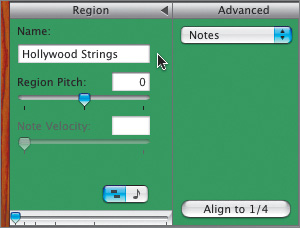
4. | Double-click the first Hollywood Strings region in the Timeline to open it in the Track Editor.
Notice that the Track Editor has a Region section showing Hollywood Strings in the Name field. This means that you have opened that region in the Track Editor. There is also a Track Editor Zoom slider located at the bottom of the Region section so you can zoom in to or out of the selected region in the Track Editor. You can see the color (green) of the selected Software Instrument region in the Timeline, or in the Track Editor by clicking anywhere in the empty gray space on the left side of the Track Editor.
|
5. | Click the empty gray space on the left side of the Track Editor.
The Track Editor turns from gray to green to reflect the color of the selected region.
 |
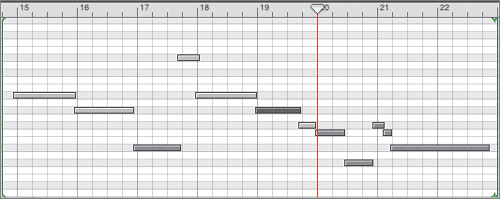
6. | Click and drag the arrow in the Track Editor Zoom slider all the way to the left to see the entire selected region in the Track Editor, if the Track Editor Zoom slider isn't already in the far-left position.
The gray bars in the Track Editor represent the individual note events displayed in Graphic view. You can listen to a note by clicking it with your pointer.
 To view the same note events in Notation view, simply click the Notation View button, which looks like a musical note. To view the same note events in Notation view, simply click the Notation View button, which looks like a musical note.
 |
7. | Click the Notation View button to change the display in the Track Editor to Notation view.
The Notation View button turns blue when it is selected, and the note events in the Track Editor change to musical notation. This is an exciting new feature in GarageBand 2, and it's great for those who are familiar with musical notation as well as those who'd like to learn more about it.
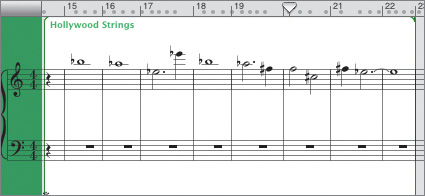 You'll work more with Notation view in Lesson 3. For now, let's change the display back to Graphic view.
|
8. | Click the Graphic View button to change the display in the Track Editor back to Graphic view.
You'll work more with editing modes in Lesson 3. For now, you'll select the notes with the arrow pointer. When you select a note, it turns green.
|
9. | Click the first note in the Track Editor to hear the note.
 Notice that the Velocity field shows a velocity of 11 for the note you selected.
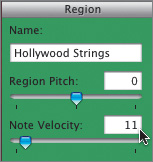 Velocity is indicated by a number between 1 and 127, with 1 being the lightest, and 127 being the hardest. You can also see a visual representation of velocity in the shades of gray used for the notes, from lightest to darkest. The darker the shade, the higher the velocity or louder the note.
Tip Keep in mind that a little variation in velocity is a good thing. Most people play instruments with passion and feeling that includes emphasis on certain notes. Some notes may be passing notes that are played delicately (low velocity), while others are strong notesthey carry the melody and are played more heavily or with higher velocity. |
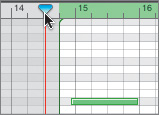
10. | Click the Beat Ruler in the Track Editor between the 14th and 15th measures to move the playhead in front of the selected region.
 |
11. | Press the spacebar to play the region along with that portion of the song in the Timeline.
Watch the playhead move across the different note events in the Track Editor and listen to the volume for the Hollywood Strings change with the different velocities.
|
12. | Press the spacebar again to stop playback.
|
13. | Drag the scroll bar at the bottom of the Track Editor to move back to the beginning of the region.
 |
14. | Click the Beat Ruler at the beginning of the region to move the playhead.
|
15. | Locate the 6th note event in the region.
Note 6 is the darkest gray line. It starts at the beginning of the 19th measure.
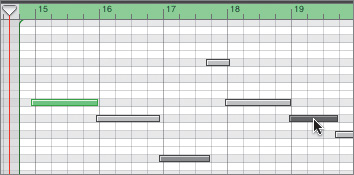 |
16. | Click the 6th note to hear it.
The velocity for this note is 70.
The difference between 11 and 70 is quite dramatic, and in this case a mistake. Before you lower the velocity, it's a good idea to check the velocity of the notes just before and after it.
|
17. | Click the note just before the 6th note and check the velocity in the Velocity field.
|
18. | Click the note directly to the right of the 6th note and check the velocity in the Velocity field.
Chances are this note was meant to be louder than the othersjust not as loud as it was actually played. Let's lower the velocity to 50.
There are two ways to change the velocity. You can type a new number in the Velocity field, or you can click and drag the Velocity slider.
|
19. | Click the 6th note to select it in the Track Editor and drag the Velocity slider until you see 50 in the Velocity field.
If you have trouble dragging the slider to 50, type 50 in the Velocity field to change the velocity. As you can see, there are advantages to both methods. Drag for a general velocity change; type a number for a specific velocity.
|
20. | Click anywhere in the space near the notes to deselect the note and see the new shade of gray.
|
21. | Move the playhead back to the beginning of the region and play the section again to hear the new velocity.
Note You can also change the velocity of notes using Notation view; however, you will be able to see the different velocities represented by shades of gray only in Graphic view. |
Now it's your turn to put together everything you have learned so far and try the same velocity change again. It just so happens that when I built this song, I copied and pasted the Hollywood Strings region so I would only have to record it once. When you're building music, reusing parts can be a real time-saver. However, it also means that the same velocity mistake is in both regions.