| The next step in building the podcast is to enhance it with artwork and markers. When you add episode artwork to a podcast, the artwork appears when you play the podcast episode in iTunes and when you work with it in iWeb. Artwork added to the Podcast Track creates a marker region the same length as the artwork in the Podcast Track. Marker regions are used in podcasts to literally mark a specific region in the Timeline to include artwork, a chapter title, or a URL. When you publish your podcast, iWeb or other software will use these marker regions to include the designated information for that region in the project. You can edit, move, and resize marker regions anytime while creating your podcast project. You can also add and edit chapter title markers and URL markers to the Podcast Track. In addition to the artwork used as marker regions in the Podcast Track, you can also designate the episode artwork in the editor. The episode artwork appears in the Podcast Preview pane whenever there is no artwork for the current marker region. Adding Artwork to the Media Browser The artwork you'll be using for this project is in the Photos for GarageBand folder inside the GarageBand 3 Lessons folder on your Desktop. You can add artwork folders to the Media Browser in the same way you added your projects folder earlier in this lesson. The difference is that you need to place podcast artwork in the Photos pane of the Media Browser. 1. | In the Media Browser, click the Photos button to show the Photos pane.
If you recall, this is the default Media Browser pane when you create a new podcast episode in GarageBand.
| 2. | In the Dock, click the Finder icon to open the Finder window. Locate the GarageBand 3 Lessons folder on your computer's Desktop.
| | | 3. | In the Finder, open the GarageBand 3 Lessons folder and select the Photos for GarageBand folder. Drag it to the Photos pane of the Media Browser. Return to GarageBand.
The Photos for GarageBand folder appears in the browser.
| 4. | Click the disclosure triangle at the left of the Photos for GarageBand folder to view the folder's contents, if they are not already showing
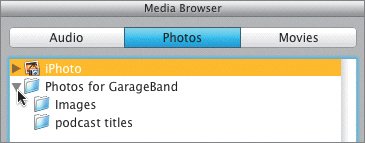 You'll see that it contains two folders: Images and podcast titles.
| 5. | Press Return to move the playhead to the beginning of the project.
| 6. | Choose Track > Show Podcast Track to show the Podcast Track in the Timeline.
The Podcast Track appears at the top of the Timeline, above the other tracks.
| 7. | Select the Podcast Track to see it in the Track Info pane.
The Podcast Track is where you can view and edit marker regions for a podcast episode.
|
Adding Episode Artwork to the Project Episode artwork represents the entire projectlike a movie poster or CD cover. People will see it when they choose your podcast to download or preview. The project can only have one piece of episode artwork. Let's take a moment and assign a file as the episode artwork for this podcast. 1. | Press Cmd-E to show the editor.
The editor appears for the Podcast Track. The Episode Artwork well on the side of the editor is currently empty. The marker area of the editor shows the marker regions and artwork already added to the Podcast Track.
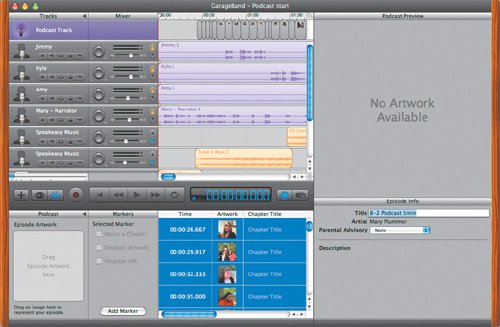 The Podcast Preview pane shows that no artwork is available, because the playhead is at the beginning of the project where there is no artwork in the Podcast Track. The Podcast Preview pane shows that no artwork is available, because the playhead is at the beginning of the project where there is no artwork in the Podcast Track.
| 2. | Press Cmd-R to show the Media Browser.
| | | 3. | In the upper pane of the Media Browser, select the podcast titles folder located inside the Photos for GarageBand folder.
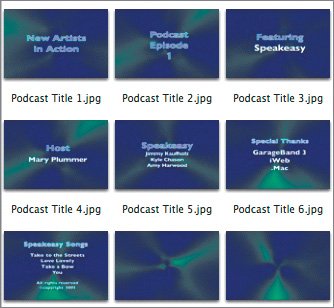 These titles were created in Motion. You can create title stills in virtually any graphics program, such as the iWorks applications. As long as the files are QuickTime-compatible, you'll be able to include them as podcast artwork.
| 4. | Select the file Podcast Title 1.jpg and drag it to the Episode Artwork well in the editor.
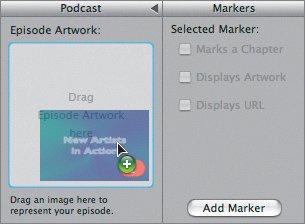 The episode artwork appears in the editor.
| | | 5. | Press Cmd-I to show the Track Info pane.
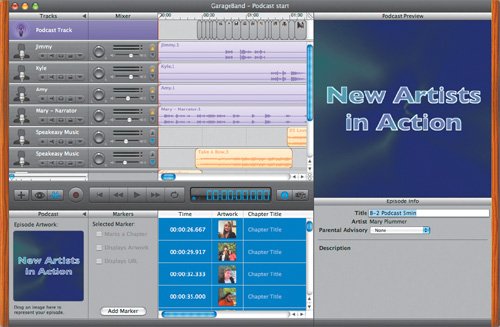 The episode artwork appears in the Podcast Preview pane because there is no other artwork in the playhead position of the Podcast Track. The episode artwork appears in the Podcast Preview pane because there is no other artwork in the playhead position of the Podcast Track.
What if you change your mind after you've added episode artwork? You can drag the artwork from the well, and it will vanish in a puff of smokereally. Or just add another piece of artwork to the well to replace the original.
| 6. | Drag the episode artwork out of the well and release the mouse.
Poofthe well is empty again. You'll add another piece of artwork later in the lesson.
|
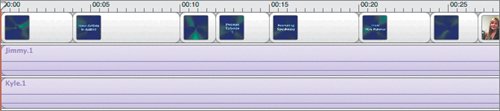
Adding Artwork to the Podcast Track Since you already have the titles showing in the Media Browser, let's go ahead and build the opening title sequence and create marker regions as we go. The opening title sequence will include images that go with the SpaceBass theme song for the podcast. Let's zoom in to the Timeline for a larger view of the Podcast Track as you add the artwork. 1. | Press Cmd-E to hide the editor.
Notice the empty space in the first 26 seconds of the Podcast Track. You'll fill that space momentarily with a marker region.
| 2. | Press Ctrl-right arrow several times until the ruler shows 10-second increments instead of 30-second increments.
 | 3. | Click the empty space at the beginning of the Podcast Track to deselect all of the marker regions within that track.
If marker regions are selected when you add new artwork to the Podcast Track, the new artwork may replace the first selected marker region, instead of creating a new marker region.
| | | 4. | Press Cmd-R, or click the Media Browser button, to show the Media Browser.
If you add artwork to the beginning of an empty space in the Podcast Track, it will automatically fill the space.
| 5. | Drag one of the Podcast Title blank files from the Media Browser to the beginning of the Podcast Track in the Timeline and release the mouse.
 A marker region appears and fills the empty space at the beginning of the Podcast Track. The new marker region shows Podcast Title blank as the artwork for the region. A marker region appears and fills the empty space at the beginning of the Podcast Track. The new marker region shows Podcast Title blank as the artwork for the region.
Note If you released the artwork too far to the left or right, it will not start at the very beginning of the track. Simply drag the beginning of the marker region toward the left until it extends to the beginning of the track. | 6. | Press Cmd-I to see the artwork for the current playhead position in the Podcast Preview pane.
| 7. | Play the project from the beginning to see the artwork in the Podcast Preview pane.
What do you think of the title sequence so far? It's a start but still a little boring. Some art is better than no art, but it could use more titles and a little something to lead into the first title. Keep in mind, there is nothing wrong with having one long piece of artwork at the beginning of a pod-cast. However, in this case, since there is more artwork available, we'll use it. Let's add Podcast Title 1 to the Podcast Track. When you add a new piece of artwork, it won't replace the entire existing artwork. Instead, it will split the original and replace the marker region from the position you release the artwork to the next marker region.
| | | 8. | Select the first marker region in the Podcast Track, if it is not already selected. Press Return to move the playhead to the beginning of the Timeline.
| 9. | Press Ctrl-left arrow to zoom out of the Timeline one level until you can see the entire first marker region in the Podcast Track.
| 10. | Press Cmd-R to show the Media Browser. Then select the Podcast Title 1 file and drag it to the middle of the first marker in the Podcast Track.
 The marker region splits in two, with the Podcast Title blank region first and the Podcast Title 1 region second.
| 11. | Press Cmd-I to show the Track Info pane and Podcast Preview pane.
| 12. | Watch the beginning of the project and listen to the audio.
Any thoughts? I think it would be much better if the "New Artists in Action" title actually appeared when the narrator says, "Welcome to New Artists in Action." No problem.
|
Editing Marker Regions Your goal in this exercise is to change the timing of the second marker region to match the narration. The first thing you need to do is find the narrator's waveform and visually identify where the first line of narration begins. 1. | Locate the Mary Narrator region in the Mary Narrator track. (Yes, it's me. I couldn't find anyone else to narrate this project in time.)
| | | 2. | Press Ctrl-right arrow to zoom in one level for a closer view of the waveform and Timeline.
 | 3. | Move the playhead to the beginning of the waveform in the Mary Narrator region (00:00:04).
| 4. | In the Podcast Track, drag the beginning of the second marker region left to the playhead position.
 When you release the mouse, the second marker region begins at four seconds, and the first marker region with the blank title artwork fills the first four seconds of the project, before the narrator speaks. When you release the mouse, the second marker region begins at four seconds, and the first marker region with the blank title artwork fills the first four seconds of the project, before the narrator speaks.
|
Finishing the Title Sequence Now that you understand how to add artwork and edit the marker regions, let's finish the title sequence. You'll use the narrator's voice and the SpaceBass music as a guide for placing the remaining artwork. Once you have the artwork in place, you can always trim or adjust the marker regions to improve the timing. 1. | Move the playhead to 00:00:10 in the Timeline, around the beginning of the first pause in narration.
| 2. | Drag one of the Podcast Title blank images from the Media Browser to the playhead position in the Podcast Track.
| | | 3. | Press Cmd-I to see the Podcast Preview pane. Play the first part of the project to see and hear the timing of the artwork to the audio.
The music plays a little synth riff during the pause in the narration that works well with the blank title background.
| 4. | Press Cmd-R to show the Media Browser. Then move the playhead to
00:00:12 in the Timeline and drag Podcast Title 2 from the Media Browser to the playhead position in the Podcast Track.
| 5. | Move the playhead to 00:00:15 and add Podcast Title 3 to the playhead position.
| 6. | Move the playhead to 00:00:20 and add Podcast Title 4 to the playhead position.
| 7. | Move the playhead to 00:00:24 and add one of the Podcast Title blank images to the playhead position.
 | 8. | Press Cmd-I to see the Podcast Preview pane, then play the title sequence.
| 9. | Save your progress.
Tip Including blank backgrounds with title images gives you more editing flexibility as you build your podcasts. The blank backgrounds make an interesting transition at the beginning and end of the sequence, as well as between titles and the main project artwork. |
Good job. You've completed the title sequence. Viewing Marker Information You can see more information about a project's markers, artwork, and marker regions in the editor. You can also select markers and change or update their information. 1. | Press Cmd-E to open the editor.
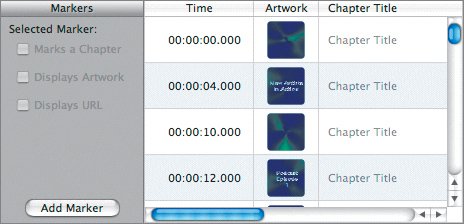 The marker regions are listed in chronological order from the beginning of the project. The editor includes columns that show Time, Artwork, Chapter Title, URL Title, and URL for each marker.
| 2. | Drag the vertical scroller to scroll down through all of the project's markers.
As you can see, there is a title sequence at the end of the project similar to the one at the beginning.
The checkboxes in the Markers area of the editor show how the marker will be designated. Adding artwork to a marker region automatically selects the Displays Artwork checkbox for that marker. You'll work with chapter title markers in the next lesson.
|
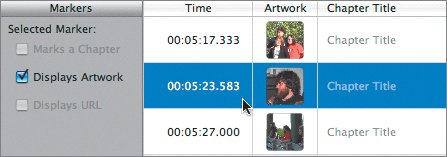
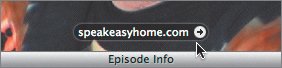
Adding a URL to a Marker You can add a URL (Web site address) to a marker region in a podcast or a marker in a movie and view the URL when you play the movie or podcast in iTunes. Not only will viewers see the URL when they play the finished project, but they can also click the URL onscreen to open the Web page in their browsers. If you add a URL title, the title appears in the Album Artwork window of iTunes (in a published podcast) and clicking it opens the Web page for the URL. An example of a URL title might be "For More Information," or "Check out our Web site." Let's add a URL title and link to the end of the project. You'll add the URL to an existing marker region. To get there, you could navigate in the Timeline or simply double-click the marker in the editor. 1. | In the editor, locate the marker that begins at 00:05:23.583. Then double-click any blank area on the marker's row in the marker list to jump to the marker's location in the Timeline.
 The playhead jumps to the marker's location in the Timeline.
| 2. | Press the spacebar to play the project from the playhead position.
The dialog content includes Jimmy saying the band's URL address.
| 3. | Press Cmd-I to hide the Track Info pane so you can see all of the marker info columns in the editor.
| 4. | For the selected marker, click the URL Title field. Type speakeasyhome.com and press Return.
 | | | 5. | For the selected marker, click the URL field. Type www.speakeasyhome.com and press Return.
GarageBand will automatically add the http:// to the address.
Notice the checkmark for the Displays URL option after you add a URL to the marker.
 URL also appears on the marker region in the Podcast Track to show that the marker includes a URL. URL also appears on the marker region in the Podcast Track to show that the marker includes a URL.
 | 6. | Press Cmd-I to show the Track Info pane. Play the marker to see the URL title appear in the Podcast Preview pane.
 Feel free to click the URL title in the Podcast Preview pane to open the Web page. If your computer is not currently connected to the Internet, your browser will try to open the page and then tell you that you're not connected.
|
Project Tasks The URL title and link you added works great. But it's not onscreen very long. To give viewers enough time to see and click the URL, let's add the same information to the next marker as well. Select the marker region that starts at 00:05:27.000 and add the same URL title and URL as you did in the previous marker. You can retype the information in each field, or copy and paste the information from a field in one marker to the same field in another. When you are finished, save your progress. Using Marker Artwork for Episode Artwork While you are in the editor, this is a good time to pick a new image for the episode artwork. Earlier you used the title of the show, but it didn't really say much about the content. Instead, let's choose one of the pictures of the band to use as the episode artwork. You could look through all of the images in the Media Browser or simply drag one of the images from the Artwork column in the editor to the Episode Artwork well. 1. | In the editor, locate the marker that starts at 00:05:17.333.
| 2. | Select the artwork image for the marker and drag it to the Episode Artwork well.
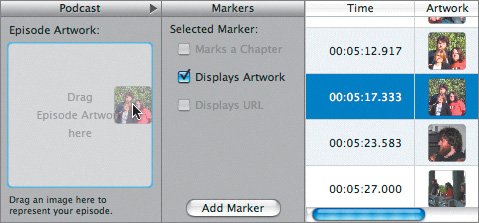 It's that easy. In fact, you can replace the image in the Episode Artwork well anytime by simply dragging another image to the well.
|
Resizing and Cropping Artwork GarageBand includes a handy Artwork Editor you can use to resize and crop your artwork to show all or part of the original image. To access the Artwork Editor, double-click the artwork in the project. 1. | Double-click the artwork in the Episode Artwork well.
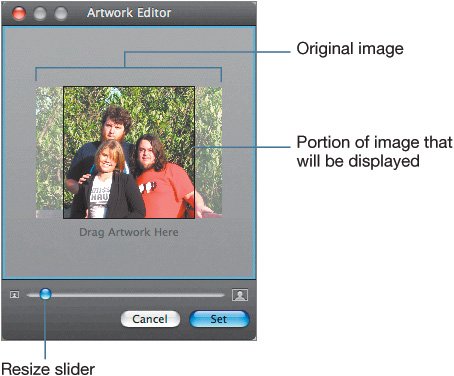 The Artwork Editor opens with the artwork. The square frame represents what will be displayed in your podcast.
| 2. | Drag the Resize slider toward the right to zoom in on the image until all three heads and shoulders just fit within the black square frame.
 | | | 3. | Drag the image left or right within the editor until you're happy with the framing of the image.
| 4. | Click the Set button to set the changes to the image. Close the Artwork Editor.
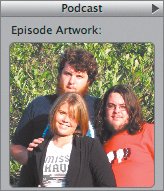 The episode artwork updates according to the changes you made in the Artwork Editor.
|
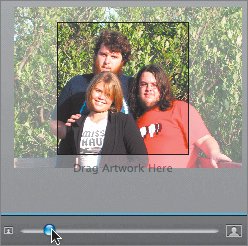
Project Tasks Now it's your turn to use the Artwork Editor to fix an artwork image in the podcast. Play the first minute or so of the podcast. The image at 00:00:40:0000 shows Amy's back, but it doesn't include the other two band members. In the Timeline, click the marker region to open it in the editor (double-click if the editor is not already open). In the editor, double-click the artwork for the selected marker to open the Artwork Editor and resize the image until you can see all three members of the band in the image. When you're finished, save your progress. |