Recording and Saving a Real Instrument Part
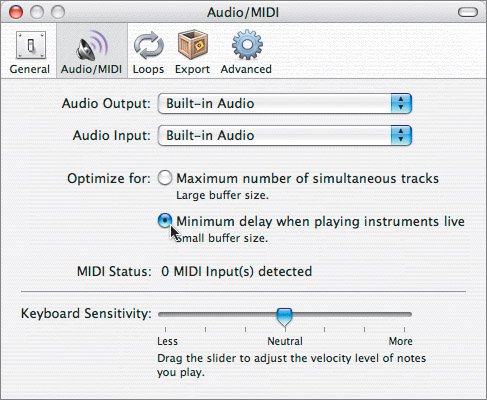
| Before you start recording, there are some recording techniques to consider. Should you record the entire song in one take, or break the instrument part into smaller pieces? I think the answer depends on the musician. If there is a song you have played so many times you don't even have to think to play it, feel free to record it in one long and perfect take. Some musicians record multiple takes of a whole song, then edit together the best parts from each take into a master track that becomes the final song. If playing the entire song flawlessly is unlikely, it is very easy to record smaller sections, then put them all together in the Timeline. Most songs in the world of music recording are recorded in smaller pieces, then arranged together to form the final master track. You can also record punch-ins to replace a specific part of a song if necessary. Let's start with the basicsrecording a short musical part, also known as a riff. Note The following recording exercise uses a guitar as an example. However, you are welcome to record whatever instrument you have available. Setting Up Your InstrumentTake a moment to set up your guitar, keyboard, bass, microphone, or whatever instrument you want to use for the recording exercise. If you don't have an instrument, and your computer has a built-in microphone, you can record finger snaps, or you can whistle. If you don't have an instrument or a microphone, read through the following steps anyway to get a sense of how recording a Real Instrument works. If you do have an instrument, play a riff on it now. Do you hear a delay between when you play and when you hear the sound? Depending on the audio hardware and computer you are using, there may be a slight delay when playing and recording Real Instruments. The short amount of time the Real Instrument input takes to reach the computer's input port and be processed is referred to as latency. You may not be able to eliminate latency completely, but you can reduce the amount of latency in the GarageBand Preferences. Let's take a look at the Preferences setting to reduce latency.
Recording a Short TakeSince the track you are about to record has no effects applied to it, the sound of whatever instrument you record will not be altered. You will learn to add effects to the tracks later.
That's it! You've recorded an instrument part into GarageBand. Project TasksNow that you've successfully recorded one part, why not try another? Create a new track in the same project and record another part to go along with the first piece you recorded. Don't forget to mute the other tracks before you record if you're not playing along with them. Listen to the finished recording and save your progress when you are finished. Recording a Long TakeThere is nothing wrong with recording the entire songor even a long part of the song, such as the first halfin one take. If you can play it, by all means record it. This method is also fantastic for recording song ideas. If you have a melody, lyrics, or instrumental parts floating around in your head, I strongly encourage you to sit down right away and record it. Who cares if it's a rough draft and full of mistakes? The important thing is to document it so you won't forget the subtle creative nuances of the idea while it's fresh. The human brain isn't the most reliable storage medium. Instead of carrying 50 songs around in your head, trying to remember all of them, commit them to your computer instead. You can always delete them or finish them later. Another thing to remember about recording one long take is that you can always punch in and record over, or rerecord any mistakes you make along the way. |
EAN: 2147483647
Pages: 134
