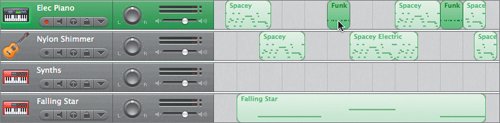
| Now that you understand working with Software Instruments and basic arrangement, let's take this project to the next level by using some advanced techniques as you finish the song. Doubling a Track with Mixed Instruments One easy method to enhance the melody arrangement in a song is to double (duplicate) the melody track, then change the instrument on the duplicate track to reinforce the original track. As you know, with Software Instruments, changing a track's instrument is very easy. All you have to do is figure out what instrument you'd like to change to. In this case, let's double the Elec Piano track containing the electric piano regions, and change the duplicate to a nylon guitar. In the previous lesson you turned a piano recording into a guitar, so you already know that those types of instruments are pretty interchangeable. There are four ways to double the Elec Piano track to create a Nylon Guitar track that reinforces the electric piano part: Select the Elec Piano track, then choose Track > Duplicate Track, or press Cmd-D. Change the duplicate track's instrument. Then Option-drag, or copy and paste, the regions from the original track to the duplicate. Create a new Software Instrument track, make the track instrument Nylon Guitar, and duplicate the regions from the Elec Piano track into the new track. Create a new Software Instrument track, make the new track Synths > Electric Piano, duplicate the region from the original Synths track to the new track, and change the original track to Nylon Guitar. Drag the Spacey Electric Piano 01 loop from the browser to the empty space below the lowest track to create a new Software Instrument Synths track. Change one of the two Synths tracks to Nylon Guitar.
Since you've been working with Option-drag in this lesson, let's try the first method and put your new skills to use. 1. | Select the Elec Piano track containing the electric piano regions.
 | 2. | Press Cmd-D to duplicate the selected track.
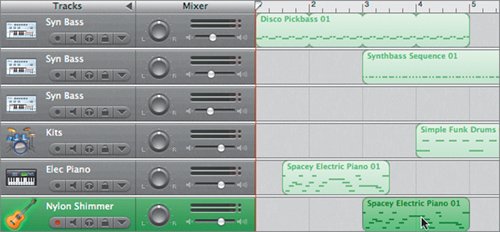
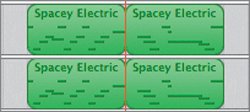
A new Elec Piano track appears below the original Elec Piano track in the Timeline.
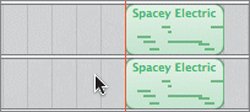
| 3. | Click the track header on the original Elec Piano track to select all of the regions inside the track. Then Option-drag the selected regions from the original Elec Piano track to the new duplicate track below.
 | 4. | Double-click the duplicate Elec Piano track header to open the Track Info pane.
| | | 5. | Select Guitars > Nylon Shimmer as the track instrument.
 An alert appears, telling you that you have made changes to the current instrument setting.
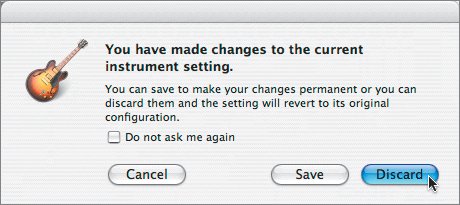 You can choose to save the current track settings before changing them to the new instrument, or discard the changes and use the new instrument sound in the track without saving the original first.
| 6. | Click Discard to discard the Elec Piano settings, and change the track directly to the Nylon Shimmer instrument.
The track name changes to Nylon Shimmer.
| 7. | Press Cmd-I to close the Track Info pane.
| 8. | Play the first half of the project to hear the doubled tracks.
| 9. | Press Cmd-S to save your progress.
|
Doubling a track is an advanced arranging technique that is used to make a musical part stronger. Doubling is also called fattening a track. Offsetting Parts in the Timeline Now that you've doubled the melody parts, you can apply another advanced arranging technique to offset the parts to create an overlap or "call and answer" effect. Offsetting the different parts within the Elec Piano and Nylon Shimmer tracks at the beginning and end of the song will really separate the parts, enhance the fact that they are two different instruments, and make the song a bit more interesting. Offsetting just means trimming or moving the regions so they don't always start and end at exactly the same time. What really makes the difference is if one region starts, then a similar region begins after an interval. For this exercise, you'll apply some of the editing and arranging techniques that you've learned to adjust the part. To start, let's shorten the first electric piano region in the Elec Piano track and move it so it starts a little earlier. 1. | Shorten the first region in the Elec Piano track (drag from the right edge) until it is only one loop segment in length.
 | 2. | Zoom in one level to the Timeline if needed until you can see the beat ticks in the Beat Ruler between measures.
| 3. | Drag the first region in the Elec Piano track to the left until it starts at the 3rd beat of the 1st measure (halfway between bar 1 and bar 2).
 | | | 4. | Shorten the first region in the Nylon Shimmer track so it is only one loop segment in length, then move it to the right so that it begins at the 3rd measure.
 | 5. | Play the beginning of the project to hear the offset regions.
This technique can really make a big difference in the overall sound of a piece. Not to mention it is much more interesting than just hearing the same old loop over and over.
| 6. | Press Cmd-S to save your progress.
|
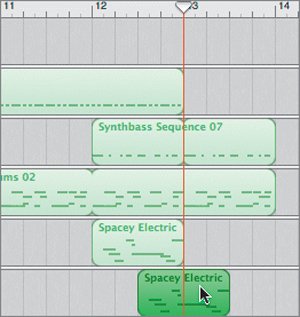
Project Tasks It's your turn once again to put your new skills to work and finish arranging the melody tracks of the song. First, shorten the middle region on the Elec Piano track so it is only one loop segment in length. Then move the region to the right so it starts at bar 9. (You can either shorten it and move it, or split the region in the middle and simply delete the first half.) Shorten the Nylon Shimmer track's middle region so it is only one and one-half loop segments in length. There's no need to change its position, just its length. It should start at bar 7 and end at bar 10. Be sure to save your progress once you finish the steps.  Splitting Multiple Regions Your goal for the electric piano regions at the end of the melody tracks is to split them both in half, simultaneously, then offset the last halves of the regions. Why split instead of resize? Because you can only resize from the right side of a loop. If the right side (end) of the loop is the part you want to keep, you'll need to cut off (split) the first part that you don't want and delete it. 1. | Move the playhead to bar 13 (13th measure).
| 2. | Click the last region in the Elec Piano track to select it.
| 3. | Shift-click the last region in the Nylon Shimmer track to select it also.
 | | | 4. | Press Cmd-T to split the selected regions at the playhead position.
 | 5. | Delete the first half of the split section on both tracks.
 | 6. | Drag the last region in the Elec Piano track to the left so it starts at bar 12.
| 7. | Drag the last region in the Nylon Shimmer track so it starts at the 3rd beat of the 12th measure (halfway between the 12th and 13th measures).
 | 8. | Play the end of the song to hear the ending arrangement.
| 9. | Save your progress.
|
Moving Regions Between Tracks The new arrangement sounds good. Of course, now there's something new that bothers me. The Funky Pop regions in the lower Synths track stand out a bit too much, probably because they are an entirely different instrument. If only you could make them sound like the Spacey Electric Piano parts in the Elec Piano track. Because these are Software Instrument tracks, it is easy to drag the Funky Pop regions from their original track to the same position on the Elec Piano track. That instantly changes their instrument to the electric piano sound, but keeps intact the notation that is already in the region. 1. | Select the first Funky Pop region in the Elec Piano track, then Shift-click the second region to select them both.
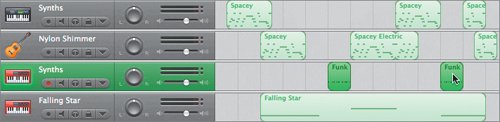 | 2. | Drag the selected regions upward to the same position on the Elec Piano track.
 | | | 3. | Select the empty Synths track near the bottom of the Timeline and press Cmd-Delete.
The empty track is deleted.
| 4. | Play the entire piece to hear the full arrangement.
| 5. | Press Shift-Cmd-S and rename the project SpaceBass arranged.
Note If you didn't complete any of the previous exercises, feel free to open the project 4-3 SpaceBass arranged to catch up. Once you open the catch-up project, resave it to the My GarageBand Projects folder on your Desktop. |
Transposing a Region in the Editor You know how to change a single note by clicking it and dragging it up or down in the editor. You can change all of the notes in the region at once by changing the pitch of the region. The musical term for changing the pitch or key is transposing. Remember, there are only 12 different keys (black and white) before a note repeats an octave higher or lower. Each key represents a semitone. To transpose a region by 12 semitones would be to lower the entire thing one full octave. To transpose a region by 12 would be to raise the entire region to a higher octave. Anything other than a full octave will change each note in the region to a different key, either higher or lower. Software Instrument regions can be transposed up to 36 semitones (three full octaves) higher or lower. Let's transpose some of the doubled parts to add even more depth to the piece. Transposing is also a great advanced technique for making parts less repetitive. For this exercise, you'll transpose two of the regions in the Nylon Shimmer track. 1. | Double-click the middle region in the Nylon Shimmer track to open it in the editor.
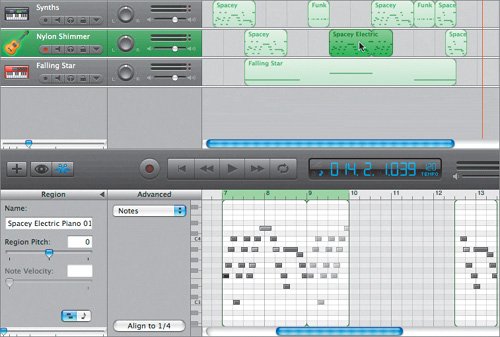 A green shaded area appears above the selected region in the editor's Beat Ruler. A green shaded area appears above the selected region in the editor's Beat Ruler.
| 2. | Locate the Region Pitch slider at the left side of the editor.
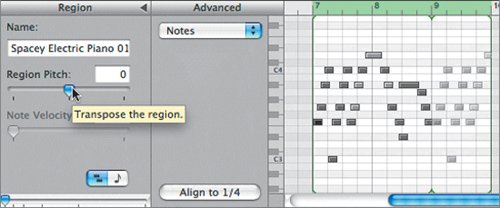 The current Transpose setting is 0, which indicates the region is in the original recorded key. The current Transpose setting is 0, which indicates the region is in the original recorded key.
| | | 3. | Type 12 in the Transpose field and press Return to raise the entire part by one octave.
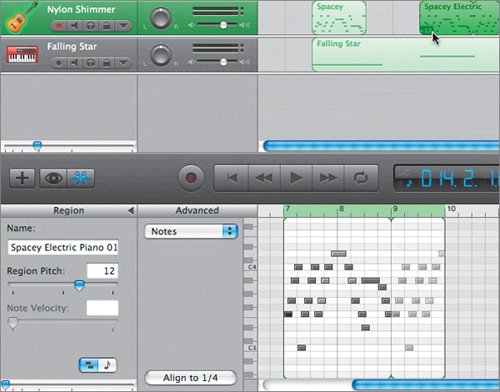 Notice that the selected region in the Timeline has a small +12 in the lower-left corner to indicate that it has been transposed by +12 semitones. Notice that the selected region in the Timeline has a small +12 in the lower-left corner to indicate that it has been transposed by +12 semitones.
| 4. | Play the region in the editor to hear it at the higher octave.
| 5. | Type 5 in the Transpose field and press Return, or drag the Region Pitch slider to transpose the region by five semitones higher than the original recording.
The transposed region has a small +5 in the lower-left corner to show that the pitch has been raised by 5 keys.
| 6. | Play the transposed region in the Timeline.
Nice. Simply transposing it by 5 semitones makes it feel like a different part even if it looks exactly the same as it did before you transposed it. Transposing changes the sound of a region without changing the note events in the region.
| | | 7. | Select the last region in the Nylon Shimmer track and transpose it by 12 (one full octave lower).
| 8. | Play the end of the song to hear the transposed region in context with the end of the song.
| 9. | Close the editor and save your progress.
|
What do you think of the transposed regions? They really add a nice variation to the melody. The only downside is the Nylon Guitar parts seem much quieter than the Synths parts. Doubling a Track to Fatten the Sound You've doubled (fattened) the melody tracks to change track instruments, arrange regions, and create an interesting sound. Another reason to double a track is simply to double up the sound of a particular part to make it stronger. You can raise the volume level of a track, but there are limits to how loud you can raise the level. Audio is cumulative, so doubling the same part on two separate tracks will enhance the levels and also make it stand out more. 1. | Select the Nylon Shimmer track and press Cmd-D to duplicate the track.
| 2. | Click the original Nylon Shimmer track header to select the regions inside if they are not already selected.
| 3. | Option-drag the selected regions from the original Nylon Shimmer track to the same positions on the duplicate track.
 | | | 4. | Play the song with the fattened Nylon Shimmer tracks.
Can you hear the difference? The guitar sound is much fatter than it was before you doubled it.
| 5. | Save your progress.
|
|