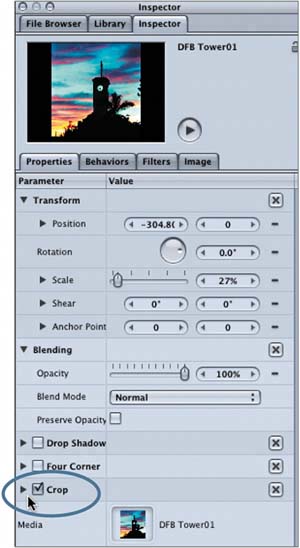
Cropping Objects in the Inspector


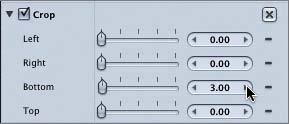
If you're working with paper photographs in the physical world, you can use a paper cutter to clean up the edges of a photo. When you're working with digital photography, you can use the Crop tool or the Crop parameters on the Properties tab of the Inspector.

Let's start with the Left object on the Top sublayer shot and crop the lower edge to clean it up. First, you'll need to select the Left object on the Layers tab or in the Canvas. Let's Cmd-click the object in the Canvas to select it.

1.

In the Canvas, Cmd-click the Left object on the Top sublayer to select it.

2.

Press Cmd-3 to open the Inspector, or click the Inspector tab in the Utility window.

The Crop parameters are toward the bottom of the Parameter list on the Properties tab.

NOTE

The image in the Preview area does not show the lower edge of the image that you need to crop. Often you won't see small imperfections around the edges of an image until it is in the Canvas.

3.

Check the box next to Crop to turn on the Crop parameter.

4.

Click the disclosure triangle for the Crop parameter to view the four Crop parameters.

The Crop parameters are Left, Right, Bottom, and Top.

NOTE

The Crop check box must be checked for you to modify the Crop parameters.

5.

In the Bottom Crop parameter's value field, click the right incremental arrow three times, or type 3 in the field and press Return.

If you click the incremental arrow, you will see the crop changes in the Canvas as you click.

You have just cropped three rows of pixels from the bottom of the DFB Tower01 object. The blue line is now gone from the image.

Before crop

After crop

The Left Center object (South Korea 505) on the Top sublayer is taller than the other objects in the same row. Let's crop the top and bottom of the object until it matches the height of the others.

6.

On the Canvas, Cmd-click the Left Center object on the Top sublayer.

7.

Crop the bottom of the South Korea 505 object by 37 rows of pixels and the top by 35.

The last object to crop is the Left Center object on the Bottom sublayer.

8.

Cmd-click the Left Center object (Castle) on the Bottom sublayer in the Canvas.

9.

Crop the bottom and top of the Castle object until it visually matches the height of the other objects in the same group (14 rows of pixels).

You've finished the cropping; now you need to fix the alignment of the Right object in the bottom row.

10.

On the Layers tab, select the Right object on the Bottom sublayer, which is the Sunset object.

You can use the Dynamic Guides to align the Right object in the bottom row with the Right object in the top row.

11.

Drag the Sunset object to the right in the Canvas until the Dynamic Guides show that it is even with the other objects in the Bottom sublayer, and the left edge is aligned with the left edge of the object above it in the Top sublayer.

12.

Press Cmd-S to save your progress.


    Apple Pro Training Series Getting Started with Motion
    Apple Pro Training Series: Getting Started With Motion
    ISBN: 0321305337
    EAN: 2147483647
    Year: 2005
    Pages: 283
    Authors: Mary Plummer

    flylib.com © 2008-2017.
    If you may any questions please contact us: flylib@qtcs.net