| Another really exciting feature of Motion is the ability to add behaviors to your project elements. Behaviors allow you to animate objects using simple, graphical controls. You'll be working with many different behaviors throughout the course of this book. For this exercise, you'll apply two different behaviors from the Library. Before you add a behavior to an object, it's a really good idea to have a goal. If you know what you want to accomplish, it's much easier to choose the right behaviors for the job. Your goal in this exercise is to have the yellow circle enter the frame on the right, move across the screen toward the left, bounce off the left edge of the frame, and exit the screen frame right. It's also a good idea to apply behaviors while the playhead is moving, so let's change the play range for the entire duration of the yellow circle's onscreen debut. For this project, the yellow circle should be visible on the screen for the first 4 seconds. That means you should change the play range for the yellow circle's performance so that it ends at 4 seconds. Dragging the Play Range Points Let's move the play range Out point to 4;00. To do this, as you learned earlier in this lesson, you can move the playhead to 4 seconds and then press Option-Cmd-O. You can also drag the play range Out point to move it. When you drag the play range In or Out point, you will see a small yellow display that shows you the new current frame for the In or Out point. Since you haven't tried that method yet, this is a good time to test it out. 1. | Click the play range Out point and drag toward the right.
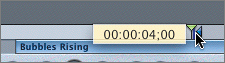
A yellow dialog window appears to show the changing timecode of the play range Out point.
| 2. | Drag the play range Out point until the window shows that the timecode is 4;00.
| 3. | Press Shift-Cmd-A to deselect all of the objects in the project.
The mini-Timeline shows only the play range points.
| 4. | Press the spacebar to play the project.
Now you're ready to animate the yellow circle.
|
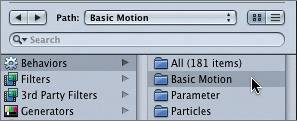
Previewing a Behavior in the Library The icon for behaviors in Motion is a gear, because behaviors represent a mechanical part, or movement. The Basic Motion behaviors are located in the Library; these are basic behaviors that are commonly used in motion graphics. Let's go to the Library and find the Basic Motion behaviors. 1. | Click the Library tab, or press Cmd-2, to open the Library pane.
| 2. | Click the Behaviors icon at the top of the upper pane of the Library.
Motion comes with more than 180 premade behaviors that are organized into categories.
| 3. | Click the Basic Motion behaviors folder in the right column of the upper pane.
Remember your goal: to make the yellow circle move across the screen. Behaviors have simple names to make it easy to understand what they do. To move an object, all you need to do is throw it.
| 4. | Click the Throw behavior to view it in the preview area at the top of the Library window.
Throw behavior selected in File Browser 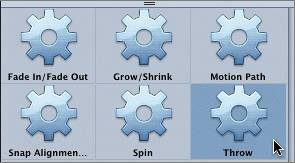
Throw behavior in Preview area 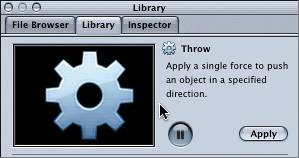
|
Applying a Basic Motion Behavior Now that you've previewed the Throw behavior in the Library, it's time to apply it to the yellow circle. To add a behavior to an object, you simply drag and drop the behavior on the object, or select the behavior and click the Apply button. Let's try the first method and throw the behavior (pun intended) onto the circle. 1. | Press the spacebar to start playback if you stopped it in the last exercise.
| 2. | Click the Circle object to see the bounding box, if it's not already visible.
| 3. | Drag the Throw behavior icon from the Library to the circle in the Canvas; release the mouse.
A purple region named Throw appears in the mini-Timeline. Behaviors and filters are always represented by purple regions in the mini-Timeline.
|
Now that you've added the behavior, you need to show it what to do. Modifying Behaviors in the Dashboard In the old days of motion graphics, we had to plot graphs, calculate motion vectors, and apply more math than creativity to make a simple object move across the screen. Fortunately, those days are over. What once took hours or days to accomplish can now be done in seconds. Not only that, but Motion also does all of the calculating for you. All you need to do is use the graphical interface in the Dashboard to adjust the behaviors. 1. | Press the spacebar to begin playback if your project is not already moving.
| 2. | Press D to open the Dashboard if it is not already open.
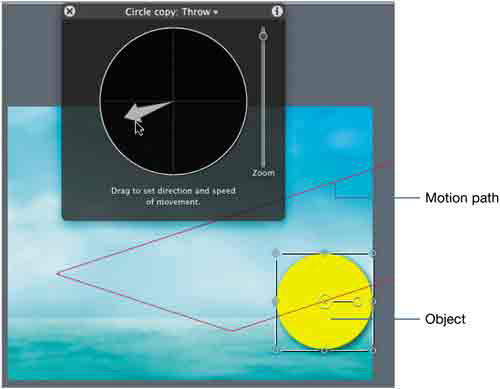
The Throw behavior is represented by a circle in the Dashboard.
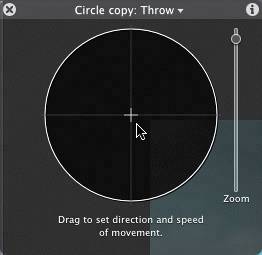
The crosshairs in the center of the circle represent your object. To make the object move, simply click and drag your pointer in the direction you want the object to go. An arrow appears in the direction that you drag the mouse. The longer the arrow, the farther and faster the object will be thrown.
| 3. | Drag toward the lower left of the Throw display in the Dashboard to throw the circle.
Your circle moves toward the lower left of the screen.
NOTE If you wish to extend the arrow longer than the graphical interface allows in the Dashboard, you can adjust the Zoom slider on the right side of the Dashboard. The Zoom slider allows you to zoom into or out of the graphical interface. Dragging the Zoom slider upward zooms out of the interface so that you can extend the arrow the farthest distance. | 4. | Drag the Throw display again to adjust the angle so the circle exits about one-third from the bottom on the left side of the frame.
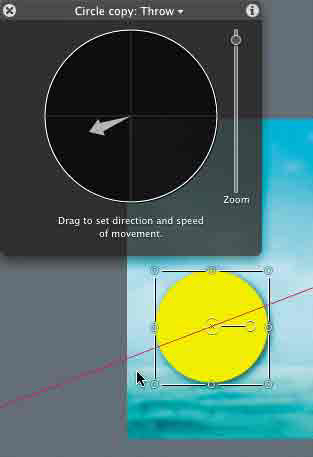
Your circle follows a red line that indicates the motion path that you just added with the Throw behavior.
Keep your playback moving for the next exercise.
|
Working with a Simulation Behavior As you can see, basic behaviors are very easy to apply and adjust. There are also Simulation behaviors that use complex mathematical physics and geometry to simulate acts of nature such as gravity, wind, and orbit. Once again, Motion takes care of the calculations; all you need to do is apply the behavior and adjust it in the Dashboard. To make an object bounce off the edges of the screen, you use a Simulation behavior called Edge Collision. When the yellow circle collides with an edge of the frame, it will bounce off in a different direction. How far it bounces is based on how hard (fast) you throw the object against the edge of the frame. Let's add an Edge Collision behavior so the yellow circle bounces off the left and bottom edges of the screen, sending it back out the way it came in, from frame right. 1. | Click the Simulations folder in the right column of the upper pane in the Library.
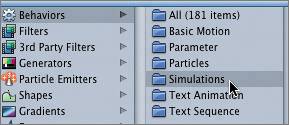
| 2. | Locate the Edge Collision behavior in the lower pane of the Library.
| 3. | Drag the Edge Collision icon from the Library to the moving circle; release the mouse.
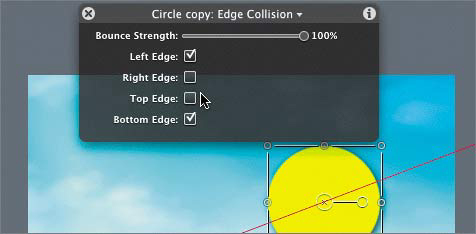
Notice the Edge Collision interface in the Dashboard. Also notice how the motion path bends as the circle bounces off the different edges of the frame.
NOTE Make sure you release the behavior on the yellow circle. If you accidentally drop it on the background, press Cmd-Z to undo and try again. You want the circle to collide off only the left and bottom edges of the frame, so your next step is to set this in the Dashboard.
| 4. | Uncheck the boxes in the Dashboard for the top and right edges to change the motion path created by the Edge Collision behavior.
If your circle is not exiting on the right side of the frame, you may need to adjust the angle and speed of your Throw behavior. You'll do that in the next exercise.
|
Adjusting Behavior Timing in the Dashboard Remember the original goal for these behaviors. You've accomplished part of the mission by throwing the circle against the left edge of the frame and having it bounce off in the other direction. The other part of the goal is to have the circle exit frame right at 4 seconds. Take a moment to watch your project play back and see if the circle is completely out of frame by the time the playhead reaches the end of the play range. If it isn't, you can easily change that by adjusting the throw controls in the Dashboard. 1. | Press the D key to cycle from the Edge Collision behavior to the Throw behavior in the Dashboard.
| 2. | Drag the arrow in the Dashboard toward the edge of the circle display to throw the circle faster.
 Remember: The longer the arrow, the faster and harder you are throwing the object. Remember: The longer the arrow, the faster and harder you are throwing the object.
You can use the red motion path as a guide to see where the circle enters and exits the frame.
| 3. | Adjust the speed of the throw (length of the arrow) until the circle exits completely at the end of the play range.
| 4. | Adjust the angle of the throw to make sure the circle exits on the right side of the frame.
Mission accomplished! You're ready to move on with the rest of the project. First, though, let's hide the motion path.
|
Hiding the Motion Path The red motion path is a visual guide that lets you see the direction and movement of an object. However, it can also be distracting as you try to build your project. To hide the motion path, simply deselect the object that is moving. 1. | Click the empty (gray) space outside the frame to deselect everything in the Canvas.
The circle continues moving, but the motion path and Dashboard disappear.
If you want to see the motion path again, simply click the moving object to select it.
| 2. | Click the yellow circle while it's moving to select it again.
The red motion path appears along with the bounding box around the circle, to show that the circle is selected. A blue region called Circle copy appears in the mini-Timeline.
| 3. | Press Shift-Cmd-A to deselect everything again.
|
Now that you're armed with a basic knowledge of behaviors, let's move on to particles. |