| All we need to do now to finish the project is to add a little color and variety to the leaves and add the behaviors to make the leaves fall. Let's add the behaviors first; then we'll modify the color of the leaf particles. 1. | On the Layers tab, select the Maple Leaf Yellow cell.
| 2. | On the toolbar, click the Add Behavior pop-up menu and choose Simulations > Random Motion.
The Random Motion behavior appears on the Behaviors tab in the Inspector, below the particle cell on the Layers tab, and as a purple region in the mini-Timeline.
Notice that the purple Random Motion region in the mini-Timeline begins at the start of the project. Let's change the In point of the region so that the behavior starts at the playhead position (7 seconds).
| 3. | Press I to change the In point of the region in the mini-Timeline to the playhead position.
 Let's do the same thing with a Gravity behavior. Let's do the same thing with a Gravity behavior.
| 4. | On the toolbar, click the Add Behavior pop-up menu and choose Simulations > Gravity.
| 5. | Press I to change the Gravity behavior In point to the playhead position.
| 6. | Press the spacebar to play the project in the Canvas.
It's working. However, the Gravity behavior isn't quite strong enough to pull the leaves all the way out of the frame. Let's increase the intensity of the Gravity behavior.
| 7. | Press D to open the Gravity Dashboard.
| 8. | In the Gravity Dashboard, drag the Acceleration slider all the way to the right to increase the gravity to the maximum value in the Dashboard (100).

Now the force of gravity pulls the leaves all the way out of the frame.
|
Changing the Color over the Life of the Particles You've added the behaviors, and the leaves are growing and falling. It's time to change the leaves' color so that they start green and slowly turn yellow and then orange at the end of their short particle lives. To make the color change over the life of the particles, all you need to do is change the Color Mode value in the Inspector to Over Life and then set the colors you want in the Gradient Editor. Let's try it. 1. | On the Layers tab, select the Emitter object.
| 2. | Click the Emitter tab in the Inspector to open it.
| 3. | On the Emitter tab, open the Color Mode pop-up menu and choose Over Life.
| 4. | Click the Color Over Life disclosure triangle to view the Gradient Editor.
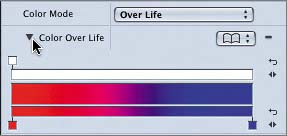
The default colors in the Gradient Editor are red and blue.
| 5. | In the Gradient Editor, click the first color tag (red) to apply the tag's color to the Color well.
| 6. | Click the red Color well below the gradient to open the Colors window.
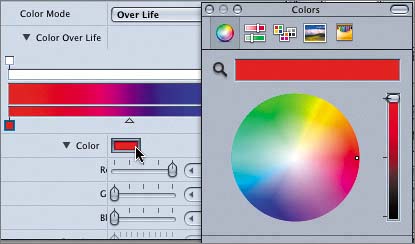
| 7. | In the Colors window, select a nice green color from the color wheel.
The gradient starts with the selected green color.
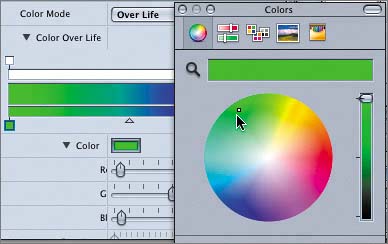
| 8. | Click the blue color tag on the right side of the Gradient Editor to apply the tag's color to the Color well.
The color in the Color well and in the Colors window changes to blue to match the selected color tag.
| 9. | In the Colors window, select a dark orange on the color wheel.
The right side of the gradient changes to orange.
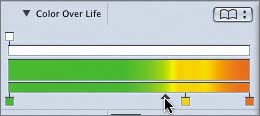
Now let's add a transitional yellow color in the Gradient Editor between the green and the orange to make the transition look more natural.
To add another color tag, you simply click the lower part of the Gradient Editor.
| 10. | Click the lower center of the Gradient Editor to add a new color tag.
| 11. | Click the new color tag to select the color in the Colors window.
| 12. | In the Colors window, select a yellow on the color wheel.
You will need to drag the Brightness slider in the Colors window upward to select a bright yellow color.

The color change works pretty well; however, the leaves need to stay green longer.
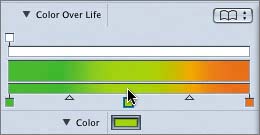
To change the proportions of a particular color in the Gradient Editor, you can drag the color tags and the gradient transition triangles located below the gradient.
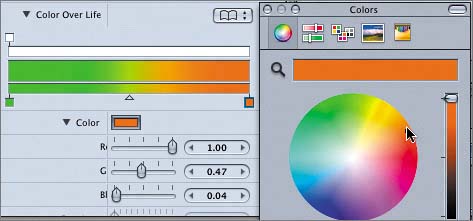
| 13. | Drag the yellow color tag toward the right until the yellow color starts at around the last quarter of the gradient.
Dragging a color tag moves the color to a new location. You can also change where the transition occurs between two colors by dragging the Location control, which looks like a small triangle.
| 14. | Drag the Location control between the green and yellow colors toward the right until the yellow color starts at around the last third of the gradient.
About two-thirds into their life, the leaves change color.
| 15. | Press Cmd-S to save your progress.
|
Adding Variety to the Particles The last step to making this project look more natural is to add a little variety to the size and angle of the leaves. I don't know about you, but I've never seen a tree on which all of the leaves are the exact same size and pointing in the exact same direction. Let's change the Scale Range and Angle Range parameters to make the leaf particles appear more random and natural. 1. | On the Emitter tab in the Inspector, change the Angle Range value to 90.0 so that the angle of the leaf particles is in the range of 90 degrees from the original value.
 The leaf particles now point in a wide range of angles in the Canvas. The leaf particles now point in a wide range of angles in the Canvas.
| 2. | Near the bottom of the Emitter tab, change the Scale Range value to 25 so that the leaves vary in size 25 percent larger and smaller than the original.
| 3. | On the Emitter tab, click the Random Seed Generate button to change the random seed until you find a random leaf pattern that you like.
| 4. | Press Cmd-S to save the finished project.
|
|