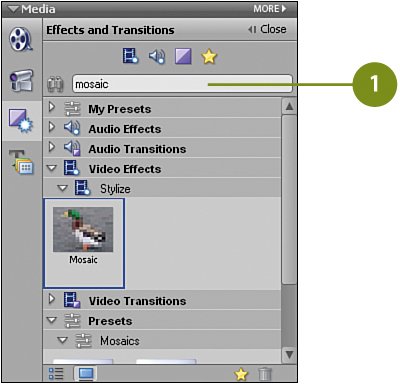
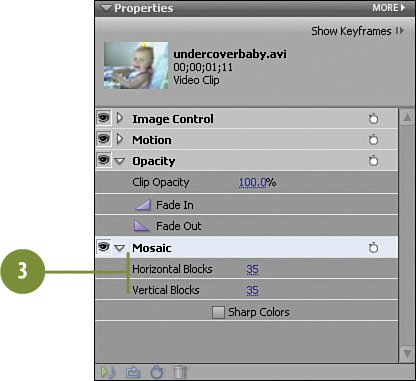
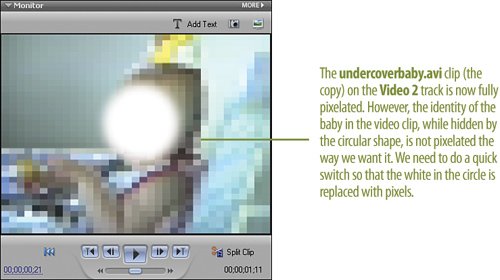
Applying the Mosaic Effect to the Second Clip


With the "hider" now tracking perfectly, we're ready to finish this effect. We next need to apply the Mosaic video effect to the copy of the clip to completely "pixelate" the image there, making unrecognizable anything on that clip. Since all we really need on that clip to be unrecognizable is the area where the ellipse is, we'll follow this up (in the next step) with the Track Matte effect to hide everything in the clip except where the ellipse is.

Apply the Mosaic Video Effect

Find the Mosaic effect in the list of effects by typing mosaic in the text box on the Effects and Transitions panel.

Tip

If the Media panel is not in the Effects and Transitions view, click the Effects and Transitions button to switch to that view.

Select the Mosaic video effect and drag it onto the clip in the Video 2 track on the Timeline.

For the pixelization of the face to look right, we'll need fairly small (but not too small) blocks, or tiles. To adjust the size of the blocks, go to the Properties panel and make the following adjustments:

  • Horizontal Blocks: 25

  • Vertical Blocks: 25

  • Sharp Colors: Leave unchecked

Tip

The size of these blocks is a bit of a personal preference. Make these blocks a bit larger or a bit smaller as you prefer. Keep in mind that too large of a block will loose all facial definition, and too small of a block will end up revealing the identity that's supposed to be hidden.


Hollywood Special Effects with Adobe Premiere Elements 3
ISBN: 0789736128
EAN: 2147483647
Year: 2006
Pages: 274
Authors: Carl Plumer

flylib.com © 2008-2017.
If you may any questions please contact us: flylib@qtcs.net