| Being able to customize the site map is what will allow you to get the most out of this Dreamweaver feature. The map gives you a visual representation of the navigation system and structure of your Web site. This can be very important because Web sites quickly become complex in their navigation structure. The Site Map will always use the index page as the top-level page and display pages linked two levels deep. You can always see additional linked pages by pressing the plus/minus signs. To see the Site Map, press F8 on your keyboard. In the toolbar of the site window or panel press the Show Map button. Notice the button has two choices, to display either the map by itself or the map along side of the files. To get the most use out of the map, I would recommend displaying the map and files. The only downside to the site panel in Windows, is it really doesn't yield enough room to display the map in an appropriate size. Your best bet is to click the expand button in the far right corner of the panel's toolbar, as shown in Figure 3.16. Figure 3.16. After clicking the expand button the site panel transforms into a site window reminiscent of Dreamweaver 4, or the site window on the Macintosh.
The site map offers the ability to change and manipulate files and links. If you want to add or delete links, you can do so in the site map view. You can also manipulate new files this can be handy if you're looking to storyboard the structure of your Web site. TIP You can easily convert the site map into a bitmap file. Inside the Site window/panel, choose File, Save Site Map. Navigate to the location on your computer where you want it to be saved, type in a filename, and choose what type of file you would like to save it as: BMP or PNG. This is perfect if you want to email the map to colleagues. You may want to optimize it first in Fireworks to reduce the file size.
In this exercise you're going to look at how you can link an existing file to a new file. -
Open your site map by pressing F8 on your keyboard. Be sure to display the site map and files by clicking the Site Map button in the toolbar. Notice the site map is now visible. -
Click the index or home page icon of your Web site to highlight it. -
Choose Site, Site Map View, Link to New File. This launches the Link to New File dialog box as shown in Figure 3.17. You can also contextual-click the selected icon and choose Link to New File from the contextual menu. Figure 3.17. The Link to New File dialog box.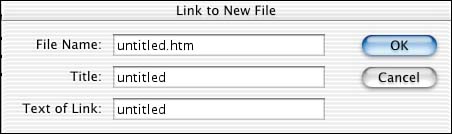
-
Enter in a name for the document with the appropriate extension: HTML, HTM, ASP, and so on. -
Type in a title for the page, which will show up in the title bar of the browser window. -
Enter in a name for the link. This name will be displayed in the document the way you type it here, in the form of a hyperlink. -
After you're happy with the information you typed in, click the OK button or press Return (Mac) or Enter (Windows). A new icon is created in the map with a line connected to the home page, or whatever icon you had selected. Linking to a new file is one way to storyboard, or to start a structure or filing system to a Web site. It can also be good to create new files this way, keeping your navigation clean and intact. You can also do the same thing for existing documents within your Web site. You can follow the steps in the previous exercises, just switching the option from Link to New File to Link to Existing File. You can also follow the steps in the next exercise. In this exercise, you'll look at how you can use a shortcut by displaying both the site files and the site map. Linking documents is as simple as clicking and dragging. -
In the Site window, be sure to display both the site files and the site map. Press F8 on your keyboard to make the site files visible. In the site files drop-down list located in the toolbar, choose Show Map and Files. Make sure, in Windows, that you're working with the expanded, undocked view of the Site panel. -
With both the map and file views visible, select the file icon in the site map that you want to link. Notice a small icon that looks like a riffle scope just above the file icon in the top-right corner. This riffle scope is the point-to-file icon, and it allows you to do just that. -
Click and drag the point-to-file icon and place it on top of the file you want to link to in the site files portion of the window, as shown in Figure 3.18. Figure 3.18. Use the point to-file icon to quickly add links to documents.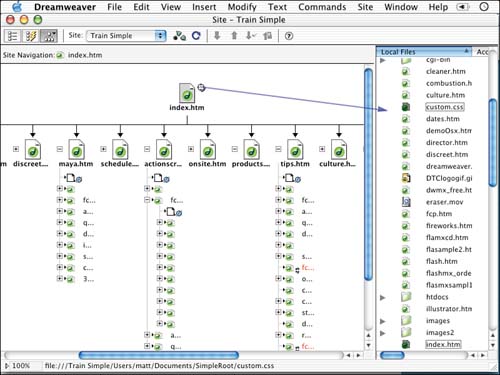
-
Open the document that you dragged the point-to-file icon from in the site map. You'll notice a text hyperlink at the bottom of the page named the same as the file that you linked it to. Modifying Page Titles You can easily modify the titles of documents as well. Just be sure to view the files in the map by title name instead of filename. To show the title name, choose View, Show Page Title, or press Command+Shift+T (Mac) or Ctrl+Shift+T (Windows) to toggle the views. With the title view active, click once to highlight the file, and then click a second time in the text area. This makes the text editable with a blinking cursor. Simply type in the new title for the document. Maintaining Files As with any Web production, moving and renaming files will be a necessity at some point. It is important to follow certain guidelines to preserve site and link integrity. You should make all such changes within the Site window or panel. This ensures that Dreamweaver will make the appropriate adjustments or modifications to any document a link or name change will affect. In contrast, if you make this change outside of the Site window and make the adjustments in Windows Explorer (Windows) or the Finder (Mac), Dreamweaver will not be aware of these changes, resulting in broken hyperlinks. This exercise will show you how to rename files within Dreamweaver. -
Be sure to have the Site window/panel visible. If you can't see the site files, press F8 on your keyboard to open the window/panel. -
Inside the Site window, select a file by clicking in it, and then click a second time on the name of the icon to see a blinking cursor. -
With the blinking cursor in the name of the file, press the Delete (Mac) key or Backspace (Windows) key to remove all the text for that file. Now that the icon does not have a name, type in a new one. Press Return (Mac) or Enter (Windows). -
After pressing Return or Enter, the Update Files dialog box launches, asking you to scan the documents within the site, as displayed in Figure 3.19. After you press Scan, Dreamweaver searches the site for related files. When the scan is complete, the dialog box indicates what files need to be updated in your Web site, as shown in Figure 3.20. Click Update. Figure 3.19. The Update Files dialog box asks to scan the site for related documents.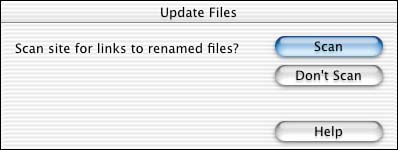
Figure 3.20. The Update dialog box displays files that will be updated.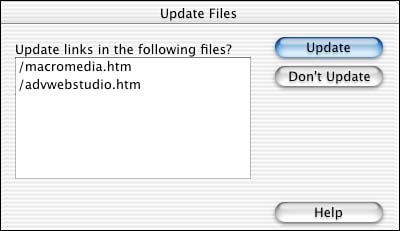
-
Dreamweaver will open each file on the list, make the necessary change, save it, and close it. The Update feature in Dreamweaver proves to be quite the timesaver. Image if you had to make all the changes manually to all the separate documents. |

