| Just as with the ASP server model, you can take advantage of user authentication using ASP.NET. Unlike ASP, the ASP.NET server model offers more robust options when it comes to storing user information. Traditionally with ASP, usernames and passwords are stored in a data store such as an XML file or database. Performing data retrieval from an XML file using the MSXML DOM was tedious at best, providing few other options than to use a database for user validation storage. Although these options are still available using the ASP.NET server model, retrieving and reading XML data is far simpler than traditional methods. Three user authentication methods are available using the ASP.NET server model: Windows Authentication Windows authentication uses IIS in conjunction with operating system-level permissions to allow or deny users access to your Web application. Forms Authentication Offering the most flexibility, forms authentication allows for the most control and customization for the developer. Using forms authentication, you now have the capability to rely on traditional methods of validation (XML file, database, hard-coded) as well as new methods (Web.Config, cookies) or a combination of both. Passport Authentication By far the newest addition to user validation methods, passport authentication is the centralized authentication service provided through the .NET initiative by Microsoft. Because users rely on their MSN or Hotmail emails as their passport, developers need never worry about storing credential information on their own servers. When users log in to a site that has passport authentication enabled, they are redirected to the passport Web site where they enter their passport and password information. After users' information is validated, they are automatically redirected back the original site. Although there are three great authentication methods, we will focus in on one: forms authentication. If you have not done so already, you can download the support files from www.dreamweavermxunleashed.com. Working with Forms Authentication Forms authentication is by far the most popular authentication method because of its flexibility to the user. An advantage of forms authentication lies in the fact that you are able to store usernames and passwords in virtually any data store, such as the Web.Config file, XML file, a database, or a combination of the three. Forms authentication is cookie based. An authentication ticket is stored within a user cookie; after forms authentication is enabled for an entire directory, pages within that directory are unable to be accessed without the proper authentication ticket. Without the proper ticket, a user can be automatically redirected to the original page, forced to log in again. You will want to be familiar with four classes within the System.Web.Security namespace when you're working with user authentication: FormsAuthentication Contains several methods for working with forms authentication. FormsAuthenticationTicket Makes up the authentication ticket that is stored in the user's cookie. FormsIdentity Represents the user's identity authenticated with forms authentication. FormsAuthenticationModule The module used for forms authentication. Now that you have a basic idea of the classes you will be using for your login page, let's see how a basic login page is constructed. There are three steps that need to be taken before forms authentication will work within your application: -
Configure the authentication mode for the application within the Web.Config file. -
Configure the authorization section to allow or deny certain users within the Web.Config file. -
Create the login page that your users will use. The first step is to configure the authentication mode for the application. This can be accomplished by opening the Web.Config file and adding the following lines of code: <system.web> <authentication mode="Forms" /> </system.web> The result is shown in Figure 32.27. Figure 32.27. Modify the authentication mode for the application.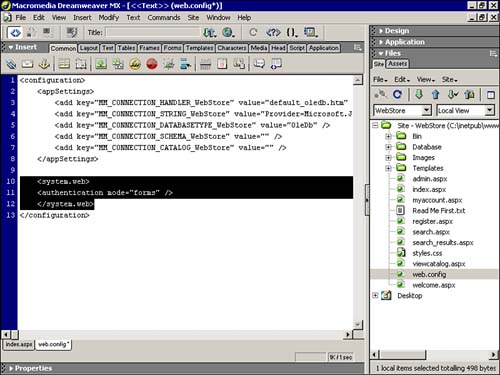
WARNING Attribute values are case sensitive; make sure that all values start with an uppercase first letter.
Remember, there are four possibilities for mode: Forms, Windows, Passport, and None. Next, set the authorization mode by adding the following lines of code: <authorization> <deny users"?" /> </authorization> The result is shown in Figure 32.28. Figure 32.28. Set the authorization mode for the application.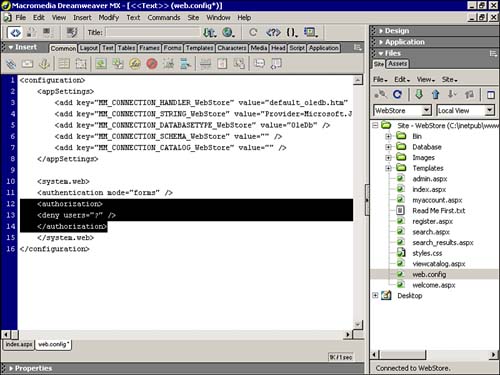
The question mark (?) symbol represents all anonymous users. If a user tries to access a certain page and does not have the appropriate authentication ticket, the user is redirected back to the login page. You can also allow users to access certain directories within your application by adding a separate Web.Config file with the following code: <authorization> <allow users"?" /> </authorization> The last step is to create the actual login page. You can create the login page for the Web Store application by following these steps: -
Create a new page by selecting New from the File menu. Choose the Advanced tab and select the Login template. -
Within the Content editable region, create a new form with a Runat="Server" attribute. Within the form, create a new table with four rows and three columns. -
Below the new table add a new link to the register.aspx page and call it New User. -
Create two new text box Web controls, naming them username and password. -
Add a new button Web control and add the text Login. The result is shown in Figure 32.29. Be sure to add the commandname="Submit_Click" attribute to the tag. This will call the "Submit_Click" subroutine. Figure 32.29. Create a login page.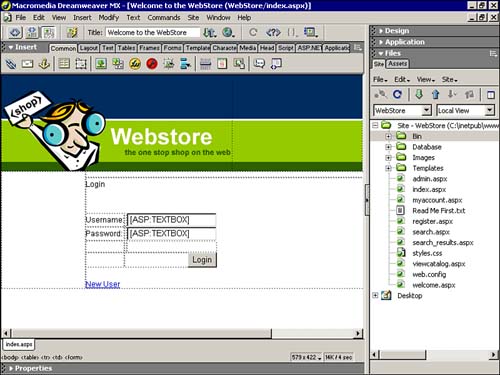
-
You are now ready to insert the code that will make the login page work. Within the <head> tag of the new login page, add the following code: <script runat="Server"> Sub Submit_Click(s As Object, e As EventArgs) If IsValid Then If (Username.Text = "zakthe" And Password.Text) = "legomaniac" Then FormsAuthentication.RedirectFromLoginPage(Username.Text, True) End If End If End Sub </script> -
Save your work as login.aspx and test it in the browser. NOTE Remember, by default if the authentication ticket does not exist on the users machine, the application will redirect to login.aspx. For this reason, the login page must be called login.aspx rather than index.aspx, which was the case when using the ASP server model.
In the preceding code, two lines make everything happen. The first: If (Username.Text = "zakthe" And Password.Text) = "legomaniac" Then checks to see if the values of the two text boxes are "zakthe" and "legomaniac". If they are correct, the next line is read: FormsAuthentication.RedirectFromLoginPage(Username.Text, True) This line calls the RedirectFromLoginPage method passing in two parameters. The first parameter is the username and the second parameter is a Boolean value indicating whether a cookie should be created. TIP If you are having unsuccessful results with the login page, make sure that you have created an application within IIS for the Web store. Because authentication within ASP.NET relies on an application-based model, it will not work if it has not been created. You can set the Web store to be an application by opening IIS, selecting the Default Web Sites directory, finding the Web Store application, right-clicking and selecting Properties, and clicking the Create button to create an application.
WARNING If you are receiving an error upon successful login, you may have to change the welcome.aspx page to read default.aspx. By default, that is the page that the application will redirect to.
The login page you have just built is the simplest form you can possibly implement. The next sections will enable you to further customize the form and credential-storing means. Configuring Forms Authentication In the previous section, you learned how to create a basic login page. You also learned how to modify the Web.Config file by enabling the form authentication mode. In this section you will explore the forms authentication section within the Web.Config file in greater detail. Aside from the basic authentication mode, the authentication section within the Web.Config file accepts a form element. The form element accepts the following attributes: loginUrl The page that the user is redirected to when authentication is necessary. By default this is login.aspx but using this attribute, you can modify the file name to be index.aspx, as was the case with the ASP server model example. name The name of the cookie to be stored on the user's machine. By default the name is set to ".ASPXAUTH". timeout The amount of time in minutes before the cookie expires. By default this value is set to 30 minutes. path The path used by the cookie. By default this value is set to "/". protection The way the cookie data is protected. Values range from All, None, Encryption, and Validation. The default value is All. An example of your newly modified Web.Config file could look similar to the following: <configuration> <system.Web> <authentication mode="Forms"> <forms name=".LoginCookie" loginUrl="login.aspx" protection="All" timeout="40" path="/" /> </authentication> </system.Web> </configuration> Configuring Forms Authorization As is the case with the authentication section of the Web.Config file, the authorization section can be modified to accept or deny certain users within your application. You can make fine-tuned decisions regarding who will and who will not be accepted into your application. For instance, the following code allows all anonymous users except for "mpizzi" and "zruvalcaba". <configuration> <system.Web> <authorization> <allow users="?" /> <deny users="mpizzi,zruvalcaba" /> </authorization> </system.Web> </configuration> You can also control how users navigate through your site by modifying the verbs attribute to accept or deny HTTP Post or Get. For example the following code enables anyone to access pages using POST or GET but prevents "mpizzi" and "zruvalcaba" from using POST. <configuration> <system.Web> <authorization> <allow verbs="POST" users="*" /> <allow verbs="GET" users="*" /> <deny verbs="POST" users="mpizzi,zruvalcaba" /> </authorization> </system.Web> </configuration> Web.Config File Authentication The great thing about the Web.Config file is that it is flexible enough to allow you to store usernames and passwords within it. Although you will not want to store all the usernames and passwords for your users within the Web.Config file, you can store a few. The following code added to the forms element of the Web.Config file sets credentials for two users: <configuration> <system.Web> <authentication mode="Forms" /> <forms> <credentials passwordFormat="Clear" > <user name="zakthe" password="legomaniac" /> <user name="mpizzi" password="pizza" /> </credentials> </forms> <authorization> <deny users="?" /> </authorization> </system.Web> </configuration> You can now modify the code that lies within the head of your login page to validate the usernames and passwords within the Web.Config file. The result will resemble the following: <script runat="Server"> Sub Submit_Click(s As Object, e As EventArgs) If IsValid Then If FormsAuthentication.Authenticate(Username.Text, Password.Text) Then FormsAuthentication.RedirectFromLoginPage(Username.Text, True) End If End If End Sub </script> Database Authentication Arguably the most flexible method of storing usernames and passwords is through the use of a database table. This section discusses the use of a database table to validate user information. Before you begin, make sure that you modify the Web.Config file back to its original state. The result should resemble the following: <system.web> <authentication mode="Forms" /> <authorization> <deny users"?" /> </authorization> </system.web> The next step is to retrieve and validate against the customers that are stored within the customers table of the WebStore database. You can add the following code to handle the authentication within the login.aspx file: <%@ Import Namespace="System.Data.OleDb" %> <html> <head> <script runat="Server"> Sub Submit_Click(s As Object, e As EventArgs) If IsValid Then If (Authenticate(Username.Text, Password.Text) > 0) Then FormsAuthentication.RedirectFromLoginPage(Username.Text, False) End If End If End Sub Function Authenticate(strUsername As String, strPassword As String) As Integer Dim objConn As OleDbConnection Dim objCmd As OleDbCommand Dim dbReader As OleDbDataReader Dim intResult As Integer objConn = New OleDbConnection("Provider=Microsoft.Jet.OLEDB.4.0;Data Source=C:\Inetpub\  wwwroot\WebStore\Database\Webstore.mdb") objCmd = New OleDbCommand("SELECT Username, Password FROM Customers", objConn) objConn.Open() dbReader = objCmd.ExecuteReader() While dbReader.Read() If (strUsername = dbReader("Username") And strPassword = dbReader("Password")) Then intResult = 1 Return intResult Else intResult = 0 Return intResult End If End While dbReader.Close() objConn.Close() End Function </script> </head> </html> wwwroot\WebStore\Database\Webstore.mdb") objCmd = New OleDbCommand("SELECT Username, Password FROM Customers", objConn) objConn.Open() dbReader = objCmd.ExecuteReader() While dbReader.Read() If (strUsername = dbReader("Username") And strPassword = dbReader("Password")) Then intResult = 1 Return intResult Else intResult = 0 Return intResult End If End While dbReader.Close() objConn.Close() End Function </script> </head> </html> Let's pick apart the code to help you better understand how the user is validated. The first subroutine Sub Submit_Click(s As Object, e As EventArgs) If IsValid Then If (Authenticate(Username.Text, Password.Text) > 0) Then FormsAuthentication.RedirectFromLoginPage(Username.Text, False) End If End If End Sub processes the "authenticate" function, passing in the two parameters for username and password. The return value, which we'll go over in a bit, is checked to make sure that it is greater than 0. If the return value is greater than 0, the RedirectFromLoginPage method is called. The authenticate function is what performs most of the work. The function accepts two string parameters, strUsername and strPassword, which you know come in as the two text box control values. The next lines of code: Dim objConn As OleDbConnection Dim objCmd As OleDbCommand Dim dbReader As OleDbDataReader Dim intResult As Integer instantiate the OleDbConnection, OleDbCommand, and OleDbReader objects as well as the return values variable, which will end up being a simple 1 or 0 value. The next few lines of code: objConn = New OleDbConnection("Provider=Microsoft.Jet.OLEDB.4.0;Data Source=C:\Inetpub\wwwroot\WebStore\Database\Webstore.mdb") objCmd = New OleDbCommand("SELECT Username, Password FROM Customers", objConn) objConn.Open() dbReader = objCmd.ExecuteReader() set the connection string to the connection object, create the new command passing in the SQL statement as well as the connection string, open the connection, and set the DataReader equal to the ExecuteReader method of the command object. The last few lines of code While dbReader.Read() If (strUsername = dbReader("Username") And strPassword = dbReader("Password")) Then intResult = 1 Return intResult Else intResult = 0 Return intResult End If End While dbReader.Close() objConn.Close() loop through the DataReader and compare the values of the two text box controls with the Username and Password fields within the database. If a match is returned, intResult is set to 1 and the result is returned. If a match is not returned, intResult is set to 0 and the result is returned. The last two lines close the connection and DataReader objects. Customer Error Messages You can create custom error messages within the login.aspx page by adding label controls to your page and manually setting those labels whenever there is an error message. For example, if a login failure occurred, rather than letting the page simply reload, you could add a simple Else clause to the If statement that processes the login. To add a custom error message to your login page, follow the steps outlined next: Add two new rows to your login table. Add a label control in the second row. Change the fore color, bold, and ID attributes accordingly. Your control may resemble the following: <asp:label ForeColor="Red" Font-Bold="True" Runat="Server" /> Change your subroutine so that it resembles the one that follows: Sub Submit_Click(s As Object, e As EventArgs) If IsValid Then If (Authenticate(Username.Text, Password.Text) > 0) Then FormsAuthentication.RedirectFromLoginPage(Username.Text, False) Else lblError.Text = "Your login was invalid. Please try again." End If End If End Sub This time when a user enters the wrong credentials, the user will receive an error message rather than a simple page reload. Logging Out Users There may be instances in which your users will no longer want to navigate within your application. People feel more secure having the knowledge that they have successfully logged out. For this and for security purposes, you might want to have your users log out of your site. You can create log out functionality within your application by following these steps: -
Open the WebStore template located in the Templates directory within the Site Management window. -
Place your cursor just after the My Account link and insert two line breaks (Shift+Enter). Insert a nonbreaking space (Ctrl+Shift+Space). -
Insert a new linkbutton Web control. The code should look similar to the following: <asp:linkButton Css Text="Log Out" OnClick="Logout_Click" Runat="Server" /> -
Add a subroutine to handle the Logout_Click event. The subroutine should contain the following code: Sub Logout_Click() FormsAuthentication.SignOut() End Sub This will effectively logout the user by terminating the cookie and redirecting the user to the login page. | 
