| The security umbrella encompasses many facets of information technology, including Web development. Make sure users go where they need to go and see what they're allowed to see within your application. Make sure everyone who visits your site logs in before they can view any pages and if they are not logged in, make sure that they don't just happen to type in the URL to a section of the application specifically meant for an administrator. Although different solutions exist for various applications that you may create for instance, IIS could provide certain pages to users who have been authenticated by NT user groups within an intranet environment this chapter focuses on simple form/script-based authentication. Dreamweaver MX has a solution for securing the Web Store application in its user authentication server behaviors. In combination with some simple coding techniques, this chapter will enable you to accomplish the following tasks: Create a login page Restrict users based on username, password, and access level Log out users Create custom error messages Check for duplicate usernames Secure your ASP.NET application Creating a Login Page The first step to securing any Web application is to create a login page for your users. Obviously there would be no point in creating an admin page, for instance, if just anyone could use it. Ideally what you want is an application that allows your users to register and navigate through the site based on access rights that you specify. What benefit does this provide? You could assume that you would want everyone to come to your site and purchase items without the tedious task of becoming a registered user. The question becomes whether your users are repeat customers. If they are, they may be typing in all their personal information more than once, essentially ending up with more work than simply registering once the first time around. Another benefit is that you can store all your users' shipping and billing information, giving them a streamlined experience as they purchase items. As a developer, you may want to generate e-mails to your registered users, alerting them of specials and bargains. There are many benefits and reasons for maintaining registered users, and after they are registered, you will want them to access the site via a secure location, typically accessed through a login page. You've seen login pages before; eBay, for instance, asks you to log in to their site before you bid on an item. You can see the correlation if you wanted to actually purchase something. How would the application know which shopping cart to place the item into? A login page enables you not only to maintain registered users, but to create sessions for the users' experience while they're on your site. That way, if a customer wants to purchase something, that item would be stored within that user's cart, belonging to that particular session. You can create a login page for the Web Store application by following the steps outlined next: -
Create a new page by selecting New from the File menu. Choose the Advanced tab and select the Login template. -
Within the content editable region, create a new form. Within the form, create a new table with four rows and three columns. -
Below the new table, add a new link to the register.asp page; call it New User. -
Create two new text box form objects, naming them username and password. -
Add a Submit button object and change the label to read Login. The result is shown in Figure 32.1. Figure 32.1. Create an outline for a login page.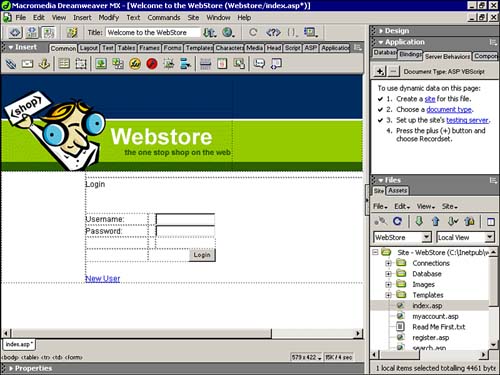
-
You are now ready to insert the Log In User server behavior. Select the Log In User behavior from the User Authentication submenu, as shown in Figure 32.2. Figure 32.2. Select the Log In User server behavior.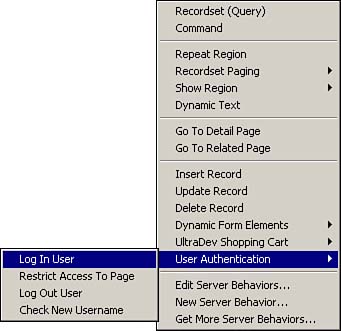
-
The Log In User dialog box enables you to specify options for the client-side form and fields to match the form objects within the database, to redirect URLs for a successful connection and failed logins, and to specify an access restriction option. Although you will explore more of these options throughout the chapter, for now match up your settings with Figure 32.3. Figure 32.3. Add the appropriate settings for the Log In User dialog box.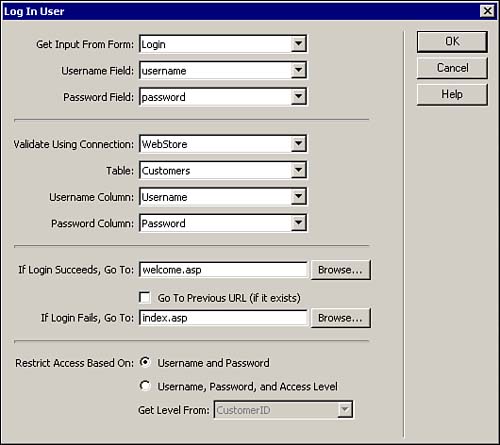
-
Save the page as index.asp so that this will always be the first page that your users come to. NOTE If you have not done so already, you can configure IIS to accept index.asp as a default page. You can do this by right-clicking the Web site within IIS, selecting Properties, and choosing the Documents header. -
Before you test the login page, check the customers table within the database to make sure that you have a valid username and password, as shown in Figure 32.4. Figure 32.4. Check to make sure you have a valid username and password before attempting to log in.
-
Now that you know the username and password, try logging in. If you entered it correctly, you will be redirected to welcome.asp. If you entered it incorrectly, the page will simply redirect back to itself. The great thing about the Log In User server behavior is that a session variable is automatically created for the user, called Session("MM_Username") This session can be used within other pages, either through server behaviors, code, or a combination of both to determine whether the user is logged in. You can even write out the user's name within the welcome message in the welcome.asp page. You can accomplish this by inserting the following code where the welcome message appears: <span > Welcome to the WebStore <%= Session("MM_Username") %> </span> Now that you have a general understanding as to how the login page is created and what the basic framework is for creating a secure environment, jump to the next step: restricting users. Restricting Access Based on Username, Password, and Access Level Your next step in securing your Web application is to restrict those users who do not meet criteria specified by you. You can specify that criteria by setting an access level that will eventually be used to track users as they navigate through your site. The reason for this is simple you want to make sure that your users do not accidentally navigate onto a page that they are not supposed to see, such as the admin.asp page. The last thing you want is for ordinary users to delete products from your store's database. You can create access levels for your users by following these steps: -
Open the customers table in design view. -
Right-click the e-mail field and select Insert Rows, as shown in Figure 32.5. Figure 32.5. Insert a new row for the access level field.
-
Call the new field AccessLevel and give it a numeric data type, as shown in Figure 32.6. Figure 32.6. Call the new field AccessLevel and give it a numeric data type.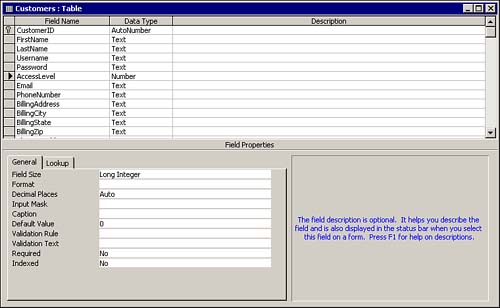
-
Switch to datasheet view and give the only user within the table an access level of 1, as shown in Figure 32.7. The following table describes the levels of users and how they will be tracked within the application: Figure 32.7. Give the administrator an access level of 1.
| Level | Type | Description | | 1 | Admin | Rights to the entire site | | 2 | User | Rights to all excluding admin.asp | NOTE If you have not done so already, you can change the name from Zak Ruvalcaba to your name within the customers table. NOTE You may want to add another fictitious user with an access level of 2. This will come in handy later in the chapter when you want to check the access level functionality. Don't forget to give the fictitious user a username and password, because you will need to log in using that name. -
Reopen the Log In User server behavior and change the Restrict Access Based On to Username, Password, and Access Level. Change Get Level From to the new Access Level field, as shown in Figure 32.8. Figure 32.8. Change the login criteria to Username, Password, and Access Level.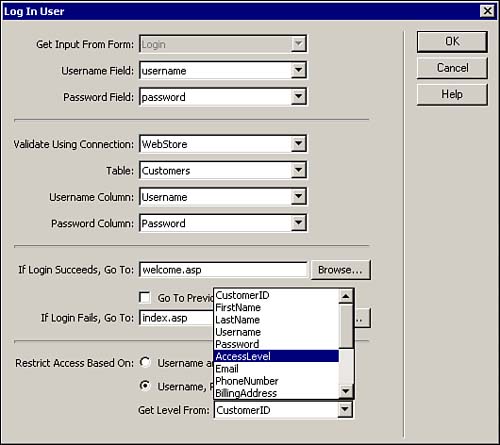
Although you will not see any changes when you log in, know that a session variable is set for the access level named Session("MM_UserAuthorization") As you will see in the following sections, you can program against this variable to check whether a user has the appropriate access level to access a particular page. For now, you may want to see the variable in action. You can change the welcome page code to display the user access level as well. The following code illustrates this point: <span > Welcome to the WebStore <%= Session("MM_Username") %><br> Your access level is: <%= Session("MM_UserAuthorization") %><br> You are classified as an: <% If (Session("MM_UserAuthorization") = 1) Then %> Administrator <% Else %> User <% End If %> </span> Essentially, the code determines whether a user has an access level of 1. If the user does, it will provide a message stating that the user is an administrator. If the session is anything but 1, it will provide a message classifying them as a user. Custom Error Messages Although there are many error messages that you can present to the user, one that needs to be taken care of right away is the failed login error message. Currently, if a user logs in with an inappropriate username and password, the browser simply redirects to the same page and does nothing. Ideally, what you want is a custom error message that alerts the user of a failed login message, allowing them to try again. You can create a simple error message by following these steps: -
Add two new rows to the login table just below the button form object that you created previously. -
Add the text That is not a valid login in the second row. Change the font to a red color so that it appears as if it is an error message. Figure 32.9 shows the result of your additions. Figure 32.9. Add an error message to your login page.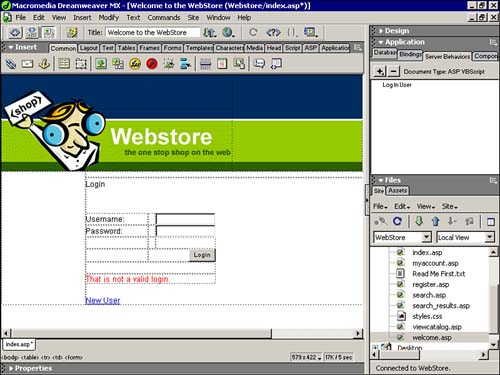
-
The next step will be to somehow capture an error response from the login failure. You can accomplish this by setting a URL parameter within the Log In User dialog box. Open the Log In User dialog box and add the string "?valid=false" just after index.asp within the If Login Fails, Go To: dialog box, as shown in Figure 32.10. Figure 32.10. Add a parameter to the URL string for the failure response.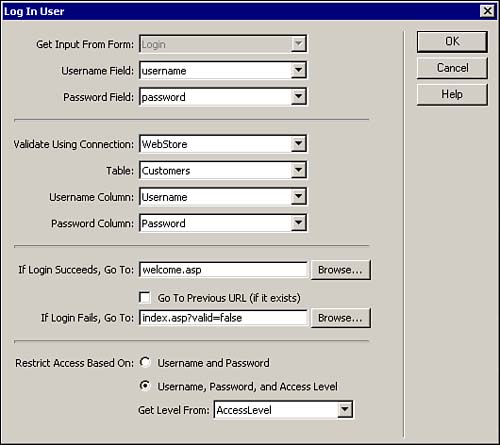
-
You'll now want to write some code to capture that parameter. Highlight the error message that you created in step 2 and switch to code/design view. Add the following code: <% If (Request.QueryString("valid") = "false") Then %> <font color="#FF0000" size="2" face="Arial"> That is not a valid login. </font> <% End If %> -
This code will essentially check to see whether a parameter is being sent across the querystring named valid. If there is, and that parameter has a value of false, it will display the message, That is not a valid login. -
Save your work and test the result in the browser. Try putting in bogus information and click Login. You should be presented with the error message shown in Figure 32.11. Figure 32.11. Purposely enter wrong information to see the error message.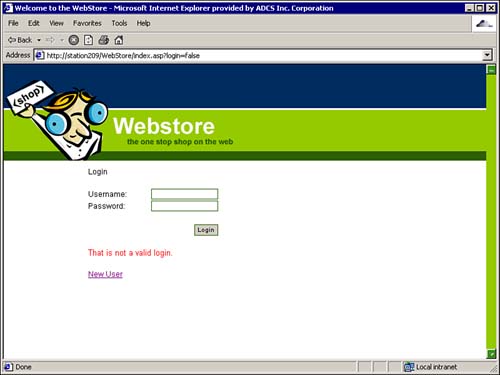
Check to See if User Is Logged In Although you may think that your application is completely secure, it is, in fact, still completely vulnerable. What's to stop a user from simply typing in the URL to your application plus welcome.asp, completely bypassing your login page? You should never expect your users to use the login page simply because it's there. Most browsers even try to guess the URL you are typing by autofilling the complete URL. If users accidentally selected the welcome.asp page, they could easily bypass the login page and jump directly into the site, thus failing to create a session for the user and ultimately causing errors. You can avoid this problem by simply detecting whether the user's session exists. Because the user session is created at login, if the user tries to bypass the login screen, the application could detect that and redirect the user back. You can add the Restrict Access server behavior by following the steps outlined next: -
Open the welcome.asp page. -
Select the Restrict Access to Page server behavior from the User Authentication submenu, as shown in Figure 32.12. Figure 32.12. Select the Restrict Access to Page server behavior.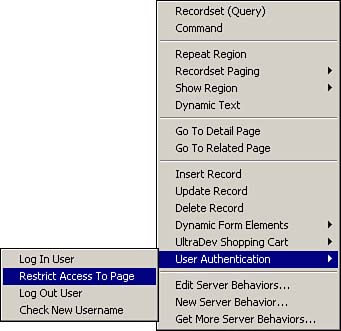
-
The Restrict Access dialog box enables you to set user levels that are allowed to enter this page as well as a redirect URL for the failure. Select Define. -
The Define Access Levels dialog box enables you to customize and configure access levels that are allowed to view your page. Select the + icon and add the values 1 and 2 as shown in Figure 32.13. Remember, this is a basic welcome page, so you want to allow both types of users in. Figure 32.13. The Define Access Levels dialog box enables you to set access levels that are allowed to view that particular page.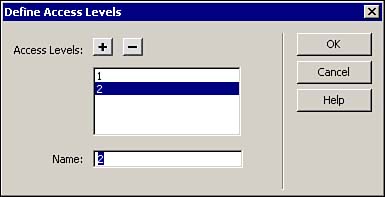
-
Select OK. -
Now add a parameter to the failure URL so that you can create a custom error message within the login page. The result is shown in Figure 32.14. Figure 32.14. Add a parameter to the end of the querystring so that you can create a custom error message on the login page.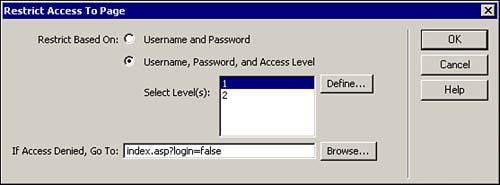
-
On the login page, create a new error message just below the previous error message that you created. Give the error message the text You must be logged in as shown in Figure 32.15. Figure 32.15. Create a new error message for the login requirement.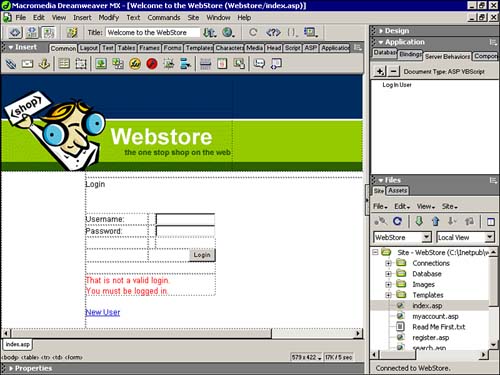
-
Switch to code/design view and type in the following code: <% If (Request.QueryString("login") = "false") Then %> <font color="#FF0000" size="2" face="Arial"> You must be logged in. </font> <% End If %> -
Save your work. This time, make sure all the browsers are closed. This will effectively terminate all sessions. Reopen the browser and try to go straight to the welcome.asp page without logging in first. You will be automatically redirected back to the login page and the custom error message will be displayed as shown in Figure 32.16. Figure 32.16. If you try to bypass the login, you are redirected and presented with an error message.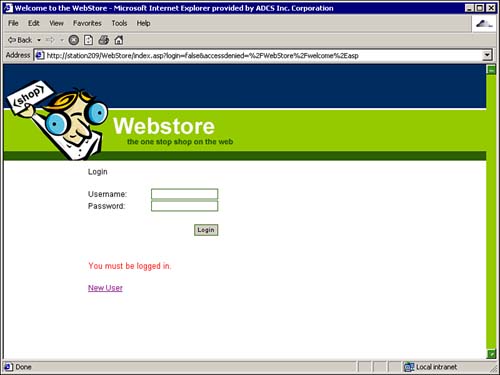
You'll want to add this functionality to all the pages within the Web Store application. When you get to the admin.asp page, change the access level from 1 and 2 to just 1. This way, only a person with an access level of 1 can enter the admin.asp site. Logging Out Users Just as you require your users to log in, you will want them to log out as well. Logging out guarantees that the users' session variables are instantly terminated, forcing them to log in again. For the most part, users will simply close the browser, terminating the session, but if users continue to browse online, it may be a good idea to alert them to log out first. Session variables, by default, remain active for 20 minutes, so if users fail to log out, their sessions would remain active even though they're navigating another Web site. To create the logout functionality for the Web Store application, follow the steps outlined next: -
Open the WebStore template located in the Templates directory within the Site Management window. -
Place your cursor just after the My Account link and insert two line breaks (Shift+Enter). Insert a nonbreaking space (Ctrl+Shift+Space). -
Type the test Logout. -
With the text highlighted, select the Log Out User server behavior located within the User Authentication submenu of the Server Behaviors panel, as shown in Figure 32.17. Figure 32.17. Insert the Log Out User server behavior.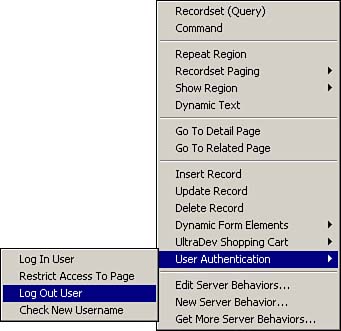
-
The Log Out User dialog box appears, enabling you to specify criteria for the logout, including whether the logout will take place when the user clicks a button, a link, or when the page loads. You also can specify a page to redirect to after the user selects the button. By default, if the link is selected before you select the server behavior, the code should appear within the drop-down menu of Link Clicked, as shown in Figure 32.18. Figure 32.18. Specify the logout criteria within the Log Out User dialog box.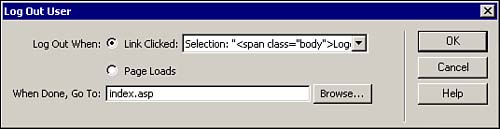
-
Select OK. -
Save the page and update all pages that share the template. -
Test the result in the browser. Log in and navigate through the site. Try clicking the logout link. Although it will appear as if nothing happened, in fact, your session was terminated. Try typing in welcome.asp in the address bar, and you should be redirected back to the login page with the error message displayed. The following code gets inserted into the page: Session.Contents.Remove("MM_Username") Session.Contents.Remove("MM_UserAuthorization") This code, utilizing the session object, physically removes the two session variables named MM_Username, which is the session variable that stores the username, and MM_UserAuthorization, which is the session variable that stores the access level. Revamping the New User Registration Page Now that most of the site has some sort of security integration, the last order of business is to make the register.asp page available only to new users. If a user has already registered, that user won't visit the page, but for users who have never been to the site, the New User Registration page must be made available and easy to find. You've added a link from the login page that jumps directly to the register.asp page; the only problem is that you still have buttons to the left of that page that link to the other Web store pages. A new user should not be given the opportunity to navigate to any portions of the site. You can change this by following the steps outlined next: -
Open the register.asp page and cut the entire table that displays the captions and form objects. Make sure you cut the form in the process. -
Open the Login template by selecting New from the File menu, navigating to the Advanced tab, and finding the Login template. -
Paste the table into the Content editable region. -
Immediately resave the page as register.asp, overwriting the previous version. The result is shown in Figure 32.19. Figure 32.19. Paste the table of captions and form objects into a new register.asp page.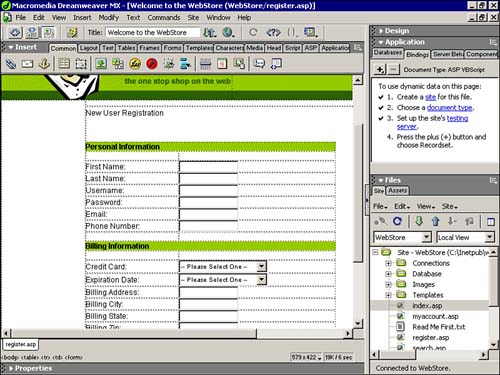
-
You may have to redefine the recordset and create the Insert Record server behavior. This time when you create the Insert Record server behavior, make sure you add a parameter on the querystring for the redirect URL. Later in the chapter, you will capture that parameter and welcome the user to the login page. The result is shown in Figure 32.20. Figure 32.20. Add a parameter to the redirect URL.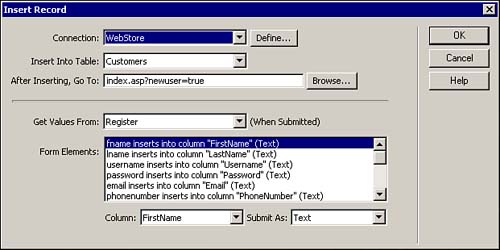
Avoiding Duplicate Usernames The last security-related server behavior is the Check New Username server behavior. The Check New Username server behavior enables you to check the username of the person that is registering on your site to make sure that a duplicate does not exist within the database. This is done to avoid confusion when people register within your site. Have you ever tried obtaining a username with AOL? It's almost impossible because most of the usernames are taken. AOL employs these same methods to avoid conflicts between users. You can check for duplicate usernames within your site by following these steps: -
Within the new register.asp page, select the Check New Username server behavior available from the User Authentication submenu in the Server Behaviors panel, as shown in Figure 32.21. Figure 32.21. Insert the Check New Username server behavior.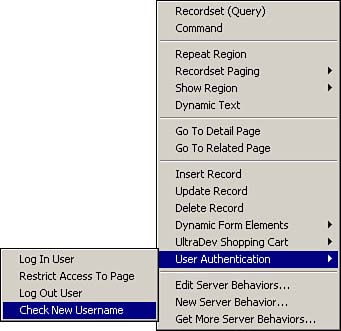
-
The Check New Username dialog box appears, allowing you to specify the field within the database to compare the value to. The Check New Username dialog box also enables you to specify a page to redirect to if there is a duplicate username. Figure 32.22 shows how you can append a parameter to the querystring so that you can create a custom error message for the user. Figure 32.22. Specify the username field within the database as well as a parameter so that you can create a custom error message to the user if the proposed username does happen to be a duplicate.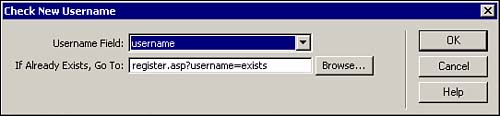
-
You can create the custom error message by placing your cursor next to the username text field and inserting a new line break (Shift+Enter). Type the text Username exists, try a different one as shown in Figure 32.23. Figure 32.23. Create a custom error message to handle the duplicate username.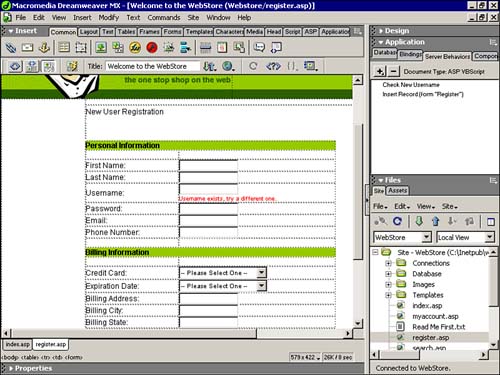
-
Now you'll want to capture the parameter that will be sent across if there does happen to be a duplicate username. Remember that parameter is "username" and the value is "exists". To handle this, wrap the text you wrote with the following code: <% If (Request.QueryString("username") = "exists") Then %> <font color="#FF0000" size="1" face="Arial"> Username exists, try a different one. </font> <% End If %> -
The results will look similar to Figure 32.24. Figure 32.24. Add the code to handle the parameter being sent across.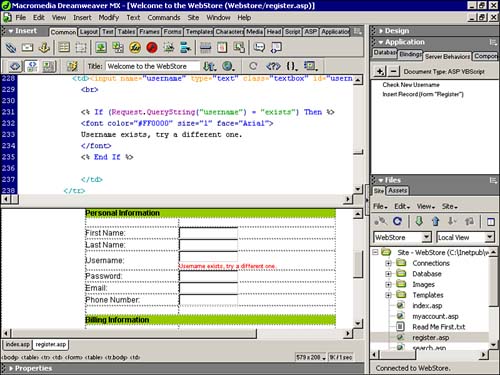
-
Save your work. Now that the user can pick a new username, he will be able to register on your site. The last thing you might want to do is add a custom message to users, welcoming them to your site and thanking them for registering. You can do this by opening index.asp and inserting the following code where the Header editable region currently resides: <% If (Request.QueryString("newuser") = "true") Then %> <span >Welcome New User</span> <% Else %> <span >Login</span> <% End If %> The result is shown in Figure 32.25. Figure 32.25. Add some code to create a custom welcome message to the user.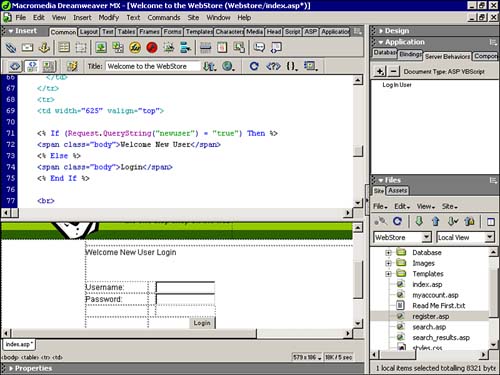
This code effectively checks for parameters coming across the querystring. It displays the text Welcome New User if it detects the parameter newuser with a value true and displays the text Login if it doesn't detect anything. Setting Access Levels Now that you are checking access levels throughout every page, you'll probably want some functionality in place that actually sets the access level when the user registers. Rather than manually going into the database each time a person registers, you could simply set a hidden field equal to a certain number, in this case 2, and have that automatically update the database. To add the functionality that sets the access level, follow these steps: -
Within the register.asp page, insert a new hidden field by selecting Form Objects from the Insert menu and choosing Hidden Field. -
Name the hidden field accesslevel and give it a value of 2. -
Reopen the Insert Record server behavior. -
Find the access level form object from the Form Elements selection box, find the AccessLevel column, and change the datatype to Numeric, as shown in Figure 32.26. Figure 32.26. Connect the access level hidden field to the appropriate field within the database.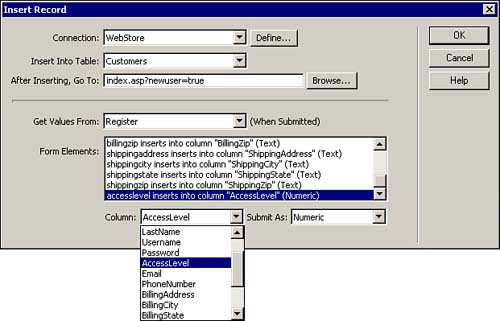
-
Save your work and test it in the browser. Create a new user. When you are finished, check the database to make sure all the appropriate information was added. |

