Lesson 1: Designing Data Access Technologies
Lesson 1: Designing Data Access Technologies
Estimated lesson time: 60 minutes
Today's database systems need to be connected to a variety of applications running on one or more platforms. To access these disparate systems, database developers need to understand the different data access technologies available to them. This lesson will review these technologies and suggest ways that they can be applied.
Selecting a Network Protocol
Connecting to a SQL Server database requires you to configure both a network protocol and a network library. When you install an instance of SQL Server 2005, several network libraries are installed as dynamic-link library (DLL) files. Each network library enables you to pass data across the network through packets. These libraries must be installed to support a particular protocol; some network libraries support multiple protocols.
The network protocol selected is critical to determining how SQL Server 2005 interacts with the network and can have an impact on the way that you integrate SQL Server 2005 with Microsoft Internet Information Services (IIS). You will need to configure network protocols after the setup has completed. You do so using the SQL Server Configuration Manager tool.
SQL Server 2005 enables you to configure one of four different network protocols. You can see what protocols are available for your instance of SQL Server by expanding the SQL Server 2005 Network Configuration node in SQL Server Configuration Manager, as shown in Figure 1-1.
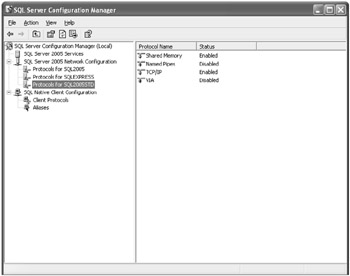
Figure 1-1: Using SQL Server Configuration Manager to configure network protocols for the server
From here, you can configure each network protocol for a particular SQL Server 2005 instance. The network protocols available are as follows.
-
Shared Memory This is the most straightforward protocol and is simply enabled or disabled. This protocol is typically used only when the connection between client and server is occurring on the same machine.
-
Named Pipes This protocol allows you to specify a pipe that SQL Server will listen on. It ensures that the Windows authentication process will occur each time a connection is established. The named pipes protocol was designed for a local area network (LAN), and in this environment, it can perform well. This is the fastest protocol to utilize when the application and server reside on the same machine.
-
TCP/IP This popular protocol was designed to support communication over the Internet and is the fastest protocol when it comes to transmitting data across wide areas. TCP/IP is a good choice when dealing with a slow network or across a wide area network (WAN).
-
VIA This special protocol only applies to Virtual Interface Adapter (VIA) hardware.
Prior to SQL Server 2005, there were more protocols available, but the number of protocols has been reduced. Typically, you will only need to consider named pipes or TCP/IP. The protocol depends on the type of network on which your application will be running.
Network protocols need to be configured on both the client and server end. Figure 1-1 shows a screenshot of where you would configure the network protocols that the server uses to listen on. You can use the same tool to configure the client side. You do so by expanding Client Protocols within the SQL Native Client Configuration node, as shown in Figure 1-2.
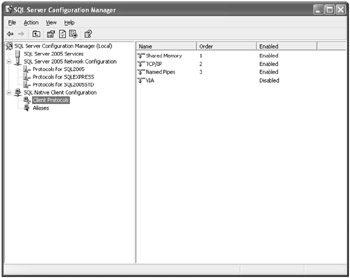
Figure 1-2: Using SQL Server Configuration Manager to configure network protocols for the client
From here, you can set the sequence in which enabled protocols are used when making a connection. A connection with the protocol ordered as 1 will be attempted first. If this connection fails, it will move to the protocol ordered as 2. In Figure 1-2, shared memory is listed as the first protocol. Using the shared memory protocol is fine if the server and client reside on the same machine. But if you know that the client always needs to attach by using another protocol, such as TCP/IP, you need to change the order on the client machine by using SQL Server Configuration Manager.
It is possible to use the connection string to specify a particular protocol. Only the specified protocol will be considered, and it will not fail over to the next protocol if a connection cannot be made. To specify the TCP protocol, you prepend your SQL Server connection string with the tcp prefix. This is followed by the server name, instance name, and optionally, the port number. The format is as follows:
tcp:<servername>\<instancename>,<portnumber>
or
tcp:<ipaddress>\<instancename>,<portnumber>
Following is an example of what the connection string would look like if you wanted to connect to a local instance of SQL Server using a TCP connection through port 1431:
//C# string connString = @"server=tcp:.\sqlexpress,1431;Integrated Security=SSPI;initial catalog=AdventureWorks"; 'VB Dim connString As String = "server=tcp:.\sqlexpress,1431; Integrated Security=SSPI;initial catalog=AdventureWorks"
Selecting a Data Provider
Developers working with the Microsoft .NET Framework are most likely familiar with ADO.NET. This application programming interface (API) is tightly integrated with the .NET Framework and enables you to provide data access for managed code applications. ADO.NET uses providers to access specific data sources, such as SQL Server or Oracle. The API, which represents a set of functions developers can use to access application functionality, provides features that are useful when designing applications for the .NET Framework, such as the in-memory cache.
Database developers might also be familiar with Microsoft Data Access Components (MDAC). This connectivity library has passed through several versions in the years since it was introduced with the Windows 98 operating system. MDAC provides developers with multiple APIs that can be used to connect to a wide variety of data sources.
MDAC 2.8 is available as a free download from MSDN at http://msdn2.microsoft.com/en-us/data/aa937730.aspx. This version is already available with the Windows XP Service Pack 2 (SP2) operating system, but if you are unsure of which version you have, you can download a utility named Component Checker from the same location as MDAC.
You might not be familiar with SQL Native Client (SNAC), which was introduced with SQL Server 2005. SNAC also provides access to a variety of data sources, but additionally, it enables you to take advantage of certain functionality made available with SQL Server 2005. The new features include database mirroring and the ability to query Multiple Active Result Sets (MARS), provide query notifications, and utilize EXtensible Markup Language (XML) data types. XML is a simple and extensible format used to represent data.
SNAC provides stricter error handling than MDAC, and errors that would be reported generally with MDAC might reveal more information with SNAC. For this reason, applications that are upgraded from MDAC to SNAC might behave unexpectedly if error handling is not specifically addressed.
SNAC does not allow you to access some of the beneficial features of MDAC, such as connection pooling, memory management, and client cursor support. SNAC also does not implement ActiveX Data Objects (ADO), although it does enable you to access the functionality of ADO. If you need to support a SQL Server database prior to version 7.0, you will have to use MDAC.
SNAC does wrap the Object Linking and Embedding (OLE) DB provider and Open DataBase Connectivity (ODBC) driver into one DLL, which enables the DLL to perform more quickly and to be secured more easily. ODBC and OLE DB are used to access a variety of data sources other than SQL Server. To take advantage of the new features available with SQL Server 2005, you need to use the SNAC for new application development. It is not necessary to upgrade existing applications to SNAC unless you plan on taking advantage of the new SQL 2005 features, such as MARS queries.
| Exam Tip | Make sure you understand the differences between each data provider and which is more appropriate in certain scenarios. Specifically, note the differences between SNAC and MDAC. |
Developers have more than one option when selecting a data provider for their applications. The one you select depends on the platform you are targeting and the language you are using. Table 1-1 lists the Microsoft recommendations for selecting a data provider.
| Data Access Technology | Recommended Use |
|---|---|
| MDAC | Use if you are writing native code targeting Windows or if you need to write a classic ASP application, Visual Basic 6.0x COM application, or C++ application. |
| SNAC | Use if you need to access the latest features in SQL Server 2005 using ODBC or OLE DB. |
| ADO.NET | Use if you are writing a managed code application for the .NET Framework. |
How to Connect by Using ADO.NET
ADO.NET is tightly integrated with the .NET Framework and can be used to build data access applications using any of the supported languages. It is comprised of two main areas:
-
Providers Represent each data source available to your application. There is a provider for SQL Server and another one for Oracle. Third-party companies can create providers for other databases as well.
-
Services Represent what is done with the data returned by a provider. For example, there is one service that provides an in-memory cache so that data can be maintained inside a dataset.
ADO.NET is included with the .NET Framework, so you do not have to do anything special to access it. Everything you need is provided in the System.Data namespace. You will have to set a reference to the specific namespace required. The namespace you use is dependent on the data source you are trying to access. For example, if you are trying to access a SQL Server 7.x database, you will set a reference to the System.Data.SqlClient namespace. Refer to Table 1-2 to determine the correct namespace to reference. The following code would need to be placed at the top of any code file that makes a connection to the database:
//C# using System.Data.SqlClient; 'VB Imports System.Data.SqlClient
| Data Source | Namespace | Object Name |
|---|---|---|
| SQL Server database, version 7.x | System.Data.SqlClient | SQLConnection |
| OLE DB database or SQL Server database, version 6.5 or earlier | System.Data.OleDb | OleDbConnection |
| ODBC database | System.Data.Odbc | OdbcConnection |
| Oracle client | System.Data.OracleClient | OracleConnection |
Each provider has a connection object that is used to establish a connection with the data source, as shown in Table 1-2. You will need to create an instance of the connection object and then set the connection properties before opening the connection. You set the connection properties through a connection string. The connection string will vary depending on the data source, but for most data sources, you will need to specify the server name, database name, and any authentication credentials.
Following is an example of the code needed to open a connection to the SQL Server 2005 database for the fictional company named Adventure Works.
//C# //Open the Connection to SQL Server Express string connString = @"server=.\sqlexpress;Integrated Security=SSPI;initial catalog=AdventureWorks"; sqlConn = new SqlConnection(connString); sqlConn.Open(); 'VB 'Open the connection to SQL Server Express Dim connString As String = "server=.\sqlexpress;Integrated Security=SSPI;initial catalog=AdventureWorks" sqlConn.ConnectionString = connString sqlConn.Open()
How to Connect by Using MDAC
MDAC consists of multiple APIs that ship with the Windows operating system. You have a choice of three interfaces:
-
ODBC
-
OLE DB
-
ADO
Open Database Connectivity
ODBC provides a way for developers to connect to any kind of data source and is the most widely accepted method of data access. Using software drivers, it enables you to access a variety of data sources, such as a Microsoft Office Access database, a Microsoft Office Excel spreadsheet, and a Microsoft Visual FoxPro database. Any third-party database vendor can write a software driver that adheres to the ODBC standards in order to provide an interface to their data.
ODBC requires you to set up a Data Source Name (DSN), which identifies the correct driver to utilize. The name of the DSN will be used in the connection string employed to connect to the database. To create a DSN, click Start, Control Panel, Administrative Tools, Data Sources (ODBC). The Drivers tab will list all the ODBC drivers available for your computer, as shown in Figure 1-3.
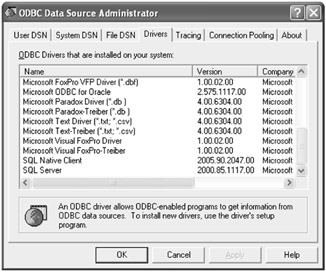
Figure 1-3: Drivers tab in the ODBC Data Source Administrator utility
You can create one of the following DSN types:
-
User DSN Can only be used by the current user on the current machine.
-
System DSN Can be used by all users on the current machine.
-
File DSN Connection details are stored in a file that can be shared with multiple users.
The first step in creating a DSN is to select a driver and therefore identify the type of data source. The connection information required for the DSN will vary depending on what driver was selected. Once the DSN is created, you can reference the DSN in the connection string, such as the one that follows, which references a DSN called "myDSN":
"DSN=myDSN;Uid=myUID;Pwd=myPwd"
If the DSN was a file DSN, the string would appear as follows.
"FILEDSN=c:\dataConn.dsn;Uid=myUid;Pwd=myPwd"
In both of these connection strings, the authentication credentials were added to the string. Authentication is the process of verifying that the user has access to the requested resource. Depending on the database you are accessing, you might not have to specify a user ID and password.
ODBC cannot be used by scripting languages such as Microsoft Visual Basic Scripting Edition (VBScript) and JScript, so the following code example is provided in C++. Connecting to an ODBC data source with C++ code involves allocating an environment and connection handle. You can then use the SQLConnect function to establish a connection to the database. The following is an example of the code you would need to make a connection using ODBC and a user DSN named "myDSN" :
//C++ // Allocate environment handle, allocate connection handle, // connect to data source, and allocate statement handle. void direxec::sqlconn(void) { unsigned char chr_ds_name[SQL_MAX_DSN_LENGTH]; // Data source name RETCODE rc; // ODBC return code unsigned char szData[MAX_DATA]; // Returned data storage SDWORD cbData; // Output length of data HENV henv; // Environment HDBC hdbc; // Connection handle HSTMT hstmt; // Statement handle //Initialize the chr_ds_name with the name of the DSN _mbscpy(chr_ds_name,(const unsigned char *)"myDSN"); SQLAllocEnv(&henv); SQLAllocConnect(henv,&hdbc); rc=SQLConnect(hdbc,chr_ds_name,SQL_NTS,NULL,0,NULL,0); // Deallocate handles, display error message, and exit. if (!MYSQLSUCCESS(rc)) { SQLFreeEnv(henv); SQLFreeConnect(hdbc); error_out(); exit(-1); } rc=SQLAllocStmt(hdbc,&hstmt); } | Important | Using ODBC with Visual Basic .NET and Visual C# .NET Typically, you will only use ODBC or OLE DB when your development language is C++. However, if you have a compelling reason to use ODBC with Visual Basic .NET or Visual C# .NET, an add-on component is provided. For more information about using ODBC with Visual Basic .NET or Visual C# .NET, refer to the MSDN articles at http://support.microsoft.com/kb/310985/ and http://support.microsoft.com/kb/310988. |
Object Linking and Embedding Database
Like ODBC, OLE DB can also be used to access a variety of data sources. However, it does not require the user to create a DSN. Typically, OLE DB is considered the fastest and most consistent option when accessing data using the C++ language.
OLE DB 2.0 utilizes a concept where data providers act as an intermediary and serve data to an application. To connect to a data provider, you must first create an instance of the data source object. The provider is uniquely identified with a class identifier (CLSID) that is stored in the registry. Similar to a globally unique identifier (GUID), the CLSID consists of a 128-bit integer that is represented as a string of hexadecimal digits. The following C++ code demonstrates how you would create an instance of a provider using their CLSID and then initialize that provider using the Initialize method:
//C++ // Create an instance of the OLE DB Initialization Component. CoCreateInstance(CLSID_MSDAINITIALIZE, NULL, CLSCTX_INPROC_SERVER, IID_IDataInitialize,(void**)&pIDataInitialize); // Create an instance of CLSID_MSDASQL with supported Services. pIDataInitialize->CreateDBInstance(CLSID_MSDASQL, NULL, CLSCTX_INPROC_SERVER, NULL, IID_IDBInitialize, (IUnknown**)&pIDBInitialize); // Initialize the DataSource object by setting any required // initialization properties and calling IDBInitialize::Initialize CHECK_HR(hr = myDoInitialization(pIDBInitialize));
There are many considerations when connecting to a data source using OLE DB. For more information about how to query data using OLE DB, refer to the "OLE DB Programmer's Reference" at http://msdn2.microsoft.com/en-us/library/ms974412.aspx.
ActiveX Data Objects
Based on OLE DB, ADO enables you to easily access data using programming languages such as Visual Basic, Active Server Pages (ASP), and JScript. ADO uses a hierarchical object model and enables developers to query a database and return data into a recordset object. If your application needs to access data using Visual Basic (not Visual Basic .NET) or the scripting languages VBScript and JScript, you need to use ADO.
Before you can create a connection using ADO, you need to reference the ADO libraries in your project. If you are using a Visual Basic project, you will need to select References from the Project menu. From Available References, browse to the location of the MDAC library, as shown in Figure 1-4.
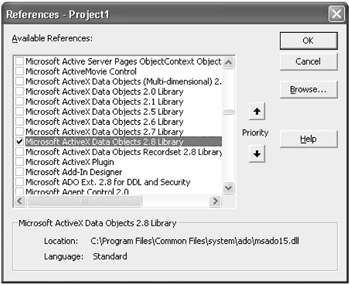
Figure 1-4: References dialog box used to set a reference to the latest MDAC library
Once the library reference has been set, you can refer to the ADO objects in your Visual Basic code. ADO provides a connection object, which represents a session with a specific data source. The connection object uses a connection string to specify the connection parameters. You can utilize a DSN connection or a DSN-less connection. For a DSN-less connection, all the connection information is specified within the connection string itself.
The following Visual Basic code can be used to open a connection to a SQL Server database using a DSN-less connection string:
'VB Dim conn as ADODB.Connection Set conn = New ADODB.Connection conn.ConnectionString = "Provider='sqloledb';Data Source='MySqlServer';" & _ "Initial Catalog='Northwind';Integrated Security='SSPI';" conn.Open
How to Connect by Using SQL Native Client
SQL Native Client was introduced with SQL Server 2005. It contains the SQL ODBC driver and SQL OLE DB provider and also enables you to connect using ADO. SNAC was introduced so developers can take advantage of the new features in SQL Server 2005.
How you handle the connection depends on which type of application you have. You will need to change the provider name specified in the connection string. The following connection string can be used by ODBC, OLE DB, or ADO to access a SQL Server database named Pubs using a trusted connection and without using the SNAC provider:
"Provider=SQLOLEDB;Server=(local);Database=Pubs;Integrated Security=SSPI;"
This is the connection string you are probably used to seeing, and it is the one you should continue to use, unless you need to take advantage of the new features available with SQL Server 2005. If you want to use the SQL Native Client with ADO, you will need to use a different provider. You will also need to use the DataTypeCompatibility keyword so that the new data types available with SQL Server 2005 are accessible in ADO. For example, the following connection string can be used for an ADO application using the SQL Native Client:
"Provider=SQLNCLI;DataTypeCompatibility=80;Server=(local); Database=Pubs;Integrated Security=SSPI;"
If you are using ODBC or OLE DB, you do not have to include the DataTypeCompatibility keyword, but you will need to keep the SQLNCLI value as the provider.
Managing Password Policies
Prior to SQL Server 2005, there was no way to force a user to change their SQL Server logon password. This was considered a security issue. Now, administrators have the option of flagging a user logon so that the password must change or it will eventually expire. This enables an administrator to set up a user logon so that the user must change the password at first logon; this helps to ensure that only the user knows the password.
| Best Practices | Configure Password Expiration whenever possible Although it is not necessary for all logons to be configured with password expiration or for the user to change the password, it is recommended that you set up logons this way whenever possible. |
Figure 1-5 shows password expiration being set using SQL Server Management Studio at the time the user logon is created. Password expiration can also be done programmatically after the logon has been created. You would accomplish this by executing the T-SQL command ALTER LOGIN.
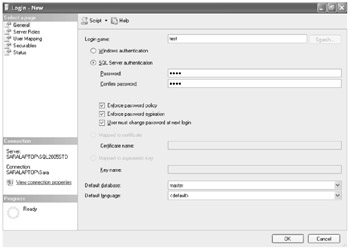
Figure 1-5: Login - New dialog box used to create a user login in SQL Server Management Studio
Because SQL Server 2005 enables you to force a password change, you can create an application for help desk employees to reset passwords while maintaining the integrity of the password. The application would use the ALTER LOGIN command to issue the password reset. The syntax for this command would be similar to the following.
ALTER LOGIN Test WITH PASSWORD='NewPassword', MUST_CHANGE
The MUST_CHANGE parameter ensures that the user must change her password the next time that she attempts to log on.
Lab: Connecting to a SQL Server Service
In this lab, you will connect to a SQL Server service using one of two different methods. In the first exercise, you will use ADO.NET to connect to an instance of SQL Server 2005. In the second exercise, you will connect to the same SQL Server instance, but this time, you will use the new SQL Native Client provider.
The completed code examples, in both Visual Basic and C#, are available in the \Labs\Chapter 01 folder on the companion CD.
| Important | Lab requirements You will need to have SQL Server and Visual Studio 2005 installed before you can complete the exercises in this chapter. Refer to the Introduction for setup instructions. |
Exercise 1: Connect Using ADO.NET
In this exercise, you will connect to a local instance of SQL Server 2005 using ADO.NET. To do this, you will first create a simple Windows forms application using Visual Studio 2005.
-
Open Microsoft Visual Studio 2005.
-
On the File menu, select New, Project.
-
In the New Project dialog box, expand the Other Project Types node, and select Visual Studio Solutions.
-
Type TK442Chapter1 for the name of your blank solution, place it in a directory of your choosing, and then click OK.
A new solution file will be created, and you can now add multiple projects to this solution. You will add one project for each lab included in this chapter.
-
On the File menu, select Add, New Project. Select Windows Application as the template, and type Lab1 as the project name. Set the language by selecting Visual Basic, Visual C#, or Visual J# from the language drop-down list box. By default, Visual Studio will select the language specified when it was first configured.
-
From the Toolbox, drag a button control onto the Form1 design surface. Use the following properties for this control:
-
Name = btnOpen
-
Text = "Connect using ADO.NET"
-
-
Right-click Form1 from Solution Explorer, and select View Code. At the top of the code file, add the following statement.
//C# using System.Data.SqlClient; 'VB Imports System.Data.SqlClient
-
Paste the following code below the Form1_load method. Modify connection strings to match your environment.
//C# private void btnOpen_Click(object sender, EventArgs e) { try { //Open the Connection to SQL Server Express using ADO.NET string connString = @"server=(local);" + "Integrated Security=SSPI;" + "Database=AdventureWorks"; sqlConn = new SqlConnection(connString); sqlConn.Open(); MessageBox.Show("Connection was successful"); } catch (Exception ex) { MessageBox.Show(ex.Message); } } 'VB Private Sub btnOpen_Click(ByVal sender As System.Object, ByVal e As System.EventArgs) Handles btnOpen.Click Try 'Open the Connection to SQL Server using ADO.NET Dim connString As String = "server=(local);" & _ "Integrated Security=SSPI;" & _ "Database=AdventureWorks" Dim sqlConn As New SqlConnection sqlConn.ConnectionString = connString sqlConn.Open() MessageBox.Show("Connection was successful") Catch ex As Exception MessageBox.Show(ex.Message) End Try End Sub -
Save the project, and press Ctrl+F5 to build the project without debugging.
Ensure that the project builds with no errors. Form1 should appear with the button you created.
-
Click the button to open a connection to the AdventureWorks database in your local instance of SQL Server. You should receive a message box that states, "Connection was successful." If you do not receive this message, you must resolve any errors before continuing.
-
Open Microsoft SQL Server Management Studio, and connect to the local instance of SQL Server.
-
Click New Query, and type the following SQL statement to query for open connections:
SELECT connect_time, connection_id, session_id, client_net_address, auth_scheme FROM sys.dm_exec_connections order by connect_time desc
You should see a record for the connection that was just created.
Exercise 2: Connect Using SQL Native Client
In this exercise, you will connect to the same instance of SQL Server, but this time, you will use the SQL Native Client provider. You will do this using ADO, which will require you to add a reference to the MDAC library.
| Important | Exercise Requirements You will need to have SQL Server and the latest version of the MDAC library installed before you can complete this exercise. Refer to the Introduction for setup instructions. |
-
Return to the project that was created in Exercise 1. If you did not complete Exercise 1, you now need to complete steps 1 through 4 of Exercise 1 before continuing with this exercise.
-
Select Project, and Add Reference.
-
Select the COM tab, and scroll to the Microsoft ActiveX Data Objects 2.8 library component. Select that component, and click OK. This will allow you to use the ADO library in your code.
-
Return to the Form1 designer and drag a button control from the Toolbox onto the Form1 design surface. Use the following properties for this control:
-
Name = btnOpenSNAC
-
Text = "Connect using SQL Native Client"
-
-
Paste the following code below the Form1_load method. Modify connection strings to match your environment.
//C# private void btnOpenSNC_Click(object sender, EventArgs e) { try { conn = new ADODB.Connection(); string connString = @"Provider=SQLNCLI;" + @"Data Source=(local);" + "Initial Catalog=Adventureworks;" + "Integrated Security=SSPI;" + "DataTypeCompatibility=80;"; conn.Open(connString,"" ,"", 0); MessageBox.Show("Connection was successful"); } catch (Exception ex) { MessageBox.Show(ex.Message); } } 'VB Private Sub btnOpenSNC_Click(ByVal sender As System.Object, ByVal e As System.EventArgs) Handles btnOpenSNC.Click Try Dim conn As New ADODB.Connection conn.ConnectionString = "Provider=SQLNCLI;" _ & "Data Source=(local);" _ & "Initial Catalog=AdventureWorks;" _ & "Integrated Security=SSPI;" _ & "DataTypeCompatibility=80;" conn.Open() MessageBox.Show("Connection was successful") Catch ex As Exception MessageBox.Show(ex.Message) End Try End Sub -
Open or return to Microsoft SQL Server Management Studio, and connect to the local instance of SQL Server.
-
Click New Query, and type the following SQL statement to query for open connections, or execute the same query from Exercise 1:
SELECT connect_time, connection_id, session_id, client_net_address, auth_scheme FROM sys.dm_exec_connections order by connect_time desc
You should see a record for the connection that was just created.
EAN: N/A
Pages: 162