Building Your First Inheritable Form
| < Day Day Up > |
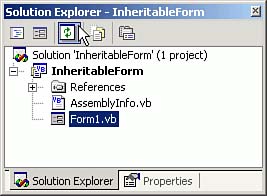
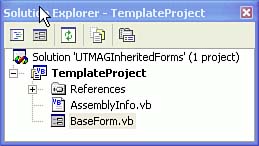
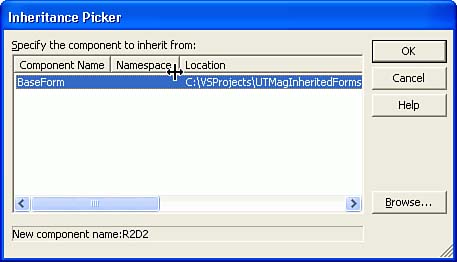
| To create an inheritable form class, open the VS IDE and select New Visual Basic .NET Windows Application project. Enter InheritedForm as the project name . (I've changed the location where the solution and project will be created to C:\VBProjects so as to make my Visual Basic .NET code easy to find.) Fill in the screen as shown in Figure 4.1. Figure 4.1. Starting a new solution and Windows Application project.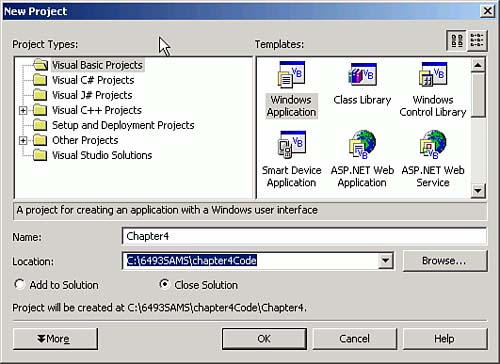 Visual Studio will create a solution file named InheritableForm, as well as a project file named InheritableForm containing a form named Form1.vb , as shown in Figure 4.2. Figure 4.2. The solution and project in the Solution Explorer window. Because we want to create an inheritable form, we need to change the Output type from Windows Application to Class Library. First close the Form Designer because you can't change project properties while the Form Designer has one of its forms open. Make sure the Solution Explorer window (Ctrl+Alt+L) is visible and selected, then right-click on the project name and select Properties. Select Class Library from the Output Type, combo box, change the name to BaseForm , and blank out the Root Namespace text box as shown in Figure 4.3. Figure 4.3. Changing the inheritable form name in the Inheritable Form Property Page.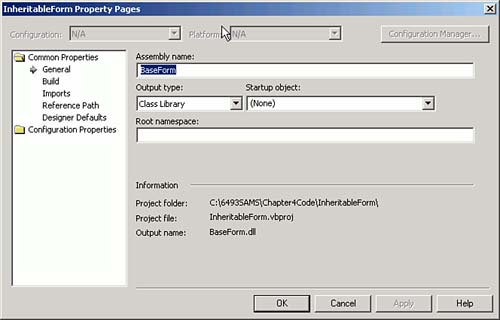 Close the Properties page. Finally, right-click on Form1.vb in the Solution Explorer and change the name to BaseForm.vb . The result should look like what's shown in Figure 4.4. Figure 4.4. The renamed form class in the Solution Explorer. Double-click on baseform.vb to bring up the designer, and then use Ctrl+Alt+X (or select View, Toolbox from the IDE menu) to display the Toolbox. Select Windows Forms. (You can only select it if the Designer is open, so if you don't see the Toolbox tab, that's probably the problem.) I want to have buttons to add, edit, delete, save, cancel, and close the form, so double-click six times on the button control. You can then use the Layout tools to line them up. Select View, Toolbars from the IDE menu and make sure Layout is checked. Next, change the buttons' Name properties to btnAdd , btnEdit , btnDelete , btnSave , btnCancel , and btnClose , and then change their respective Text values to Add , Edit , Delete , Save , Cancel , and Close . I like to put an ampersand (&) in front of the appropriate capitalized letter of each text caption to enable a hotkey. I use Cl&ose because & Cancel is taken, even though it's not really a conflict because both are never enabled at the same time. Speaking of enabling, I initially disable all buttons except Close, for reasons that will become clear presently. I also changed the form's Text property to Change me! as a reminder to the programmer. Finally, position all six of the buttons near the bottom left of the screen, and then select all of them and set the Anchor property to Bottom, Left , as shown in Figure 4.5. Figure 4.5. Anchoring the buttons to the bottom left of the form.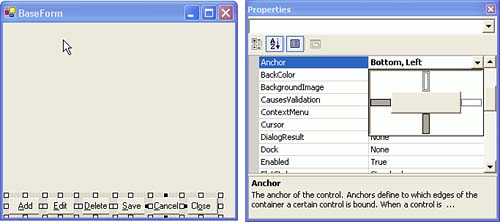 Although some "flat files" are very large, most applications use lots of little tables. So I'm going to make a simplifying assumption that a single level of filtering is sufficient to show a subset of matching records from which a single record can be chosen for viewing or editing. For this purpose, I'll put a text box at the top of the screen so that the user can enter a filtering value for a designated search field, and a button and a list box to show the matching values of said search field. It's not going to work in every case, but if it meets 90% of your needs, it's a good start. Add two labels, a text box, a button, and a list box to make the form look like Figure 4.6. Figure 4.6. Adding a search capability to the form.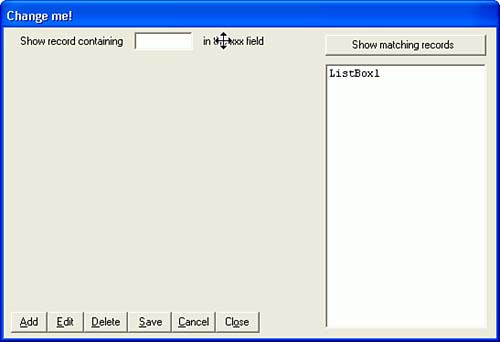 I anchored the Show Matching Records button at the top and right, and the list box is anchored at the top, right, and bottom. As a result, automatic resizing performs exactly as you would expect. That's better than writing all of that resizing code that used to be required, and it works the same way in the IDE as it does in the final program. Coding the Form ClassThe first thing I code is always the Close button because I'm anxious to see it work. Double-click on the Close button and you'll see that the IDE generates two lines of code. Listing 4.2 shows the code for the Click event of the Close button. Note that the Handles clause determines which event the routine responds to, not the routine name as is the case in Visual FoxPro. Listing 4.2. The Close Button Click Event CodePrivate Sub btnClose_Click( _ ByVal sender As System.Object, _ ByVal e As System.EventArgs) _ Handles btnClose.Click Close() End Sub The Private Sub and End Sub lines were written by the IDE's code generator. I added the Close command. (The ending parentheses were added by the IDE.) The form displays one record at a time, which makes saving changes simple. That's the reason for this design. But that means we have to have a mechanism for selecting a record for viewing or editing. That's what the text box, the list box, and the Show Matching Record button are for. The user enters a string ”one or more letters ”into the text box and clicks on the button, and the list is populated with all of the records that match. But match on what? I've decided to specify a single search field, presumably the most important field in the table, as the target for the search. I've also decided to show all records that start with the string entered by the user. As you'll see shortly, matching any part of the expression is equally easy. But it's my design, so I'll do it my way. To see how this works, compile the project. This creates a DLL named BookInheritedForm.dll , which can contain several inheritable items. Next, add a project called UseTheFormLuke to your current solution. (I did my first FoxBASE project for George Lucas at the Skywalker Ranch.) It will add a form called Form1 , which we'll ignore for now. Next, right-click on the new project and select Add, Add Inherited Form from the context menu. The resulting dialog will first ask for a name for the new form (call it Test ), and then it will ask you to select from the available inheritable classes, as shown in Figure 4.7. Select BaseForm , the only one on the list. The resulting form will look just like BaseForm because it inherits from BaseForm . Figure 4.7. Selecting an inheritable class for an inherited form. We'll need a Main Form in order to test our inherited form. You can use Form1 , which was created automatically when you added the Windows Application project. Change the filename to MainForm.vb by right-clicking on the filename and selecting Rename, and then open the form's code and change Class Form1 , the first line in the file, to Class MainForm . (You can also open the form in the Form Designer and change the Name property.) Next, drag a MainMenu control from the Windows Form toolbox to the form's design surface. Type File in the top left cell , and Exit just below it, as shown in Figure 4.8. Figure 4.8. Adding menu items to the form.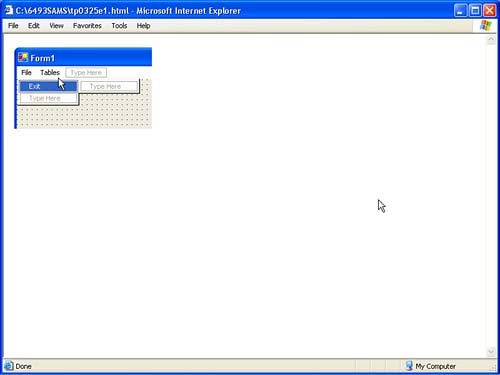 Double-click on Exit and enter the single command End . Go up and to the right of File and type Tables , and then go down and type Test Form . Double-click on Test Form and enter the following three lines of code: Dim frm as Test frm = New Test frm.Show() Press F5 to compile and run your application. Then select Tables, Test from the menu, and you'll see your first inherited form. It doesn't do much yet, but it will. |
| < Day Day Up > |
EAN: 2147483647
Pages: 130