Chapter 5: Organizing and Finding Information in Microsoft Office OneNote
Collaboration begins with how well you organize yourself. If a coworker or a member of another team you’re a part of asks for information or your opinion on an issue, it’s helpful if you know right where the information is or have read last week’s status report. There’s a sense of personal satisfaction that comes with being well organized and well informed-from knowing where to find things. You get more time for yourself if you don’t spend more time than is necessary keeping up with your job, your tasks, and your chores. You save not only time but effort when you know about the information you have and what information you need.
This chapter is about Microsoft Office OneNote, a program that was introduced in Microsoft Office 2003. You will often work on your own in Office OneNote 2007- collecting, organizing, and locating information-but OneNote is also designed as a tool that people use to share information.
Office OneNote is essentially an online notebook, a program that you use as you would a three-ring binder. You can divide a OneNote notebook into sections and add pages for notes, drawings, lists, and records. You can also add electronic printouts to a OneNote notebook, audio and video recordings, and copies of and links to Web sites. This chapter describes how to set up and work with OneNote as a step in your collaborative work-organizing yourself so that you can also work effectively as a member of a group.
| Note | Office OneNote 2007 is one of the programs in the 2007 Office release that does not have the new user interface, based on the Ribbon and its command tabs. In your work with OneNote, you’ll use familiar menus, toolbars, and task panes. For more information about the new user interface, see Chapter 2, “The 2007 Office System User Interface: What’s Changed, What’s the Same.” |
Organizing a OneNote Notebook
A OneNote notebook is divided into one or more sections. You can create as many sections as you need, and each section of a notebook can contain as many pages (and subpages) as you require. Each section of a notebook is identified by a tab across the top of the notebook, and each page in a section is identified by a tab that’s displayed along the notebook’s right side. Figure 5–1 shows a newly created Client notebook, one of the types of notebooks that you can create from a template provided with Office OneNote 2007.
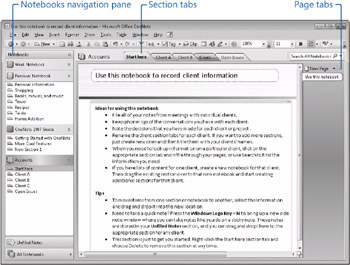
Figure 5–1: A OneNote notebook is made up of sections and pages. Click a section tab to display that section; click a page tab to jump to that page.
| Note | When you open Office OneNote 2007, you’ll notice that it displays three built-in notebooks-a guide to using the program, a sample of a Work notebook, and a sample of a Personal notebook. The pages in these notebooks provide information about how to use OneNote, including tips and tricks and examples of the types of information a specific section or page is designed to contain. |
Creating a Notebook
The number of notebooks that you set up in OneNote will be determined by any number of factors. You might find yourself joining a group of coworkers who use OneNote extensively, which means you’ll need to do the same because it’s the group’s common tool. You might set up a notebook for each month of the year, with a series of standard sections in which you record, for example, your progress on work assignments, thoughts about classes and training sessions you want to attend, and the list of tasks you need to complete before you meet with your manager at the end of each week. If you’re a project manager, you might create a notebook for each project you’re involved with. If you’re a sales representative, you could set up a notebook for each account you call on. Attorneys and legal assistants could set up a notebook for each active case.
To start creating a notebook in Office OneNote, follow these steps:
-
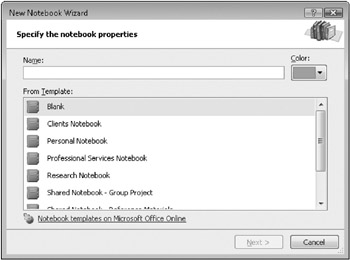
On the standard toolbar, click the arrow next to the New button, and then click Notebook. You’ll see the dialog box shown here, the first page of the New Notebook Wizard.
-
In the Name box, type a name for the notebook.
-
From the Color list, select the color you want to apply to this notebook’s cover. This color will be displayed on the notebook’s icon when the notebook is open and listed in the Notebooks navigation pane.
-
If you want to base this notebook on a template, select the template from the list provided, and then click Next. OneNote provides several built-in templates, and additional templates are available on Microsoft Office Online.
-
Select an option for how you will use the notebook, and then click Next.
You can set up a notebook to be used on a single computer, for use on more than one computer, or as a notebook that you’ll share with other users (by locating the notebook on a file server or in a shared folder on the computer on which you create the notebook.) If you initially set up a notebook to use on a single computer, you can share the notebook later so that it is available to you from another computer or can be shared among a group of users.
-
As the final step in creating a notebook, the New Notebook Wizard displays a page on which you can confirm the location where the notebook will be stored.
If you are creating a shared notebook, verifying this location is particularly important. You need to be sure that you are storing the notebook in a location that other users have access to. By default, notebooks that are set up to be used on a single computer are stored in your default documents folder (My Documents in Microsoft Windows XP; Documents in Microsoft Windows Vista) in a folder named OneNote Notebooks.
When you click Create to complete the wizard, OneNote opens the notebook you’ve created. It displays the sections and pages that are defined in a notebook template or, for a blank notebook, a single unnamed section and a blank untitled page, ready for you to start capturing the day’s details and thoughts.
The New Notebook Wizard provides links to online Help topics that describe what you need to know about sharing a notebook, either on more than one computer or among a group of users. You’ll also learn more about these topics later in the chapter in “Using a Notebook on More Than One Computer” on page 120 and “Working as a Team with Office OneNote 2007" on page 123.
Working in the OneNote Window
In the Notebooks navigation pane along the left side of the OneNote window, each open notebook is listed. In the view shown in Figure 5–2, all but one of the notebooks are shown in expanded view. This view displays the name of the notebook along with the name of each section the notebook contains. The view of the notebook named Work is collapsed so that it shows only the name of the notebook. You can expand or collapse a notebook by clicking the arrow beside the notebook’s name.
| Note | To open a section of a notebook, click the section’s name. To open a specific page, click the page’s name. You can also move from section to section by clicking the section tabs or by clicking the Back or Forward button on the toolbar. Click the arrow beside the Back or Forward button to open a list of the pages and sections you’ve viewed most recently. You can open these lists and then select the page you want to view. |
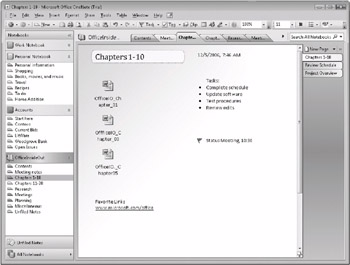
Figure 5–2: Open notebooks are listed in the Notebooks navigation pane. Click the name of a notebook or a notebook section to display it.
You can change the orientation of the navigation pane by clicking the arrow to the right of the Notebooks label at the top of the pane. By clicking the arrow, you collapse the view of each notebook, and OneNote arranges the names of the open notebooks vertically as tabs, as shown in Figure 5–3. This arrangement provides more space on a page you’re working with-space for taking notes, making a drawing, and so on. The All Notebooks tab at the bottom of the navigation pane provides another means for displaying a section of an open notebook. By clicking this tab, you see a window, shown in Figure 5–4, that lists each open notebook side by side so that you can scan the list and select the notebook section you need.
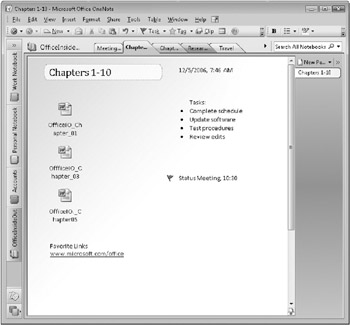
Figure 5–3: The Notebooks navigation pane can be viewed in different ways. Right-click a notebook to rename the notebook, add a section, or change the order of the notebooks.
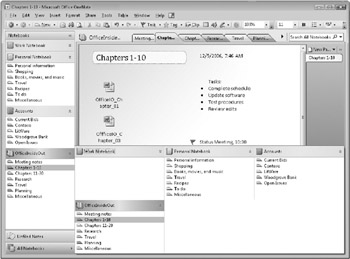
Figure 5–4: The All Notebooks tab displays a window in which each open notebook and its sections are displayed side by side.
You’ll learn more about the Unfiled Notes tab later in this chapter, in the sidebar, “OneNote Options,” on page 107.
Organizing Notebook Sections
Nothing prevents you from including only a single section in a notebook. However, if OneNote becomes an application you use regularly to maintain records of your daily work, you’ll undoubtedly add another section or two to your notebooks to keep the information you need in order.
You can create a section for a notebook by using the New button on the toolbar, the New command on the File menu, or by right-clicking the tab for a section that’s already included in a notebook and then clicking New Section. A section tab is added to the notebook with the temporary name New Section (with the addition of a number, starting with 1, if you’ve created several sections without naming them.) Enter a name for the section, and then press Enter or click away from the tab.
If a notebook is open and displayed in expanded view in the navigation pane, you need only to click the section name or the section tab to open that section. A notebook doesn’t need to be open, however, for you to open a section within it. Also, you can open a specific section of a notebook without opening the complete notebook. (Each section of a notebook is stored as a separate file, with the extension .one, in the OneNote Notebooks folder or in whichever folder you’ve used to store the notebook.) To open a section that’s not already displayed, on the File menu, point to Open, and then click Section. In the File Open dialog box, select the section (the .one file) as you would any other type of file you need to work with.
Notebook sections can be reordered, renamed, deleted, and grouped. The following list describes these and other ways you can organize the sections in a notebook.
-
Moving and reordering sections To move a section tab to a new location in the current notebook, drag the section tab to the left or right. A small triangle appears to indicate the new location. When a notebook is expanded in the navigation pane, you can drag any section tab up or down to a new location. When you drag a section in the navigation pane, a horizontal line appears to indicate the new location. You can also right-click a section tab that you want to move, and then click Move. Use the Move Section To dialog box, shown in Figure 5–5, to change the order of the section in the current notebook, to move the section to another notebook or a section group, or to create a section group.
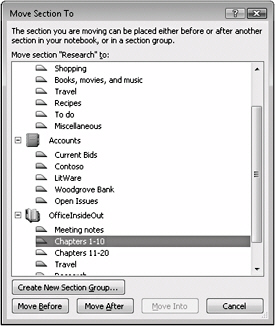
Figure 5–5: You can rearrange notebook sections by using the Move Section To dialog box. -
Renaming a section Right-click the tab of the section that you want to rename, and then click Rename. Type a new name for the section, and then press Enter.
-
Deleting a section Right-click the tab of the section you want to delete, and then click Delete.
-
Defining a section group In notebooks that contain a large number of sections, notebooks that you use for multiple purposes, or those to which you want to add another level of organization, you can create and name a section group. To create a section group, on the File menu, point to New, and then click Section Group. You can then add sections to the section group and keep related information together; for example, you could create a section group for each phase of a complex project.
| Inside Out-Creating a Table of Contents for a Notebook | On any page in your notebook, you can add a hyperlink that lets you jump to a section in the notebook. Adding hyperlinks to each section of a notebook is useful for cross-referencing notes or for creating a table of contents for a notebook. To add a hyperlink, right-click the tab of the section that the hyperlink should point to, and click Copy Hyperlink To This Section. Click the location on the page where you want the hyperlink to appear, and then paste the hyperlink at that location. OneNote inserts a hyperlink that displays the target section when you click it. You can return to the previous page by clicking the Back button on the OneNote standard toolbar. |
Adding and Grouping Notebook Pages
Each page in a notebook includes an area, shown in Figure 5–6, in which you name the page or describe the page’s contents. The current date and time are displayed by default below the title area as well. The text you enter for the page’s title also appears on the tab that identifies the page. If you leave the title area empty, the first line of your notes becomes the title of the page. To rename a page, double-click its page tab, and then type a different title into the title area.
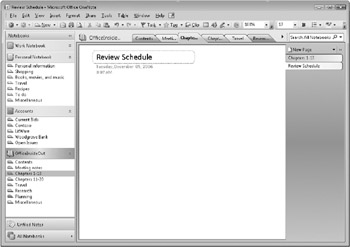
Figure 5–6: Enter a title or description at the top of a page to name the page.
To add a blank page to a section, click New Page, located at the right side of the current page. If you want to add a page that comes from a OneNote template-a page for describing a project overview, for example, or a blank page with college-ruled lines-click the arrow to the right of New Page, and then click More Template Choices And Options. The built-in page templates are displayed in a task pane and are organized in five categories-Academic, Blank, Business, Decorative, and Planners-as shown in Figure 5–7. At the bottom of the task pane, you can click the Save Current Page As Template link to create a page template of your own.
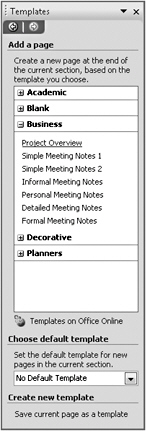
Figure 5–7: Page templates let you build the features of a notebook quickly. You can also save a page that you’ve designed as a custom template.
You also have the option of adding a subpage to a page. By using subpages, you can create groups of related pages. Each group has its primary page and as many subpages as you require. You can select a group of pages as a single unit when you need to copy or move the pages or send the pages in an e-mail message. Each subpage can also have a title.
EAN: 2147483647
Pages: 299