Ethernet
| Ethernet was originally implemented by Xerox in the early 1970s. Because it was successful, DEC, Intel, and Xerox collectively defined a standard for 10Mb ethernet in 1978. This formed the basis for the IEEE 802.3 definition, which was specified in 1985. The following are three major elements of an ethernet network:
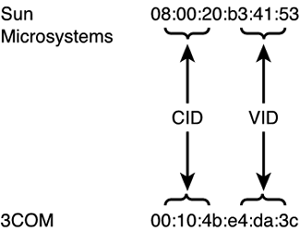
The two types of ethernet in use today are the original DEC, Intel, and Xerox standard, (also called DIX, named after the initial letters from each company and known as Ethernet II) and the IEEE 802.3 ethernet. Some differences exist between the two, primarily in the composition of the frames, which are discussed in the next section. Ethernet FramesAn ethernet frame is the basic unit of data transfer in ethernet networks. It contains a destination address, the sender (or source ) address, other control information, and the actual data itself. Ethernet AddressesHardware vendors providing network components use assigned starting ranges and globally unique MAC or hardware addresses (discussed below) to guarantee a component can be individually addressed, both within the local machine and on the network. The ethernet address is a 48-bit address typically displayed in hexadecimal as 12 numbers in groups of two called octets separated by colons. An example of an ethernet address is 08:00:20:b3:41:53 . Here, you can see that the third octet is 20 because it comprises 8 bits of the address. Ethernet addresses are assigned in two portions, each consisting of 24 bits, or three octets. The first three octets are the company identifier (CID), which is assigned and administered by the IEEE, and the second is a unique vendor-supplied identifier (VID). Sun Microsystems uses the CID 08:00:20 for most of its systems, the exceptions being 00:00:be for Sun E10K and Sun Fire E15K systems and 00:03:ba for SunBlade systems. A non-Sun example is 3Com, which uses 00:10:4b as its CID. Figure 1.7 summarizes how an ethernet address is assigned. Figure 1.7. Components of an ethernet address. Two forms of addressing can be used with the IEEE ethernet specification. The default is host-based addressing, in which the ethernet address is obtained from the hardware itself, and the other option is port-based addressing, in which a locally assigned ethernet address is specified instead of the hardware address. This latter method is described later in this chapter, in the section "Assigning a Port-Based Ethernet Address."
Ethernet uses three types of addresses:
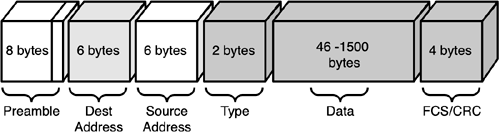
Ethernet Frame CompositionAn Ethernet II frame comprises a number of fields containing the necessary information to transmit and receive data. Figure 1.8 shows a graphical representation of an Ethernet II frame. Figure 1.8. The fields of an Ethernet II frame. Each of the fields comprising an Ethernet II frame is described here:
Ethernet II frames differ from IEEE 802.3 frames primarily in the fourth field. In Ethernet II, this field is a type field, identifying the type of data being carried in the data field. In IEEE 802.3 frames, however, this field is a length field, specifying the length in bytes of the data field. Because networks might be carrying both Ethernet II and IEEE 802.3 frames, the frame format can be easily identified by the value of this fourth field. In Ethernet II frames, the value of this field is always greater than 1536, whereas in IEEE 802.3 frames, the length must be less than 1500. The Ethernet II frame format is typically used in a TCP/IP environment. Maximum Transfer UnitsAn Ethernet II frame can be a maximum of 1518 bytes long, but the maximum transfer unit (MTU) is 1500 bytes because the MTU refers to the maximum size of the data field that can be transmitted in a single ethernet frame. An ethernet frame that is fully populated is broken down as follows :
Conversely, an Ethernet II frame has a minimum size of 64 bytes. This is broken down as follows:
If an ethernet frame contains a data field with less than 46 bytes of data, padding is added until it is equal to the specified minimum.
As you have just seen, the maximum size of an ethernet frame is 1518 bytes, of which 1500 bytes can be data. If the data to be transmitted exceeds the MTU, it is automatically fragmented , meaning it is split up into 1500-byte pieces to fit into an ethernet frame. For example, 3050 bytes of data would be split into three separate ethernet frames for physical transmission across the network. The first two frames would each contain 1500 bytes of data, and the last one would contain the remaining 50 bytes of data. Each fragment contains all the headers that would be expected in an ethernet frame and is a self-contained unit.
Frame ErrorsWhen sending ethernet frames across a network, errors can occur due to various causes, ranging from faulty network cards to electrical interference on the network itself. Table 1.1 lists some of the more common error conditions encountered on ethernet networks and offers a description of possible causes. Table 1.1. Ethernet Frame Error Conditions
Assigning a Port-Based Ethernet AddressEarlier in this chapter, I mentioned that host-based addressing is the default method used for obtaining the ethernet address. This is where the address is obtained from the hardware itself. In cases in which obtaining the address from the hardware is impossible or you are creating a multihomed host containing several physical interfaces (using a Quad Fast ethernet card, for example), port-based addressing is necessary. Therefore, a locally assigned, unique ethernet address has to be provided for the device so it can participate in network communication. To assign the ethernet address locally, you need to inspect, and modify if necessary, one of the EEPROM values, namely local-mac-address? . The default value of this variable is false , meaning that port-based addressing is disabled. Verify this by logging in as root and using the eeprom or prtconf command as follows: # eeprom local-mac-address? local-mac-address?=false or # prtconf -pv grep local-mac-address? Local-mac-address? 'false' The value of this variable needs to be modified to true . Do this as follows: # eeprom local-mac-address?=true
You can assign a locally defined ethernet address to an interface using the ifconfig command with the ether switch. The seventh bit of the ethernet address denotes whether the ethernet address is globally or locally assigned. If the bit is not set ( ), the address is global; if it is set ( 1 ), the address is local. This changes the CID of a Sun ethernet address from 08:00:20 to 0a:00:20 . The VID part of the ethernet address should be assigned locally, ensuring that it is unique on the local network. Some use the existing VID, whereas others start a sequence of their own, such as 00:00:01 and so on. The following example shows the commands to set (and verify) the hme0 interface to a locally assigned ethernet address. The current configuration shows the hme0 interface with a globally assigned ethernet address: # ifconfig hme0 hme0: flags=1000843<UP,BROADCAST,RUNNING,MULTICAST,IPv4> mtu 1500 index 2 inet 192.168.1.28 netmask ffffff00 broadcast 192.168.1.255 ether 8:0:20:b3:41:53 To set the ethernet address to 0a:00:20:00:00:01 , enter the following command: # ifconfig hme0 ether 0a:00:20:00:00:01 If you now rerun the ifconfig command, the new address will be displayed, as such: # ifconfig hme0 hme0: flags=1000843<UP,BROADCAST,RUNNING,MULTICAST,IPv4> mtu 1500 index 2 inet 192.168.1.28 netmask ffffff00 broadcast 192.168.1.255 ether a:0:20:0:0:1
Ethernet Interface StatisticsVarious statistics about ethernet interfaces can be displayed to show which ethernet interfaces are installed on the local system, the number of packets or frames being sent or received, and whether any errors are being encountered. The following sections describe each of these. Displaying Installed Ethernet InterfacesUse the ifconfig -a command to display all ethernet interfaces that are present on the local system. This includes physical and pseudo interfaces, such as the loopback device. Remember that, if you run this command as a non-root user, the ethernet addresses will not be displayed. The following example shows the result of running ifconfig -a as root on a system with one physical interface installed, namely hme0 : #ifconfig -a lo0: flags=1000849<UP,LOOPBACK,RUNNING,MULTICAST,IPv4> mtu 8232 index 1 inet 127.0.0.1 netmask ff000000 hme0: flags=1000843<UP,BROADCAST,RUNNING,MULTICAST,IPv4> mtu 1500 index 2 inet 192.168.1.28 netmask ffffff00 broadcast 192.168.1.255 ether 8:0:20:b3:41:53
Collision RatesA collision is said to have occurred when more than one host on a network tries to send a packet at the same time. The netstat -i command shows the current level of usage for all ethernet interfaces on the local system. To determine the collision rate, apply the following formula: ([number of collisions] x 100) / total number of output packets The following example shows the result of running netsat -i : # netstat -i Name Mtu Net/Dest Address Ipkts Ierrs Opkts Oerrs Collis Queue lo0 8232 loopback localhost 10156 0 10156 0 0 0 hme0 1500 ultra10 ultra10 184835 0 209364 21840 Applying the formula, you would calculate the collision rate as follows (the affected fields appear as bold text in the previous code): (21840 x 100) / 209364 = 10.43 The result of 10.43 means that 1 in 10 packets being sent across the network is resulting in a collision. For an ethernet network running at 10Mbps, the collision rate should not be higher than 5%, and it should not be higher than 10% for one running at 100Mbps. The numbers in the previous equation were taken from a network running at 10Mbps, indicating that a performance problem is being caused either by faulty or poor network cabling or by the network having too many hosts connected to the segment.
Input/Output ErrorsIn the previous section, the netstat -i command was used to show the level of usage of ethernet interfaces on the network. This command is also used to detect input and output errors. Collisions, as you have seen, are a network- related problem, whereas input and output errors are specific to the local system and the cause could be one of the following:
Troubleshooting Ethernet ProblemsSolaris provides a number of network utilities that can be used to troubleshoot an ethernet interface. This section describes the utilities ifconfig , ping , netstat , snoop , and ndd . When used together, they can diagnose the majority of network-related problems. ifconfigAs root, use the ifconfig -a command to verify the status of all installed ethernet interfaces, as shown in the following: #ifconfig -a lo0: flags=1000849<UP,LOOPBACK,RUNNING,MULTICAST,IPv4> mtu 8232 index 1 inet 127.0.0.1 netmask ff000000 hme0: flags=1000843<UP,BROADCAST,RUNNING,MULTICAST,IPv4> mtu 1500 index 2 inet 192.168.1.28 netmask ffffff00 broadcast 192.168.1.255 ether 8:0:20:b3:41:53 As shown in the preceding code, you can use the flags= line to verify that the ethernet interface is up and running and that the netmask is correct for the specific interface IP address. Problems such as this can often be encountered when an ethernet interface has been manually configured incorrectly. pingThe ping command ( ping stands for Packet Internet Groper), although relatively basic, is an extremely useful utility for checking the reachability of a host on the network. If the alive response is received, the ethernet interface is responding and you can quickly check that the host can be contacted across the network. When network problems occur, you can also send a continuous ping to an unreachable host so that you know when the network becomes available again. netstatYou have already seen the netstat -i command used to display the current usage for the ethernet interfaces installed, but you can also use the netstat -s command to display network statistics for each of the network protocols in use. The output from this command can be several pages, but it shows useful information relating to parameters and errors. The following code shows the result after running this command (the output has been truncated). RAWIP rawipInDatagrams = 0 rawipInErrors = 0 ... UDP udpInDatagrams = 14443 udpInErrors = 0 udpOutDatagrams = 14446 udpOutErrors = 0 TCP tcpRtoAlgorithm = 4 tcpRtoMin = 400 tcpRtoMax = 60000 tcpMaxConn = -1 tcpActiveOpens = 30 tcpPassiveOpens = 33 ... IPv4 ipForwarding = 2 ipDefaultTTL = 255 ipInReceives = 93136 ipInHdrErrors = 0 ipInAddrErrors = 0 ipInCksumErrs = 0 ipForwDatagrams = 0 ipForwProhibits = 0 IPv6 ipv6Forwarding = 2 ipv6DefaultHopLimit = 255 ... ICMPv4 icmpInMsgs = 56 icmpInErrors = 0 icmpInCksumErrs = 0 icmpInUnknowns = 0 icmpInDestUnreachs = 3 icmpInTimeExcds = 0 icmpInParmProbs = 0 icmpInSrcQuenchs = 0 icmpInRedirects = 0 icmpInBadRedirects = 0 icmpInEchos = 53 icmpInEchoReps = 0 ... ICMPv6 icmp6InMsgs = 0 icmp6InErrors = 0 ... icmp6InOverflows = 0 IGMP: 50 messages received ... snoopThe snoop command is run by the root user and is arguably the best network diagnostic program available in the Solaris operating environment. It is used to capture network packets and either display them on the screen or write them to a file for further analysis. You can use snoop to monitor all network traffic that passes the local ethernet interface or to monitor selected hosts and protocols. The amount of detail captured can also be tailored because snoop provides three levels of detail: summary, summary verbose , and verbose . The following examples demonstrate the type of information that can be collected, using three levels of detail (basic summary, summary verbose and verbose), from a simple ping command from host puma : IP address 192.168.1.28 , to host lion : IP address 192.168.1.19 . The basic summary level of information is obtained using the default option, as shown here: # snoop -d hme0 1 0.00000 puma -> lion ICMP Echo request (ID: 725 Sequence number: 0) 2 0.00031 lion -> puma ICMP Echo reply (ID: 725 Sequence number: 0) The summary verbose option of snoop uses the -V switch as follows and provides more information for exactly the same ping operation (from host puma to host lion ): [View full width]
The verbose option of snoop uses the -v switch and provides the most detailed information. Again, the same ping command is used: # snoop -v -d hme0 ETHER: ----- Ether Header ----- ETHER: ETHER: Packet 1 arrived at 15:32:40.70 ETHER: Packet size = 98 bytes ETHER: Destination = 0:b0:d0:e7:9f:fd, Computer Products International ETHER: Source = 8:0:20:b3:41:53, Sun ETHER: Ethertype = 0800 (IP) ETHER: IP: ----- IP Header ----- IP: IP: Version = 4 IP: Header length = 20 bytes IP: Type of service = 0x00 IP: xxx. .... = 0 (precedence) IP: ...0 .... = normal delay IP: .... 0... = normal throughput IP: .... .0.. = normal reliability IP: .... ..0. = not ECN capable transport IP: .... ...0 = no ECN congestion experienced IP: Total length = 84 bytes IP: Identification = 43864 IP: Flags = 0x4 IP: .1.. .... = do not fragment IP: ..0. .... = last fragment IP: Fragment offset = 0 bytes IP: Time to live = 255 seconds/hops IP: Protocol = 1 (ICMP) IP: Header checksum = 1b22 IP: Source address = 192.168.1.28, puma IP: Destination address = 192.168.1.19, lion IP: No options IP: ICMP: ----- ICMP Header ----- ICMP: ICMP: Type = 8 (Echo request) ICMP: Code = 0 (ID: 725 Sequence number: 0) ICMP: Checksum = 592d ICMP: ETHER: ----- Ether Header ----- ETHER: ETHER: Packet 2 arrived at 15:32:40.70 ETHER: Packet size = 98 bytes ETHER: Destination = 8:0:20:b3:41:53, Sun ETHER: Source = 0:b0:d0:e7:9f:fd, Computer Products International ETHER: Ethertype = 0800 (IP) ETHER: IP: ----- IP Header ----- IP: IP: Version = 4 IP: Header length = 20 bytes IP: Type of service = 0x00 IP: xxx. .... = 0 (precedence) IP: ...0 .... = normal delay IP: .... 0... = normal throughput IP: .... .0.. = normal reliability IP: .... ..0. = not ECN capable transport IP: .... ...0 = no ECN congestion experienced IP: Total length = 84 bytes IP: Identification = 7736 IP: Flags = 0x4 IP: .1.. .... = do not fragment IP: ..0. .... = last fragment IP: Fragment offset = 0 bytes IP: Time to live = 128 seconds/hops IP: Protocol = 1 (ICMP) IP: Header checksum = 2743 IP: Source address = 192.168.1.19, lion IP: Destination address = 192.168.1.28, puma IP: No options IP: ICMP: ----- ICMP Header ----- ICMP: ICMP: Type = 0 (Echo reply) ICMP: Code = 0 (ID: 725 Sequence number: 0) ICMP: Checksum = 612d ICMP: You can see that, depending on which level of detail is required, you can either obtain simple, higher-level information, or detailed information about all protocols that were used to complete the operation (in this case, a single ping command).
It is not always convenient or manageable to display the packet capture results to the screen. Instead, you can save the results to a file for offline analysis. To do this, use the -o < filename > option of snoop . The saved file will not be human readable, but you can load it back into snoop later using the -i < filename > option as shown here: # snoop -d hme0 -o /tmp/file.out Then, to read the contents of the saved output file, use the following command: # snoop -i /tmp/file.out If you do want to save the information to a text file that can be read like any other file, simply redirect the output as follows: # snoop -v -d hme0 >> /tmp/snooptmp nddThe ndd utility is used to inspect, and modify if necessary, the network driver parameters. Many of the network protocols are implemented as drivers. The main ones we are concerned about in this book, however, are arp , tcp , udp , ip (ipv6) , icmp ( icmpv6) , and hme / le / qfe (depending on the type of ethernet interface installed).
The ? option to ndd displays all the parameters for a given driver, although it is typically preceded by a \ character to escape the ? from the shell. Otherwise it might be interpreted as a special shell character. As an example, consider the hme driver as shown here: # ndd /dev/hme \? ? (read only) transceiver_inuse (read only) link_status (read only) link_speed (read only) link_mode (read only) ipg1 (read and write) ipg2 (read and write) use_int_xcvr (read and write) pace_size (read and write) adv_autoneg_cap (read and write) adv_100T4_cap (read and write) adv_100fdx_cap (read and write) adv_100hdx_cap (read and write) adv_10fdx_cap (read and write) adv_10hdx_cap (read and write) autoneg_cap (read only) 100T4_cap (read only) 100fdx_cap (read only) 100hdx_cap (read only) 10fdx_cap (read only) 10hdx_cap (read only) lp_autoneg_cap (read only) lp_100T4_cap (read only) lp_100fdx_cap (read only) lp_100hdx_cap (read only) lp_10fdx_cap (read only) lp_10hdx_cap (read only) instance (read and write) lance_mode (read and write) ipg0 (read and write) Notice that each parameter listed also contains permission information, such as whether you can only inspect the value or change it as well. The link_speed parameter is frequently the cause of problems, particularly with older network interfaces. Newer interfaces can autosense whether the network is running at 10Mbps or 100Mbps, for example, and set this parameter automatically. Older interface cards, however, might be hardwired to 10Mbps, so a problem occurs when you connect it to a 100Mbps network. The following example shows how to inspect two values that provide useful information: link_speed and autoneg_cap . The first shows a value of because it is running at 10Mbps (the value would be 1 if it was running at 100Mbps). The second identifies whether the interface can automatically negotiate the link speed, meaning it can set itself to whatever the network is running at. In this case, note that the value of 1 indicates that this interface can set the value depending on the network: # ndd /dev/hme link_speed 0 # ndd /dev/hme autoneg_cap 1
Another useful example is the system startup script /etc/rc2.d/S69inet (which is a hard link to /etc/init.d/inetinit ), in which the ndd command is used to either enable or disable the forwarding of IP requests , depending on whether the host is a router. The relevant fragment of this script is shown here to demonstrate the use of ndd in a script (setting the parameter to 1 enables forwarding, whereas disables it). I have highlighted, in bold, the two lines that set the forwarding parameter: ... if [ ! -f /etc/notrouter -a $numdhcp -eq 0 -a \ \( $numifs -gt 2 -o $numptptifs -gt 0 -o -f /etc/gateways \) ]; then # # Machine is an IPv4 router: turn on ip_forwarding, run # in.routed, and advertise ourselves as a router using router # discovery. # echo 'Machine is an IPv4 router.' /usr/sbin/ndd -set /dev/ip ip_forwarding 1 [ -f /usr/sbin/in.routed ] && /usr/sbin/in.routed -s [ -f /usr/sbin/in.rdisc ] && /usr/sbin/in.rdisc -r else # # Machine is an IPv4 host: if router discovery finds a router # then we rely on router discovery. If there are no routers # advertising themselves through router discovery # run in.routed in quiet mode. In both cases, turn off # ip_forwarding. /usr/sbin/ndd -set /dev/ip ip_forwarding 0 if [ -f /usr/sbin/in.rdisc ] && /usr/sbin/in.rdisc -s; then echo 'Starting IPv4 router discovery.' elif [ -f /usr/sbin/in.routed ]; then /usr/sbin/in.routed -q echo 'Starting IPv4 routing daemon.' fi fi ... |
EAN: 2147483647
Pages: 174