Modeless Dialog Boxes
At the beginning of this chapter, I explained that dialog boxes can be either "modal" or "modeless." So far we've been looking at modal dialog boxes, the more common of the two types. Modal dialog boxes (except system modal dialog boxes) allow the user to switch between the dialog box and other programs. However, the user cannot switch to another window in the program that initiated the dialog box until the modal dialog box is destroyed. Modeless dialog boxes allow the user to switch between the dialog box and the window that created it as well as between the dialog box and other programs. The modeless dialog box is thus more akin to the regular popup windows that your program might create.
Modeless dialog boxes are preferred when the user would find it convenient to keep the dialog box displayed for a while. For instance, word processors often use modeless dialog boxes for the text Find and Change dialogs. If the Find dialog box were modal, the user would have to choose Find from the menu, enter the string to be found, end the dialog box to return to the document, and then repeat the entire process to search for another occurrence of the same string. Allowing the user to switch between the document and the dialog box is much more convenient.
As you've seen, modal dialog boxes are created using DialogBox. The function returns a value only after the dialog box is destroyed. It returns the value specified in the second parameter of the EndDialog call that was used within the dialog box procedure to terminate the dialog box. Modeless dialog boxes are created using CreateDialog. This function takes the same parameters as DialogBox:
hDlgModeless = CreateDialog (hInstance, szTemplate, hwndParent, DialogProc) ;
The difference is that the CreateDialog function returns immediately with the window handle of the dialog box. Normally, you store this window handle in a global variable.
Although the use of the names DialogBox with modal dialog boxes and CreateDialog with modeless dialog boxes may seem arbitrary, you can remember which is which by keeping in mind that modeless dialog boxes are similar to normal windows. CreateDialog should remind you of the CreateWindow function, which creates normal windows.
Differences Between Modal and Modeless Dialog Boxes
Working with modeless dialog boxes is similar to working with modal dialog boxes, but there are several important differences.
First, modeless dialog boxes usually include a caption bar and a system menu box. These are actually the default options when you create a dialog box in Developer Studio. The STYLE statement in the dialog box template for a modeless dialog box will look something like this:
STYLE WS_POPUP ¦ WS_CAPTION ¦ WS_SYSMENU ¦ WS_VISIBLE
The caption bar and system menu allow the user to move the modeless dialog box to another area of the display using either the mouse or the keyboard. You don't normally provide a caption bar and system menu with a modal dialog box, because the user can't do anything in the underlying window anyway.
The second big difference: Notice that the WS_VISIBLE style is included in our sample STYLE statement. In Developer Studio, select this option from the More Styles tab of the Dialog Properties dialog. If you omit WS_VISIBLE, you must call ShowWindow after the CreateDialog call:
hDlgModeless = CreateDialog ( . . . ) ; ShowWindow (hDlgModeless, SW_SHOW) ;
If you neither include WS_VISIBLE nor call ShowWindow, the modeless dialog box will not be displayed. Programmers who have mastered modal dialog boxes often overlook this peculiarity and thus experience difficulties when first trying to create a modeless dialog box.
The third difference: Unlike messages to modal dialog boxes and message boxes, messages to modeless dialog boxes come through your program's message queue. The message queue must be altered to pass these messages to the dialog box window procedure. Here's how you do it: When you use CreateDialog to create a modeless dialog box, you should save the dialog box handle returned from the call in a global variable (for instance, hDlgModeless). Change your message loop to look like
while (GetMessage (&msg, NULL, 0, 0)) { if (hDlgModeless == 0 ¦¦ !IsDialogMessage (hDlgModeless, &msg)) { TranslateMessage (&msg) ; DispatchMessage (&msg) ; } } If the message is intended for the modeless dialog box, then IsDialogMessage sends it to the dialog box window procedure and returns TRUE (nonzero); otherwise, it returns FALSE (0). The TranslateMessage and DispatchMessage functions should be called only if hDlgModeless is 0 or if the message is not for the dialog box. If you use keyboard accelerators for your program's window, the message loop looks like this:
while (GetMessage (&msg, NULL, 0, 0)) { if (hDlgModeless == 0 ¦¦ !IsDialogMessage (hDlgModeless, &msg)) { if (!TranslateAccelerator (hwnd, hAccel, &msg)) { TranslateMessage (&msg) ; DispatchMessage (&msg) ; } } } Because global variables are initialized to 0, hDlgModeless will be 0 until the dialog box is created, thus ensuring that IsDialogMessage is not called with an invalid window handle. You must take the same precaution when you destroy the modeless dialog box, as explained below.
The hDlgModeless variable can also be used by other parts of the program as a test of the existence of the modeless dialog box. For example, other windows in the program can send messages to the dialog box while hDlgModeless is not equal to 0.
The final big difference: Use DestroyWindow rather than EndDialog to end a modeless dialog box. When you call DestroyWindow, set the hDlgModeless global variable to NULL.
The user customarily terminates a modeless dialog box by choosing Close from the system menu. Although the Close option is enabled, the dialog box window procedure within Windows does not process the WM_CLOSE message. You must do this yourself in the dialog box procedure:
case WM_CLOSE : DestroyWindow (hDlg) ; hDlgModeless = NULL ; break ;
Note the difference between these two window handles: the hDlg parameter to DestroyWindow is the parameter passed to the dialog box procedure; hDlgModeless is the global variable returned from CreateDialog that you test within the message loop.
You can also allow a user to close a modeless dialog box using push buttons. Use the same logic as for the WM_CLOSE message. Any information that the dialog box must "return" to the window that created it can be stored in global variables. If you'd prefer not using global variables, you can create the modeless dialog box by using CreateDialogParam and pass to it a structure pointer, as described earlier.
The New COLORS Program
The COLORS1 program described in Chapter 9 created nine child windows to display three scroll bars and six text items. At that time, the program was one of the more complex we had developed. Converting COLORS1 to use a modeless dialog box makes the program—and particularly its WndProc function—almost ridiculously simple. The revised COLORS2 program is shown in Figure 11-7.
Figure 11-7. The COLORS2 program.
COLORS2.C /*------------------------------------------------ COLORS2.C -- Version using Modeless Dialog Box (c) Charles Petzold, 1998 ------------------------------------------------*/ #include <windows.h> LRESULT CALLBACK WndProc (HWND, UINT, WPARAM, LPARAM) ; BOOL CALLBACK ColorScrDlg (HWND, UINT, WPARAM, LPARAM) ; HWND hDlgModeless ; int WINAPI WinMain (HINSTANCE hInstance, HINSTANCE hPrevInstance, PSTR szCmdLine, int iCmdShow) { static TCHAR szAppName[] = TEXT ("Colors2") ; HWND hwnd ; MSG msg ; WNDCLASS wndclass ; wndclass.style = CS_HREDRAW | CS_VREDRAW ; wndclass.lpfnWndProc = WndProc ; wndclass.cbClsExtra = 0 ; wndclass.cbWndExtra = 0 ; wndclass.hInstance = hInstance ; wndclass.hIcon = LoadIcon (NULL, IDI_APPLICATION) ; wndclass.hCursor = LoadCursor (NULL, IDC_ARROW) ; wndclass.hbrBackground = CreateSolidBrush (0L) ; wndclass.lpszMenuName = NULL ; wndclass.lpszClassName = szAppName ; if (!RegisterClass (&wndclass)) { MessageBox (NULL, TEXT ("This program requires Windows NT!"), szAppName, MB_ICONERROR) ; return 0 ; } hwnd = CreateWindow (szAppName, TEXT ("Color Scroll"), WS_OVERLAPPEDWINDOW | WS_CLIPCHILDREN, CW_USEDEFAULT, CW_USEDEFAULT, CW_USEDEFAULT, CW_USEDEFAULT, NULL, NULL, hInstance, NULL) ; ShowWindow (hwnd, iCmdShow) ; UpdateWindow (hwnd) ; hDlgModeless = CreateDialog (hInstance, TEXT ("ColorScrDlg"), hwnd, ColorScrDlg) ; while (GetMessage (&msg, NULL, 0, 0)) { if (hDlgModeless == 0 || !IsDialogMessage (hDlgModeless, &msg)) { TranslateMessage (&msg) ; DispatchMessage (&msg) ; } } return msg.wParam ; } LRESULT CALLBACK WndProc (HWND hwnd, UINT message, WPARAM wParam, LPARAM lParam) { switch (message) { case WM_DESTROY : DeleteObject ((HGDIOBJ) SetClassLong (hwnd, GCL_HBRBACKGROUND, (LONG) GetStockObject (WHITE_BRUSH))) ; PostQuitMessage (0) ; return 0 ; } return DefWindowProc (hwnd, message, wParam, lParam) ; } BOOL CALLBACK ColorScrDlg (HWND hDlg, UINT message, WPARAM wParam, LPARAM lParam) { static int iColor[3] ; HWND hwndParent, hCtrl ; int iCtrlID, iIndex ; switch (message) { case WM_INITDIALOG : for (iCtrlID = 10 ; iCtrlID < 13 ; iCtrlID++) { hCtrl = GetDlgItem (hDlg, iCtrlID) ; SetScrollRange (hCtrl, SB_CTL, 0, 255, FALSE) ; SetScrollPos (hCtrl, SB_CTL, 0, FALSE) ; } return TRUE ; case WM_VSCROLL : hCtrl = (HWND) lParam ; iCtrlID = GetWindowLong (hCtrl, GWL_ID) ; iIndex = iCtrlID - 10 ; hwndParent = GetParent (hDlg) ; switch (LOWORD (wParam)) { case SB_PAGEDOWN : iColor[iIndex] += 15 ; // fall through case SB_LINEDOWN : iColor[iIndex] = min (255, iColor[iIndex] + 1) ; break ; case SB_PAGEUP : iColor[iIndex] -= 15 ; // fall through case SB_LINEUP : iColor[iIndex] = max (0, iColor[iIndex] - 1) ; break ; case SB_TOP : iColor[iIndex] = 0 ; break ; case SB_BOTTOM : iColor[iIndex] = 255 ; break ; case SB_THUMBPOSITION : case SB_THUMBTRACK : iColor[iIndex] = HIWORD (wParam) ; break ; default : return FALSE ; } SetScrollPos (hCtrl, SB_CTL, iColor[iIndex], TRUE) ; SetDlgItemInt (hDlg, iCtrlID + 3, iColor[iIndex], FALSE) ; DeleteObject ((HGDIOBJ) SetClassLong (hwndParent, GCL_HBRBACKGROUND, (LONG) CreateSolidBrush ( RGB (iColor[0], iColor[1], iColor[2])))) ; InvalidateRect (hwndParent, NULL, TRUE) ; return TRUE ; } return FALSE ; } |
COLORS2.RC (excerpts)//Microsoft Developer Studio generated resource script. #include "resource.h" #include "afxres.h" ///////////////////////////////////////////////////////////////////////////// // Dialog COLORSCRDLG DIALOG DISCARDABLE 16, 16, 120, 141 STYLE DS_MODALFRAME | WS_POPUP | WS_VISIBLE | WS_CAPTION CAPTION "Color Scroll Scrollbars" FONT 8, "MS Sans Serif" BEGIN CTEXT "&Red",IDC_STATIC,8,8,24,8,NOT WS_GROUP SCROLLBAR 10,8,20,24,100,SBS_VERT | WS_TABSTOP CTEXT "0",13,8,124,24,8,NOT WS_GROUP CTEXT "&Green",IDC_STATIC,48,8,24,8,NOT WS_GROUP SCROLLBAR 11,48,20,24,100,SBS_VERT | WS_TABSTOP CTEXT "0",14,48,124,24,8,NOT WS_GROUP CTEXT "&Blue",IDC_STATIC,89,8,24,8,NOT WS_GROUP SCROLLBAR 12,89,20,24,100,SBS_VERT | WS_TABSTOP CTEXT "0",15,89,124,24,8,NOT WS_GROUP END |
RESOURCE.H (excerpts)// Microsoft Developer Studio generated include file. // Used by Colors2.rc #define IDC_STATIC -1 |
Although the original COLORS1 program displayed scroll bars that were based on the size of the window, the new version keeps them at a constant size within the modeless dialog box, as shown in Figure 11-8.
When you create the dialog box template, use explicit ID numbers of 10, 11, and 12 for the three scroll bars, and 13, 14, and 15 for the three static text fields displaying the current values of the scroll bars. Give each scroll bar a Tab Stop style, but remove the Group style from all six static text fields.
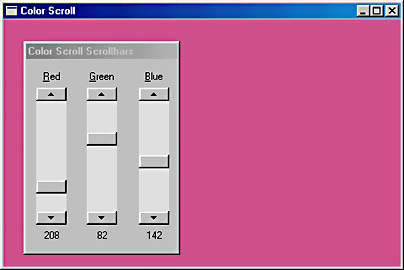
Figure 11-8. The COLORS2 display.
The modeless dialog box is created in COLORS2's WinMain function following the ShowWindow call for the program's main window. Note that the window style for the main window includes WS_CLIPCHILDREN, which allows the program to repaint the main window without erasing the dialog box.
The dialog box window handle returned from CreateDialog is stored in the global variable hDlgModeless and tested during the message loop, as described above. In this program, however, it isn't necessary to store the handle in a global variable or to test the value before calling IsDialogMessage. The message loop could have been written like this:
while (GetMessage (&msg, NULL, 0, 0)) { if (!IsDialogMessage (hDlgModeless, &msg)) { TranslateMessage (&msg) ; DispatchMessage (&msg) ; } } Because the dialog box is created before the program enters the message loop and is not destroyed until the program terminates, the value of hDlgModeless will always be valid. I included the logic in case you want to add some code to the dialog box window procedure to destroy the dialog box:
case WM_CLOSE : DestroyWindow (hDlg) ; hDlgModeless = NULL ; break ;
In the original COLORS1 program, SetWindowText set the values of the three numeric labels after converting the integers to text with wsprintf. The code looked like this:
wsprintf (szBuffer, TEXT ("%i"), color[i]) ; SetWindowText (hwndValue[i], szBuffer) ; The value of i was the ID number of the current scroll bar being processed, and hwndValue was an array containing the window handles of the three static text child windows for the numeric values of the colors.
The new version uses SetDlgItemInt to set each text field of each child window to a number:
SetDlgItemInt (hDlg, iCtrlID + 3, color [iCtrlID], FALSE) ;
Although SetDlgItemInt and its companion, GetDlgItemInt, are most often used with edit controls, they can also be used to set the text field of other controls, such as static text controls. The iCtrlID variable is the ID number of the scroll bar; adding 3 to the number converts it to the ID for the corresponding numeric label. The third argument is the color value. The fourth argument indicates whether the value in the third argument is to be treated as signed (if the fourth argument is TRUE) or unsigned (if the fourth argument is FALSE). For this program, however, the values range from 0 to 255, so the fourth argument has no effect.
In the process of converting COLORS1 to COLORS2, we passed more and more of the work to Windows. The earlier version called CreateWindow 10 times; the new version calls CreateWindow once and CreateDialog once. But if you think that we've reduced our CreateWindow calls to a minimum, get a load of this next program.
HEXCALC: Window or Dialog Box?
Perhaps the epitome of lazy programming is the HEXCALC program, shown in Figure 11-9. This program doesn't call CreateWindow at all, never processes WM_PAINT messages, never obtains a device context, and never processes mouse messages. Yet it manages to incorporate a 10-function hexadecimal calculator with a full keyboard and mouse interface in fewer than 150 lines of source code. The calculator is shown in Figure 11-10.
Figure 11-9. The HEXCALC program.
HEXCALC.C /*---------------------------------------- HEXCALC.C -- Hexadecimal Calculator (c) Charles Petzold, 1998 ----------------------------------------*/ #include <windows.h> LRESULT CALLBACK WndProc (HWND, UINT, WPARAM, LPARAM) ; int WINAPI WinMain (HINSTANCE hInstance, HINSTANCE hPrevInstance, PSTR szCmdLine, int iCmdShow) { static TCHAR szAppName[] = TEXT ("HexCalc") ; HWND hwnd ; MSG msg ; WNDCLASS wndclass ; wndclass.style = CS_HREDRAW | CS_VREDRAW; wndclass.lpfnWndProc = WndProc ; wndclass.cbClsExtra = 0 ; wndclass.cbWndExtra = DLGWINDOWEXTRA ; // Note! wndclass.hInstance = hInstance ; wndclass.hIcon = LoadIcon (hInstance, szAppName) ; wndclass.hCursor = LoadCursor (NULL, IDC_ARROW) ; wndclass.hbrBackground = (HBRUSH) (COLOR_BTNFACE + 1) ; wndclass.lpszMenuName = NULL ; wndclass.lpszClassName = szAppName ; if (!RegisterClass (&wndclass)) { MessageBox (NULL, TEXT ("This program requires Windows NT!"), szAppName, MB_ICONERROR) ; return 0 ; } hwnd = CreateDialog (hInstance, szAppName, 0, NULL) ; ShowWindow (hwnd, iCmdShow) ; while (GetMessage (&msg, NULL, 0, 0)) { TranslateMessage (&msg) ; DispatchMessage (&msg) ; } return msg.wParam ; } void ShowNumber (HWND hwnd, UINT iNumber) { TCHAR szBuffer[20] ; wsprintf (szBuffer, TEXT ("%X"), iNumber) ; SetDlgItemText (hwnd, VK_ESCAPE, szBuffer) ; } DWORD CalcIt (UINT iFirstNum, int iOperation, UINT iNum) { switch (iOperation) { case `=`: return iNum ; case `+': return iFirstNum + iNum ; case `-': return iFirstNum - iNum ; case `*': return iFirstNum * iNum ; case `&': return iFirstNum & iNum ; case `|': return iFirstNum | iNum ; case `^': return iFirstNum ^ iNum ; case `<`: return iFirstNum << iNum ; case `>`: return iFirstNum >> iNum ; case `/': return iNum ? iFirstNum / iNum: MAXDWORD ; case `%': return iNum ? iFirstNum % iNum: MAXDWORD ; default : return 0 ; } } LRESULT CALLBACK WndProc (HWND hwnd, UINT message, WPARAM wParam, LPARAM lParam) { static BOOL bNewNumber = TRUE ; static int iOperation = `=` ; static UINT iNumber, iFirstNum ; HWND hButton ; switch (message) { case WM_KEYDOWN: // left arrow --> backspace if (wParam != VK_LEFT) break ; wParam = VK_BACK ; // fall through case WM_CHAR: if ((wParam = (WPARAM) CharUpper ((TCHAR *) wParam)) == VK_RETURN) wParam = `=` ; if (hButton = GetDlgItem (hwnd, wParam)) { SendMessage (hButton, BM_SETSTATE, 1, 0) ; Sleep (100) ; SendMessage (hButton, BM_SETSTATE, 0, 0) ; } else { MessageBeep (0) ; break ; } // fall through case WM_COMMAND: SetFocus (hwnd) ; if (LOWORD (wParam) == VK_BACK) // backspace ShowNumber (hwnd, iNumber /= 16) ; else if (LOWORD (wParam) == VK_ESCAPE) // escape ShowNumber (hwnd, iNumber = 0) ; else if (isxdigit (LOWORD (wParam))) // hex digit { if (bNewNumber) { iFirstNum = iNumber ; iNumber = 0 ; } bNewNumber = FALSE ; if (iNumber <= MAXDWORD >> 4) ShowNumber (hwnd, iNumber = 16 * iNumber + wParam - (isdigit (wParam) ? `0': `A' - 10)) ; else MessageBeep (0) ; } else // operation { if (!bNewNumber) ShowNumber (hwnd, iNumber = CalcIt (iFirstNum, iOperation, iNumber)) ; bNewNumber = TRUE ; iOperation = LOWORD (wParam) ; } return 0 ; case WM_DESTROY: PostQuitMessage (0) ; return 0 ; } return DefWindowProc (hwnd, message, wParam, lParam) ; } |
|
HEXCALC.RC (excerpts)//Microsoft Developer Studio generated resource script. #include "resource.h" #include "afxres.h" ///////////////////////////////////////////////////////////////////////////// // Icon HEXCALC ICON DISCARDABLE "HexCalc.ico" ///////////////////////////////////////////////////////////////////////////// #include "hexcalc.dlg" |
HEXCALC.DLG /*--------------------------- HEXCALC.DLG dialog script ---------------------------*/ HexCalc DIALOG -1, -1, 102, 122 STYLE WS_OVERLAPPED | WS_CAPTION | WS_SYSMENU | WS_MINIMIZEBOX CLASS "HexCalc" CAPTION "Hex Calculator" { PUSHBUTTON "D", 68, 8, 24, 14, 14 PUSHBUTTON "A", 65, 8, 40, 14, 14 PUSHBUTTON "7", 55, 8, 56, 14, 14 PUSHBUTTON "4", 52, 8, 72, 14, 14 PUSHBUTTON "1", 49, 8, 88, 14, 14 PUSHBUTTON "0", 48, 8, 104, 14, 14 PUSHBUTTON "0", 27, 26, 4, 50, 14 PUSHBUTTON "E", 69, 26, 24, 14, 14 PUSHBUTTON "B", 66, 26, 40, 14, 14 PUSHBUTTON "8", 56, 26, 56, 14, 14 PUSHBUTTON "5", 53, 26, 72, 14, 14 PUSHBUTTON "2", 50, 26, 88, 14, 14 PUSHBUTTON "Back", 8, 26, 104, 32, 14 PUSHBUTTON "C", 67, 44, 40, 14, 14 PUSHBUTTON "F", 70, 44, 24, 14, 14 PUSHBUTTON "9", 57, 44, 56, 14, 14 PUSHBUTTON "6", 54, 44, 72, 14, 14 PUSHBUTTON "3", 51, 44, 88, 14, 14 PUSHBUTTON "+", 43, 62, 24, 14, 14 PUSHBUTTON "-", 45, 62, 40, 14, 14 PUSHBUTTON "*", 42, 62, 56, 14, 14 PUSHBUTTON "/", 47, 62, 72, 14, 14 PUSHBUTTON "%", 37, 62, 88, 14, 14 PUSHBUTTON "Equals", 61, 62, 104, 32, 14 PUSHBUTTON "&&", 38, 80, 24, 14, 14 PUSHBUTTON "|", 124, 80, 40, 14, 14 PUSHBUTTON "^", 94, 80, 56, 14, 14 PUSHBUTTON "<", 60, 80, 72, 14, 14 PUSHBUTTON ">", 62, 80, 88, 14, 14 } |
HEXCALC.ICO
Figure 11-10. The HEXCALC display.
HEXCALC is a normal infix notation calculator that uses C notation for the operations. It works with unsigned 32-bit integers and does addition, subtraction, multiplication, division, and remainders; bitwise AND, OR, and exclusive OR operations; and left and right bit shifts. Division by 0 causes the result to be set to FFFFFFFF.
You can use either the mouse or keyboard with HEXCALC. You begin by "clicking in" or typing the first number (up to eight hexadecimal digits), then the operation, and then the second number. You can then show the result by clicking the Equals button or by pressing either the Equals key or the Enter key. To correct your entries, use the Back button or the Backspace or Left Arrow key. Click the "display" box or press the Esc key to clear the current entry.
What's so strange about HEXCALC is that the window displayed on the screen seems to be a hybrid of a normal overlapped window and a modeless dialog box. On the one hand, all the messages to HEXCALC are processed in a function called WndProc that appears to be a normal window procedure. The function returns a long, it processes the WM_DESTROY message, and it calls DefWindowProc just like a normal window procedure. On the other hand, the window is created in WinMain with a call to CreateDialog that uses a dialog box template defined in HEXCALC.DLG. So is HEXCALC a normal overlapped window or a modeless dialog box?
The simple answer is that a dialog box is a window. Normally, Windows uses its own internal window procedure to process messages to a dialog box window. Windows then passes these messages to a dialog box procedure within the program that creates the dialog box. In HEXCALC we are forcing Windows to use the dialog box template to create a window, but we're processing messages to that window ourselves.
Unfortunately, there's something that the dialog box template needs that you can't add in the Dialog Editor in Developer Studio. For this reason, the dialog box template is contained in the HEXCALC.DLG file, which you might guess (correctly) was typed in manually. You can add a text file to any project by picking New from the File menu, picking the Files tab, and selecting Text File from the list of file types. A file such as this, containing additional resource definitions, needs to be included in the resource script. From the View menu, select Resource Includes. This displays a dialog box. In the Compile-time Directives edit field, type
#include "hexcalc.dlg"
This line will then be inserted into the HEXCALC.RC resource script, as shown above.
A close look at the dialog box template in the HEXCALC.DLG file will reveal how HEXCALC uses its own window procedure for the dialog box. The top of the dialog box template looks like
HexCalc DIALOG -1, -1, 102, 122 STYLE WS_OVERLAPPED ¦ WS_CAPTION ¦ WS_SYSMENU ¦ WS_MINIMIZEBOX CLASS "HexCalc" CAPTION "Hex Calculator"
Notice the identifiers, such as WS_OVERLAPPED and WS_MINIMIZEBOX, which we might use to create a normal window by using a CreateWindow call. The CLASS statement is the crucial difference between this dialog box and the others we've created so far (and it is what the Dialog Editor in Developer Studio doesn't allow us to specify). When we omitted this statement in previous dialog box templates, Windows registered a window class for the dialog box and used its own window procedure to process the dialog box messages. The inclusion of a CLASS statement here tells Windows to send the messages elsewhere—specifically, to the window procedure specified in the HexCalc window class.
The HexCalc window class is registered in the WinMain function of HEXCALC, just like a window class for a normal window. However, note this very important difference: the cbWndExtra field of the WNDCLASS structure is set to DLGWINDOWEXTRA. This is essential for dialog procedures that you register yourself.
After registering the window class, WinMain calls CreateDialog:
hwnd = CreateDialog (hInstance, szAppName, 0, NULL) ;
The second argument (the string "HexCalc") is the name of the dialog box template. The third argument, which is normally the window handle of the parent window, is set to 0 because the window has no parent. The last argument, which is normally the address of the dialog procedure, isn't required because Windows won't be processing the messages and therefore can't send them to a dialog procedure.
This CreateDialog call, in conjunction with the dialog box template, is effectively translated by Windows into a CreateWindow call that does the equivalent of
hwnd = CreateWindow (TEXT ("HexCalc"), TEXT ("Hex Calculator"), WS_OVERLAPPED ¦ WS_CAPTION ¦ WS_SYSMENU ¦ WS_MINIMIZEBOX, CW_USEDEFAULT, CW_USEDEFAULT, 102 * 4 / cxChar, 122 * 8 / cyChar, NULL, NULL, hInstance, NULL) ; where the cxChar and cyChar variables are the width and height of the dialog font character.
We reap an enormous benefit from letting Windows make this CreateWindow call: Windows will not stop at creating the one popup window but will also call CreateWindow for all 29 child window push-button controls defined in the dialog box template. All these controls send WM_COMMAND messages to the window procedure of the parent window, which is none other than WndProc. This is an excellent technique for creating a window that must contain a collection of child windows.
Here's another way HEXCALC's code size is kept down to a minimum: You'll notice that HEXCALC contains no header file normally required to define the identifiers for all the child window controls in the dialog box template. We can dispense with this file because the ID number for each of the push-button controls is set to the ASCII code of the text that appears in the control. This means that WndProc can treat WM_COMMAND messages and WM_CHAR messages in much the same way. In each case, the low word of wParam is the ASCII code of the button.
Of course, a little massaging of the keyboard messages is necessary. WndProc traps WM_KEYDOWN messages to translate the Left Arrow key to a Backspace key. During processing of WM_CHAR messages, WndProc converts the character code to uppercase and the Enter key to the ASCII code for the Equals key.
Calling GetDlgItem checks the validity of a WM_CHAR message. If the GetDlgItem function returns 0, the keyboard character is not one of the ID numbers defined in the dialog box template. If the character is one of the IDs, however, the appropriate button is flashed by sending it a couple of BM_SETSTATE messages:
if (hButton = GetDlgItem (hwnd, wParam)) { SendMessage (hButton, BM_SETSTATE, 1, 0) ; Sleep (100) ; SendMessage (hButton, BM_SETSTATE, 0, 0) ; } This adds a nice touch to HEXCALC's keyboard interface, and with a minimum of effort. The Sleep function suspends the program for 100 milliseconds. This prevents the buttons from being "clicked" so quickly that they aren't noticeable.
When WndProc processes WM_COMMAND messages, it always sets the input focus to the parent window:
case WM_COMMAND : SetFocus (hwnd) ;
Otherwise, the input focus would be shifted to one of the buttons whenever it was clicked with the mouse.
EAN: 2147483647
Pages: 112