Configuring a Local Area Network
|
| < Day Day Up > |
|
Creating a local network of your own involves just a few simple steps. You can set up a system to serve as the main server for your own local area network (LAN), providing such services as e-mail, a Web site, or shared printers. You can even connect different types of systems, such as those running Windows or the Mac OS. You can also configure your system to serve as a gateway to the Internet, through which all your other systems will connect. In fact, you could have one Internet connection on your gateway that each host on your network could use. A few security precautions allow your system to work as a firewall, protecting your local hosts from outside attacks. You could also set up a very simple configuration to provide Web access only. This chapter will cover the basic concepts for setting up such a network. Later chapters in this book will cover these topics in detail.
Your local area network consists of a collection of host systems connected to the main host running Linux. This main host will be referred to as the gateway. The steps for setting up a local network involve the following:
-
Setting up and configuring the Ethernet cards on each system (connected or wireless). Your gateway should have two Ethernet cards (see Chapter 32).
-
Setting up a proxy server to provide direct Web access (DNS is not required, see Chapter 23).
-
Setting up your DNS server on the gateway (see Chapter 34).
-
Configuring your DNS server to allow all other local hosts to access the Internet (see Chapter 19).
-
Setting up firewall protection (see Chapter 19).
-
Enabling e-mail services (see Chapter 24).
-
Setting up local host access to the Internet through DNS (Chapter 34).
-
Sharing printers with Windows hosts (see Chapter 37).
-
Setting up a local Web site (see Chapter 22).
Along with setting up your connections, you will have to run at least one service on the main gateway computer you set up for your network. On Red Hat, you can start and stop a service with the redhat-config-services tool (Services on the System Servers menu and window) or by using the service command. To have the service started automatically, you can use redhat-config-services. For a simple network, you should have the DNS and Network services running. If you have Windows systems on your network and you want to share printers with them, you will need the Samba service. The Network, Squid, Sendmail, Postfix, DNS, and Samba programs may have to be restarted as you configure them. You will have to know the names used for the DNS, Sendmail, Postfix, Squid, and Samba server programs to restart them with the service tool. They are shown here. In addition, you will have to add a firewall rule to enable your local hosts to access the Internet through your firewall.
| Service Name | Service Program |
|---|---|
| Domain Name Service (DNS) | named |
| Samba | smb |
| Network connections | network |
| Firewall | iptables |
| Squid | squid |
| Sendmail | sendmail |
| Postfix | postfix |
You use the start, stop, and restart arguments to start, stop, and restart a service. To restart the DNS service, you would use the following:
service named restart
Physical Configuration
To set up the physical connections between different computers on your system, you will need to install an Ethernet device on each. Many computers already have an Ethernet card installed or built in. Most Ethernet configurations use lightweight cables to connect computers, though there are some that are wireless. The computers on a network are referred to as hosts. To connect several hosts together on a network, you will need Ethernet cables for each and a hub that will connect them all together. To connect up a host, connect one end of the cable to its Ethernet card and the other to the hub. A hub will have several plugs, one for each host on your network. For a larger network, you can connect several hubs together.
In the configuration described here, the host running a Linux system will be used as the main server and gateway for the local network. Here, you will install various servers, such as the Proxy, DNS, and Web servers. This host also will function to connect all the local hosts to the Internet (or a larger network). To do this effectively, this gateway/server host will need an Ethernet card and an Internet connection device such as a modem, DSL (digital subscriber line) modem, or another Ethernet card. The examples in this chapter use a second Ethernet connection.
IP Addressing
Most networks, including the Internet, use a set of network protocols called TCP/IP, which stands for Transmission Control Protocol/Internet Protocol. On a TCP/IP network such as the Internet, each computer is given a unique address called an IP address. The IP address is used to identify and locate a particular host—a computer connected to the network. It consists of a number, usually four sets of three digits separated by periods. An example of an IP address is 192.168.0.1.
You will have to assign an IP address to each host on your network. Depending on the type of network, several of the first segments are used for the network address and several of the last segments are used for the host address. For a small local network, the first three segments are the computer's network address and the last segment is the computer's host ID (as used in these examples). For example, in the address 192.168.0.2, 192.168.0 is the network address and 2 is the computer's host ID within that network. Together, they make up an IP address with which the computer can be addressed from anywhere on the Internet.
To set up a local area network (LAN) whose hosts are not directly connected to the Internet, you would use a special set of IP numbers reserved for such non-Internet networks (also known as private networks or intranets). This is especially true if you are implementing IP masquerading, where only a gateway machine has an Internet address, and the others make use of that one address to connect to the Internet. For a small network (254 hosts or less), these are numbers that have the special network number 192.168.0, as used in these examples. If you are setting up a LAN, such as a small business or home network, you are free to use these numbers for your local machines. For a local network, assign IP addresses starting from 192.168.0.1. The host segment can range from 1 to 254, where 255 is used for the broadcast address. If you have three hosts on your home network, you can give them the addresses 192.168.0.1, 192.168.0.2, and 192.168.0.3.
| Note | To allow local hosts in this example to connect to the Internet through using the IP address of the gateway, you need to implement IP masquerading. In effect, the local hosts mask themselves by taking on the gateway's IP address, appearing to the Internet as the gateway system. IP masquerading is implemented as part of the Netfilter packet filtering program described in Chapter 19. |
The network address for such a network would be the first three segments of the IP address, 192.168.0. The network netmask would cover those first three segments, using the number 255.255.255.0. This mask is used to determine the host and network parts of an IP address. The broadcast address, 192.168.0.255 in this example, is used to allow an administrator to contact all hosts at once. You would then use these three IP addresses when configuring a host.
In the sample network used in these examples, there are three hosts, each with its own IP addresses and hostnames listed here. The network address, netmask, and broadcast address are the same as those just described:
192.168.0.1 192.168.0.2 192.168.0.3
| Note | See Chapters 34 and 38 for detailed information on IP addresses and DNS server setup. |
The firewall should run only on the gateway. Furthermore, the gateway will have two network connections, one for the local network and an Internet connection device for the Internet. Make sure that the firewall is applied to the device used as the Internet device, not to your local network. On redhat-config-securitylevel, you do this by making the local network device a trusted device. In the network example used here, the firewall is run on the eth0 network device (the first Ethernet card), which functions as the gateway. The local network is connected through the eth1 network device (the second Ethernet card).
Assigning IP Addresses: static and dynamic
You can assign IP addresses either statically or dynamically. Static addresses are entered manually into each machine, whereas dynamic addresses are assigned automatically by a single DCHP server running on one of the machines. If your network is very small, like two or three machines in a home network, then it may make sense to use static addressing. In this case, you manually assign each IP address by physically logging into each computer as the root user and running redhat-config-network to assign an IP address to that machine. On each machine, while running redhat-config-network, you also designate the gateway, the machine connected to the network.
If you have a larger network, or if you want more centralized control, you can have the IP addresses automatically assigned to each machine by a DHCP server (see Chapter 35). You will still have to log in to each system and run redhat-config-network to configure each machine to use DHCP to retrieve configuration information. Be sure to also configure any firewalls to allow DHCP transmissions. The DHCP server is usually run on the gateway machine. First you have to configure the server to assign addresses, as well as provide the IP address of the gateway.
Currently, there is no Red Hat tool to configure a DHCP server. You have to manually create a /etc/dhcpd.conf DHCP configuration file with the appropriate options. Red Hat recommends the following configuration for a simple network. This configuration uses the private network addresses starting from 192.168.1.0.
DHCP configuration is discussed in detail in Chapter 35. For a simple network, you only need a few options, as shown here. You have to define a subnet using the subnet declaration with the network address and its netmask (see Chapter 38). A simple network in the range 192.168.1.1–192.168.1.255 is defined by the network address 192.168.1.0 and the netmask 255.255.255.0. Within the declaration, you specify options for the domain and gateway, and the range of addresses to use. The routers option specifies the address of the gateway. For the domain-name option, enter the domain name you want to give to your local network. The domain-name-servers option holds the address of the machine running your local network's DNS server, should you have one. The range option lists the range of IP addresses that can be assigned, in this case any address from 192.168.1.10 to 192.168.1.100, giving you 90 possible addresses.
/etc/dhcpd.conf
ddns-update-style interim; subnet 192.168.1.0 netmask 255.255.255.0 { option routers 192.168.1.1; option subnet-mask 255.255.255.0; option domain-name "mytrek.com"; option domain-name-servers 192.168.1.1; range 192.168.1.10 192.168.1.100; } Once DHCP is configured, you can start the DHCP server by running redhat-config-services and selecting DHCP, then clicking Start. You can also start and restart the server using the service command.
service dhcpd restart
For a network like that set up in the following examples, where a gateway has two Ethernet cards, one for the Internet and the other for the local network, you would want your local DHCP server to run only on the local network, using the local Ethernet card. To do this, you need to specify the Ethernet card as a command line option when the dhcpd server starts up. On Red Hat, simply edit the /etc/sysconfig/dhcpd file and assign the Ethernet card to the DHCPDARGS parameter. In the following examples, the eth0 card is used for the local network, so the following would be entered in the /etc/sysconfig/dhcpd file.
DHCPDARGS=eth0
If the Ethernet card you are running the DHCP server on is also firewalled, you will need to allow access on the port it uses, port 67.
Squid Proxy Server
If you only want to provide your hosts Internet Web access, you can do so by just running the Squid server on your gateway host. You will not have to set up and run a DNS server. Squid is a proxy server and can handle the Internet connection between a browser and Internet sites directly. You only have to configure the network connections for each host, providing their IP addresses. This you can do automatically with DHCP. Squid is included with the basic installation (see Chapter 23).
Each Web browser will have to be configured to reference the machine running the Squid server. On Mozilla, select Preferences from the Edit menu, and then select Proxies in the Advanced item. Here you can enter the IP address of the machine running the Squid server, normally the gateway.
You can start the Squid server by using redhat-config-services (Services in the System Settings/Server Settings window) and selecting squid, and then clicking Start. You can also manually start and stop Squid with the service command.
service squid start
The chkconfig command can automatically start Squid whenever your system boots.
chkconfig squid on
| Note | There are several ways to enable e-mail services on your network. You can either set up your network with a central server handling e-mail for all the users on your network, or have each host handle its own users independently. Internet mail setup also varies depending on whether you have a stand-alone system, a small network with one connection, or a larger network with its own official domain address (see Chapter 24). |
Implementing a DNS Server
Now that your local network is physically set up, your gateway/server needs to run certain services to allow your hosts to communicate over the network. You first have to configure and run a Domain Name Service (DNS), which will allow all the hosts on your local network to identify each other using a hostname. This involves several steps:
-
Decide on the IP addresses to assign to each local host. Use 192.168.0 as the network address.
-
Decide on the domain name for your local network.
-
Decide on the hostname for each host on your network.
-
Configure each host with its IP address and domain name address.
-
On the gateway/server, configure a DNS server listing each host's IP address and hostname.
-
Start the DNS service.
All hosts on the Internet are identified by their IP addresses. When you send a message to a host on the Internet, you must provide its IP address. Using a sequence of four numbers of an IP address, however, can be difficult. They are hard to remember, and it's easy to make mistakes when typing them. To make identifying a computer on the Internet easier, DNS was implemented. DNS establishes a fully qualified domain name address for each IP address. The fully qualified domain name consists of the name of the host and the network (domain) that it belongs to. Whenever you use that name, it is automatically converted to an IP address, which is then used to identify that Internet host. The fully qualified domain name is far easier to use than its corresponding IP address. For example, a DNS server will translate www .linux.org into its IP address, 198.182.196.56.
In Figure 5-6, the user at rabbit.mytrek.com wants to connect to the remote host lizard .mytrek.com. rabbit.mytrek.com first sends a request to the network's DNS server—in this case, turtle.mytrek.com—to look up the name lizard.mytrek.com and find its IP address. It then returns the IP address for lizard.mytrek.com, 192.168.0.3, to the requesting host, rabbit.mytrek.com. With the IP address, the user at rabbit.mytrek.com can then connect to lizard.mytrek.com.
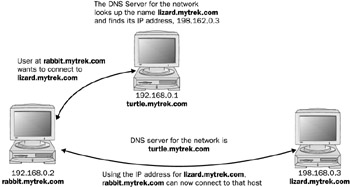
Figure 5-6: DNS server operation
You can then set up domain name services for your network by running a DNS server on one of the machines. This machine becomes your network's DNS server. You can give your machines fully qualified domain names and configure your DNS server to translate the names to their corresponding IP addresses. As shown in Figure 5-7, for example, you could give the machine 192.168.0.1 the name turtle.mytrek.com, and the machine 192.168.0.2 the name rabbit.mytrek.com. You can also implement Internet services on your network such as FTP, Web, and mail services by setting up servers for them on your machines. You can then configure your DNS server to let users access those services using fully qualified domain names. For example, for the mytrek.com network, the Web server could be accessed using the name www.mytrek.com.
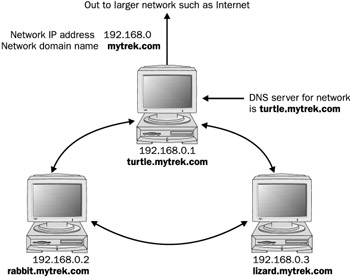
Figure 5-7: DNS server and network
| Note | Instead of a Domain Name Service, you could have the /etc/hosts files in each machine contain the entire list of IP addresses and domain names for all the machines in your network. But for any changes, you would have to update each machine's /etc/hosts file. |
Configuring the DNS Server with redhat-config-bind
To configure the DNS server, you will have to enter the IP addresses and hostnames for your different hosts in the DNS configuration file. You can do so easily with the redhat-config-bind configuration tool (select Domain Name Service in the Server Settings window or menu). Bind is the kind of DNS software used on most networks (see the Red Hat Customization Guide for detailed information on redhat-config-bind). You will need to create two zone configurations: a forward master zone and a reverse master zone. The main redhat-config-bind window will display all configured domains and their record entries. Buttons at the top let you create new domains, add new records, delete any domains or records, and let you save your configuration. Clicking on a domain selects that domain. The Properties button will let you edit any selected entry. Figure 5-8 shows a sample redhat-config-bind configuration for a domain called mytrek.com that has three hosts, turtle, rabbit, and lizard. There are domain entries for both the forward and reverse domain configuration.
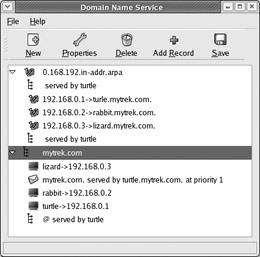
Figure 5-8: redhat-config-bind example
To save your redhat-config-bind configuration, select the Save button to generate the DNS server configuration files. Files generated by redhat-config-bind are saved in the /var/named directory, under chroot/var/named.
Master Zone
Your forward master zone is where you enter your main DNS configuration entries for the host domain names and their IP addresses. Click New and select Forward Master Zone. You will initially be asked to enter a domain name. Enter the domain name you decided on for your local network, such as mytrek.com.
A window then opens labeled Master Zone with several entries for your DNS server (see Figure 5-9). Default settings based on the domain name you previously entered have already been entered for you. The Name box will hold the domain name you just specified. File Name is the name for the master zone file and, along with the extension .zone, will be the name of the domain. The e-mail address is the address of the person managing the DNS server, by default set to the root user. Feel free to change this to another user's address. The Primary Name Server entry will have an @ symbol as its default. The @ symbol merely represents the name of the DNS server. The Serial Number field will have an initial value of 1. It will increment automatically whenever you make changes to the configuration files. The Time Settings button opens a dialog box where you can set refresh, retry, and expiration dates. You can leave these as they are. These, as well as the other settings, are covered in detail in Chapter 34.
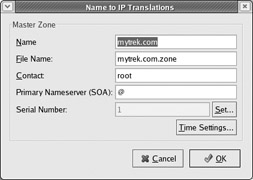
Figure 5-9: redhat-config-bind master zone
Adding Records
You will then return to the main redhat-config-bind window which will now list the new domain, bearing the name you gave it (see Figure 5-10). Here, you add and edit the host and domain entries as well as specify the host running the DNS server. If your network has a mail server, as discussed in Chapter 24, you would add that here also. Usually, the same host runs the DNS server and the mail server. To add a record, Select the domain entry and click Add Record. This opens a window with four tabbed panels: Host, Alias, Nameserver, Mail Exchange. These panels cover the basic kinds of records you will need in a nameserver configuration.
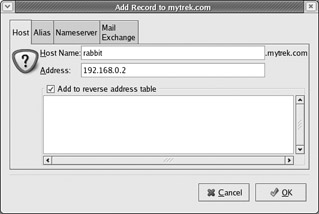
Figure 5-10: Adding a host
You now need to add host entries for the different hosts on your system, providing both their hostnames and IP addresses. To add a host entry, click Add Record, and then select the Host panel. This displays a panel with boxes for entering the hostname and its IP address. For the hostname, you do not have to include the domain name. That will be automatically added for you. You will see the domain name listed next to the entry box. Check the Add to Reverse Table checkbox to have the entry also added to the reverse domain file. In Figure 5-10, the host rabbit is added for the mytrek.com domain with the IP address 192.168.0.2.
| Note | If you want to set up a Web site on the gateway host, you should add an alias for it, where the alias uses the hostname www. When adding the alias, select the Alias panel in the Add Record window, enter the alias name, and select the host it will alias from the listed hosts. |
You will also have to create a nameserver entry to specify the host running the DNS server. The host running the DNS server is referred to as the name server. Click the Add Record button, and then select the Nameserver panel. Your current domain will be entered by default, in this example, mytrek.com. To set up a nameserver for your current domain, you do not need to enter anything in the Domain Name box. For a subdomain, you can add the discriminating part for the name. In the Served by box you enter the host name for the host running the DNS server. For a local host you need only enter the first name, like turtle for turtle.mytrek.com.
If you have a network with its own centralized mail server, like large networks may have, you can add it now. A small network such as a home network would not normally have such a server. Each host would operate as its own mail server and does not need to be specified in the DNS configuration. Larger networks that have centralized mail service operations would make use of DNS mail entries to configure mail delivery (see Chapter 24 for more details). Click the Add Record button and select the Mail Exchange panel. In the Name box enter the domain name for the network served by the mail server. In the Priority box specify the priority (1 will be entered by default). Then, from the list of hosts, select the one that is running the mail server.
Reverse Master Zone
You then have to create a reverse master zone. Click New. In the Zone Type window that first appears, click the Reverse Master Zone check box. The entry box on this window will be labeled IP Address (first three octets). Here, enter the network part of your host IP address. This is the first three sets of numbers for the IP addresses you are using for the hosts on your system. For example, the IP address for turtle.mytrek.com is 192.168.0.1, so the network part is 192.168.0. The network part will be the same for all your hosts. A Reverse Master Zone window will open with the IP address and the filename already filled in for you. Here you can set the standard domain parameters like the serial number and time settings. Once you finish, you will return to the redhat-config-bind window, which will now display an entry for the reverse domain. You now need to add entries for all the hosts on your network. To add an entry, first be sure that the reverse domain is selected, and then click Add Record to open a window where you enter the IP address and hostname for the host. Select the Address panel. In the IP Address box, enter just the host part of the host's IP address. This will be a single number. For example, for the IP address 192.168.0.2, you would just enter 2. In the Full Host Name box, you enter the full hostname of the host. For the rabbit host, you would enter
rabbit.mytrek.com
You then need to add an entry for the DNS server. Click Add Record and then select the name server panel. Here you enter the domain name and the name of the host that will run your DNS server. Be sure to include a trailing period. In this example, the name server host is
turtle.mytrek.com.
| Note | To manually start your DNS service, you can use redhat-config-services (Services on the Server Settings menu). |
|
| < Day Day Up > |
|
EAN: 2147483647
Pages: 328