Printer Configuration
|
| < Day Day Up > |
|
As part of the installation procedure for Linux, you configured a printer connected to your computer. To change configurations or to add a new printer later, you can use the printer configuration tool, redhat-config-printer. This utility enables you to select the appropriate driver for your printer, as well as set print options such as paper size and print resolutions. You can configure a printer connected directly to your local computer or a printer on a remote system on your network (see Chapter 25). You can start redhat-config-printer by selecting the Printing entry in the System Settings window or menu.
When you start up redhat-config-printer, you are presented with a window that lists your installed printers (see Figure 4-3). To add a new printer, click New. To edit an installed printer, double-click its entry, or select it and click Edit. Once you have made your changes, you can click Apply to save your changes and restart the printer daemon. If you have more than one printer on your system, you can make one the default by selecting it and then clicking Default. The Delete button will remove a printer configuration. You can test your printer with a PostScript, A4, or ASCII test sheet selected from the Test menu.
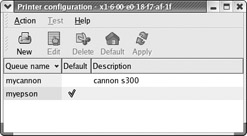
Figure 4-3: rehat-config-printer
When you select New, a series of dialog boxes are displayed where you can enter the printer name, its type, and its model. In the Queue Name dialog box, give the printer a name along with any particular description. On the following Queue Type screen, you enter the appropriate printer connection information. From the drop-down menu at the top of the screen, you can select the kind of connection, the first choice being a locally connected printer and the others, different kinds of remote printers. For remote printers, you need to select the kind of network or system it is attached to, such as Novell for Novell networks or Windows for printers attached to a Windows computer. For a local printer, you will need to select the device the printer is connected to. The device is the port to which the printer is connected. For the first three parallel ports, these are lp0, lp1, and lp2. For serial ports, these are ttyS0, ttyS1, ttyS2, and so on. For a remote printer, you will have to enter the appropriate server and remote queue information.
On the Printer Model screen, you select the manufacturer and model of your printer, which will determine the appropriate driver. Manufacturers are listed in a drop-down menu at the top of the screen. Click it and select your printer's manufacturer (if not listed use Generic and select the printer type). A list of printer models for the selected manufacturer will be listed in the remainder of the window, automatically. For example, selecting Canon from the manufacturer list will then list all Canon printers in the Printer Model window. Click yours, and then the Forward button. You will be notified that the printer configuration is about to be created. Click Finish. You then see your printer listed in the redhat-config-printer window. You are now ready to print.
You can also edit a printer to change any settings. For editing, a set of five tabbed panes are displayed for the printer name, queue type, queue options, driver, and driver options. For the queue selection, you can specify entries for the printer device and spool directory. From a drop-down menu, you can also specify whether the printer is local or remotely accessed through a connection. For the driver options selection, you can specify printer features such as paper size and resolution. When you finish, click OK to close the window. Choose the Quit item from the File menu to quit redhat-config-printer.
| Tip | If you configure your printers with redhat-config-printer, redhat-config-printer will use the CUPS print server for managing all your local printers. |
You can also use redhat-config-printer to set up a remote printer on Linux, Unix, Microsoft, or Novell networks. When you add a new printer, the Queue Type pane is displayed with the following selections from a pop-up menu: Locally-Connected, Networked Unix (LPD), Networked Windows (SMB), Networked CUPS (IPP), Networked Novell (NCP), or Network JetDirect. (If you edit an exiting printer, the queue panel displays a drop-down menu where you can select a remote entry.) For a remote Linux or Unix printer, select Networked Unix (LPD). This displays a dialog box for configuring the remote printer with entries for the server and the queue. For the server, enter the hostname for the system that controls the printer. For the queue, enter the device name on that host for the printer. A Networked Novell (NCP) screen will add entries for the user and the password. A Networked Windows (SMB) screen will have entries for different connected printers. To add one, click the Specify button to open a window where you can enter the share name, host IP address, workgroup, user, and password. Networked CUPS (IPP) will have entries for the CUPS server and its directory.
A Windows (SMB share) printer is one located on a Windows network. To access an SMB share remote printer, you need to install Samba and have the Server Message Block services enabled using the smbd daemon. Printer sharing must, in turn, be enabled on the Windows network. In the printer configuration utility, you need to enter the name of the share, its IP address, the name of the printer's workgroup, and the username and password. The share is the hostname and printer name in the format \\hostname\printername. The server is the computer where the printer is located. The username and password can be for the printer resource itself, or for access by a particular user. You can then use a print client lpr to print a file to the Windows printer. lpr will invoke the Samba client smbclient to send the print job to the Windows printer.
| Tip | To write to a CD-R/RW drive, you use the cdrecord tool or any of several CD burner applications like KonCD. To write to a DVD-R/RW drive, you use dvdrecord, an enhanced version of cdrecord. For DVD+R/+RW drives, you need to use the dvd+rw tools such as growisofs and dvd+rw-format. See Chapter 30 for more details. |
|
| < Day Day Up > |
|
EAN: 2147483647
Pages: 328