Configuring RAID Devices
|
| < Day Day Up > |
|
RAID is a method of storing data across several disks to provide greater performance and redundancy. In effect, you can have several hard disks treated as just one hard disk by your operating system. RAID then efficiently stores and retrieves data across all these disks, instead of having the operating system access each one as a separate file system. Lower-level details of storage and retrieval are no longer a concern of the operating system. This allows greater flexibility in adding or removing hard disks, as well as implementing redundancy in the storage system to provide greater reliability. With RAID, you can have several hard disks that are treated as one virtual disk, where some of the disks are used as real-time mirrors, duplicating data. You can use RAID in several ways depending upon the degree of reliability you need. When you place data on multiple disks, I/O operations can overlap in a balanced way, improving performance. Because having multiple disks increases the mean time between failures (MTBF), storing data redundantly also increases fault-tolerance.
RAID can be implemented on a hardware or software level. On a hardware level, you can have hard disks connected to a RAID hardware controller, usually a special PC card. Your operating system then accesses storage through the RAID hardware controller. Alternatively, you can implement RAID as a software controller, letting a software RAID controller program manage access to hard disks treated as RAID devices. The software version lets you use IDE hard disks as RAID disks. Linux uses the MD driver, supported in the 2.4 kernel, to implement a software RAID controller. Linux software RAID supports five levels (linear, 0, 1, 4, and 5), whereas hardware RAID supports many more. Hardware RAID levels, such as 6 through 10, provide combinations of greater performance and reliability.
| Tip | Before you can use RAID on your system, make sure it is supported on your kernel, along with the RAID levels you want to use. If not, you will have to reconfigure and install a RAID module for the kernel. Check the Multi-Driver Support component in your kernel configuration. You can specify support for any or all of the RAID levels. |
Linux Software RAID Levels
Linux software RAID can be implemented at different levels, depending on whether you want organization, efficiency, redundancy, or reconstruction capability. Each capability corresponds to different RAID levels. For most levels, the size of the hard disk devices should be the same. For mirroring, RAID 1, disks of the same size are required, and for RAID 5 they are recommended. Linux software RAID supports five levels as shown in Table 31-1. (On Red Hat, level 4 is implemented as part of level 5.)
| RAID Level | Capability | Description |
|---|---|---|
| Linear | Appending | Simply treats RAID hard drives as one virtual drive with no striping, mirroring, or parity reconstruction. |
| 0 | Striping | Implements disk striping across drives with no redundancy. |
| 1 | Mirroring | Implements a high level of redundancy. Each drive is treated as a mirror for all data. |
| 5 | Distributed Parity | Implements data reconstruction capability using parity information. Parity information is distributed across all drives, instead of using a separate drive as in RAID 4. |
Linear
The linear level lets you simply organize several hard disks into one logical hard disk, providing a pool of continuous storage. Instead of being forced to set up separate partitions on each hard drive, in effect you have only one hard drive. The storage is managed sequentially. When one hard disk fills up, the next one is used. In effect, you are appending one hard disk to the other. This level provides no recovery capability. If you had a hard disk RAID array containing two 80GB disks, after you used up the storage on one, you would automatically start on the next.
RAID 0: Striping
For efficiency, RAID stores data using disk striping, where data is organized into standardized stripes that can be stored across the RAID drives for faster access (level 0). RAID 0 also organizes your hard disks into common RAID devices but treats them like single hard disks, storing data randomly across all the disks. If you had a hard disk RAID array containing two 80GB disks, you could access them as one 160GB RAID device.
RAID 1: Mirroring
RAID level 1 implements redundancy through mirroring. In mirroring, the same data is written to each RAID drive. Each disk has a complete copy of all the data written, so that if one or more disks fail, the others still have your data. Though extremely safe, redundancy can be very inefficient and consumes a great deal of storage. For example, on a RAID array of two 80GB disk drives, one disk is used for standard storage and the other is a real-time backup. This leaves you with only 80GB for use on your system. Write operations also have to be duplicated across as many mirrored hard disks used by the RAID array, slowing down operations.
RAID 5: Distributed Parity
As an alternative to mirroring, data can be reconstructed using parity information in case of a hard drive crash. Parity information is saved instead of full duplication of the data. Parity information takes up the space equivalent of one drive, leaving most of the space on the RAID drives free for storage. RAID 5 combines both striping and parity (see RAID 4), where parity information is distributed across the hard drives, rather than in one drive dedicated to that purpose. This allows the use of the more efficient access method, striping. With both striping and parity, RAID 5 provides both fast access and recovery capability, making it the most popular RAID level used. For example, a RAID array of four 80GB hard drives would be treated as one 320GB hard drive with part of that storage (80GB) used to hold parity information, leaving 240GB free.
RAID 4: Parity
Though it is not supported in Red Hat due to overhead costs, RAID 4, like RAID 5, supports a more compressed form of recovery using parity information instead of mirrored data. With RAID 4, parity information is kept on a separate disk, while the others are used for data storage, much like in a linear model.
| Tip | Red Hat also allows you to create and format RAID drives during installation. At that time, you can create your RAID partitions and devices. |
RAID Devices and Partitions: md and fd
A RAID device is named an md, and uses the MD driver. These devices are already defined on your Linux system in the /etc/dev directory, starting with md0. /dev/md0 is the first RAID device, and /dev/md1 is the second, and so on. Each RAID device, in turn, uses hard disk partitions, where each partition contains an entire hard disk. These partitions are usually referred to as RAID disks, whereas a RAID device is an array of the RAID disks it uses.
When creating a RAID partition, you should set the partition type to be fd, instead of the 83 for the standard Linux partition. The fd type is that used by RAID for automatic detection.
Corresponding Hard Disk Partitions
The term device can be confusing, because it is also used to refer to the particular hard disk partitions that make up a RAID device. In fact, a software RAID device is an array of hard disk partitions, where each partition could, but not necessarily, take up an entire hard disk. In that case, you can think of a RAID device as consisting of a set (array) of hard disks (devices). In practice, the hard disks in your RAID configuration would normally contain several corresponding hard disk partitions, each set having the same size. Each set of corresponding partitions would make up a RAID device. So you could have several RAID devices using the same set of hard disks. This is particularly true for Linux partition configurations, where different system directories are placed in their own partitions. For example, /boot could be in one partition, /home in another, and / (the root) in yet another partition. To set up RAID devices so that you have separate partitions for /boot, /home, and / (root), you need to create three different RAID devices, say md0 for /boot, md1 for /home, and md2 for the root. If you have two hard disks, for example hda and hdb, each would have three partitions, /boot, /home, and /. The first RAID device, md0, would consist of the two /boot partitions, the one on hda and the one on hdb. Similarly, the second raid device, md1, would be made up of the two root partitions, /, the one on hda and the other on hdb. md3 would consist of the /home partitions on hda and hdb (see Figure 31-1).
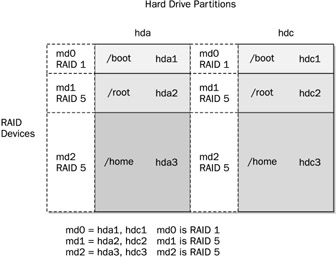
Figure 31-1: RAID devices
When you create the partitions for a particular RAID device, it is important to make sure that each partition has the same size. For example, the / partition used for the md0 device on the hda disk must have the same size as the corresponding md0 partition on the hdb disk. So if the md1 partition on hda is 20GB, then its corresponding partition on hdb must also be 20GB. If md2 is 100GB on one drive, its corresponding partitions on all other drives must also be 100GB.
| Tip | During installation, Red Hat Disk Druid supports the Clone tool that let you automatically create the corresponding partitions on other hard disks based on one already set up. In effect, you set up the RAID partitions for each RAID device on one hard disk, and then use the Clone tool to create their corresponding partitions on your other hard disks. |
Booting from a RAID Device
As part of the installation process, Red Hat lets you create RAID devices from which you can also boot your system. Your Linux system will be configured to load RAID kernel support and automatically detect your RAID devices. The boot loader will be installed on your RAID device, meaning on all the hard disks making up that device.
Red Hat does not support booting from RAID 5, only RAID 1. This means that if you want to use RAID 5 and still boot from RAID disks, you will need to create at least two (or more if you want) RAID devices using corresponding partitions for each device across your hard disks. One device would hold your /boot partition and be installed as a RAID 1 device. This RAID 1 device would be the first RAID device, md0, consisting of the first partition on each hard disk. The second RAID device, md1, could then be a RAID 5 device. It would consist of corresponding partitions on the other hard disks. Your system could then boot from the RAID 1 device but use the RAID 5 device.
If you do not create RAID disks during installation, but create them later and want to boot from them, you will have to make sure your system is configured correctly. The RAID devices need to be created with persistent superblocks. Support for the RAID devices has to be enabled in the kernel. On Red Hat, this support is enabled as a module. Difficulties occur if you are using RAID 5 for your / (root) partition. This partition contains the RAID 5 module, but to access the partition, you have to already load the RAID 5 module. To work around this limitation, you can create a RAM disk in the /boot partition that contains the RAID 5 module. Use the mkinitrd command to create the RAM disk and the -with option to specify the module to include.
mkinitrd --preload raid5 --with=raid5 raid-ramdisk 2.4.20-8
Automatic Detection: Persistent Superblocks
Linux software RAID now supports automatic detection of RAID devices. This allows your RAID devices to be detected automatically whenever your system boots, just like standard partitions. You can then use any RAID device (md) as you would a hard disk partition (hd or sd), using them in the /etc/fstab file (see Chapter 30). Automatic detection is implemented using persistent superblocks placed on each RAID disk to hold configuration information. A persistent superblock needs to be created when you create the RAID device using mkraid. To instruct mkraid to create a persistent superblock, you specify the persistent-superblock option in the /etc/raidtab file, the RAID configuration file. Without the persistent superblock option, you would have to manually start your RAID devices with the raidstart command. raidstart -a starts up all your devices.
RAID Tools
The RAID tools are useful for managing software RAID devices on Linux. mkraid creates a RAID device, raidstop stops the device, and raidstart turns it on (see Table 31-2). These are discussed in detail in the next section.
Creating and Installing RAID Devices
If you created your RAID devices and their partitions during the installation process, you should already have working RAID devices. Your RAID devices will be configured in the /etc/raidtab file, and the status of your RAID devices will be listed in the /proc/mdstat file. You can manually start or stop your RAID devices with the raidstart and raidstop commands. The -a option operates on all of them, though you can specify particular devices if you want.
To create a new RAID device manually for an already installed system, follow these steps:
-
Make sure that your kernel supports the RAID level you want for the device you are creating. To enable support for a RAID level in the kernel, use the kernel configuration tool to create a module for it, as discussed previously.
-
If you have not already done so, create the RAID disks (partitions) you will use for your RAID device.
-
Configure your RAID device (/dev/mdn) in the /etc/raidtab file, specifying the RAID disks to use. Be sure to specify the persistent superblock option to have your RAID devices automatically detected when you boot.
-
Create your RAID device with mkraid.
-
Activate the RAID device with raidstart.
-
Create a file system on the RAID device (mkfs) and then mount it.
Table 31-2: RAID Tools Tool
Description
mkraid
Creates (configures) RAID devices from a set of block devices, initializing them.
raidstart
Activates RAID devices.
raid0start
Activates older nonpersistent linear and RAID 0 RAID devices.
raidstop
Turns off a RAID device.
Creating Hard Disk Partitions: fd
To add new RAID devices or to create them in the first place, you need to manually create the hard disk partitions they will use, and then configure RAID devices to use those partitions. To create a hard disk partition for use in a RAID array, use fdisk or parted and specify fd as the file system type. You invoke fdisk or parted with the device name of the hard disk you want to create the partition on. Be sure to specify fd as the partition type. The following example invokes fdisk for the hard disk /dev/hdb (the second hard disk on the primary IDE connection):
fdisk /dev/hdb
Though technically partitions, these hard disk devices are referred to as disks in RAID configuration documentation and files.
Configuring RAID: /etc/raidtab
Once you have your disks, you then need to configure them as RAID devices. RAID devices are configured in the /etc/raidtab file. This file will be used by the mkraid command to create the RAID device. In the /etc/raidtab file, you create a raiddev entry for each RAID device, and specify which disks they will use along with any RAID options. For a raiddev entry, you specify the name of the RAID device you are configuring, such as /dev/md0 for the first RAID device.
raiddev /dev/md0
You then specify the level for the RAID device, such as 0, 1, or 5 using the keyword raid-level followed by the RAID level number. Then add any options you may need along with the list of disks making up the RAID array. A disk is defined with the device entry, and its position in the RAID array, with the raid-disk option. The configuration directives and options are listed in Table 31-3. A sample entry for the /etc/raidtab file is shown here:
raiddev /dev/md0 raid-level 5 nr-raid-disks 3 nr-spare-disks 1 persistent-superblock 1 chunk-size 4 parity-algorithm left-symmetric device /dev/hdb1 raid-disk 0 device /dev/hdc1 raid-disk 1 device /dev/hdd1 raid-disk 0
The preceding example configures the RAID device /dev/md0 as a RAID 5 (raid-level 5) device. There are three disks (partitions) that make up this RAID array, /dev/hdb1, /dev/hdc1, and /dev/hdd1, of which /dev/hdb1 is the first and /dev/hdc1 is the second. There is one spare disk, /dev/hdd1. There are three RAID disks altogether (nr-raid-disks) and one spare partition (nr-spare-disks). The RAID file system uses persistent superblocks (persistent-superblock) to hold file system configuration information, allowing your devices to be automatically detected. The parity-algorithm option is used for RAID 5 devices to specify the type of parity algorithm to use for parity restoration, in this example, left-symmetric.
| Directives and Options | Description |
|---|---|
| raiddev device | Starts a configuration section for a particular RAID device. |
| raid-level num | The RAID level for the RAID device, such as 0, 1, 4, 5, and –1 (linear). |
| device disk-device | The disk device (partition) to be added to the RAID array. The number of device entries specified for a RAID device must match that specified by nr-raid-disks. |
| nr-raid-disks count | Number of RAID devices in an array. Each RAID device section must have this directive. The maximum is 12. |
| nr-spare-disks count | The number of spare devices in the array. Used only for RAID 4 and RAID 5. The kernel must be configured to allow the automatic addition of new RAID disks as needed. You can add and remove spare disks with raidhotadd and raidhotremove. |
| persistent-superblock 0/1 | Specifies whether a newly created RAID array should |
| chunk-size size | Sets the stripe size to size bytes, in powers of 2. |
| device devpath | Adds the most recently defined device to the list of devices that make up the RAID system. |
| raid-disk index | Inserts the most recently defined RAID device at the specified position in the RAID array. |
| spare-disk index | Inserts the most recently defined RAID device as a spare device at the specified position in the RAID array. |
| parity-disk index | The most recently defined device is used as the parity device, placing it at the end of the RAID array. |
| parity-algorithm algorithm | For RAID 5 devices, specifies the parity algorithm to use: left-asymmetric, right-asymmetric, left-symmetric, or right-symmetric. |
| failed-disk index | The most recently defined device is added to a RAID array as a failed device at the specified position. |
The mkraid Command
Once you have configured your RAID devices in the /etc/raidtab file, you then use the mkraid command to create your RAID devices. mkraid takes as its argument the name of the RAID device, such as /dev/md0 for the first RAID device. It then locates the entry for that device in the /etc/raidtab file and uses that configuration information to create the RAID file system on that device. You can specify an alternative configuration file with the -c option, if you wish. mkraid operates as a kind of mkfs command for RAID devices, initializing the partitions and creating the RAID file systems. Any data on the partitions making up the RAID array will be erased.
mkraid /dev/md0
The raidstart Command
Once you have created your RAID devices, you can then activate them with the raidstart command. raidstart makes your RAID file system accessible. raidstart takes as its argument the name of the RAID device you want to start. The -a option activates all RAID devices.
raidstart /dev/md0
Creating a File System
Once the RAID devices are activated, you can then create file systems on the RAID devices and mount those file systems. The following example creates a standard Linux file system on the /dev/md0 device:
mkfs.ext3 /dev/md0
In the following example, the user then creates a directory called /myraid and mounts the RAID device there:
mkdir /myraid mount /dev/md0 /myraid
If you plan to use your RAID device for maintaining your user directories and files, you would mount the RAID device as your /home partition. Such a mounting point might normally be used if you created your RAID devices when installing your system. To transfer your current home directories to a RAID device, first back them up on another partition, and then mount your RAID device, copying your home directories to it.
The raidstop Command
If you decide to change your RAID configuration or add new devices, you first have to deactivate your currently active RAID devices. To deactivate a RAID device, you use the raidstop command. Be sure to close any open files and unmount any file systems on the device first.
umount /dev/md0 raidstop /dev/md0
| Tip | Hot swapping is the practice of replacing drives while the system is running. Its feasibility is limited. Never try to hot-swap an IDE drive; you could destroy the drive. SCSI drives might successfully swap, though most likely will not. IBM SCA drives can successfully swap. You can use the raidhotadd and raidhotremove commands to perform such a swap. |
RAID Example
Earlier in the chapter, Figure 31-1 showed a simple RAID configuration with three RAID devices using corresponding partitions on two hard disks for /boot, / (root), and /home partitions. The boot partition is configured as a RAID 1 device because systems can be booted only from a RAID 1 device, not RAID 5. The other partitions are RAID 5 devices, a more commonly used RAID access method.
You could set up such a system during installation, selecting and formatting your RAID devices and their partitions using Disk Druid. The steps described here assume you have your system installed already on a standard IDE drive and are setting up RAID devices on two other IDE disk drives. You can then copy your file from your standard drive to your RAID devices.
First you create the hard disk partitions using a partition tool like parted or fdisk.
Then configure the three raid devices in the /etc/raidtab file.
raiddev /dev/md0 raid-level 1 nr-raid-disks 2 nr-spare-disks 0 persistent-superblock 1 chunk-size 4 device /dev/hda1 raid-disk 0 device /dev/hdc1 raid-disk 1 raiddev /dev/md1 raid-level 5 nr-raid-disks 2 persistent-superblock 1 chunk-size 4 parity-algorithm left-symmetric device /dev/hda2 raid-disk 0 device /dev/hdc2 raid-disk 1 raiddev /dev/md2 raid-level 5 nr-raid-disks 2 persistent-superblock 1 chunk-size 4 parity-algorithm left-symmetric device /dev/hda3 raid-disk 0 device /dev/hdc3 raid-disk 1
Then create your RAID devices with mkraid.
mkraid md0 md1 md2
Activate the RAID devices with raidstart.
raidstart md0 md1 md2
Create your file systems on the raid devices.
mkfs.ext3 md0 md1 md2
You can then migrate the /boot, /, and /home files from your current hard disk to your RAID devices. Install your boot loader on the first RAID device, md0, and load the root file system from the second RAID device, md1.
|
| < Day Day Up > |
|
EAN: 2147483647
Pages: 328