Managing Printers with CUPS
|
| < Day Day Up > |
|
The Common Unix Printing System (CUPS) is an alternative to LPRng that provides printing services. It is freely available under the GNU Public License. Though it is now included with most distributions, you can also download the most recent source-code version of CUPS from www.cups.org. The site also provides detailed documentation on installing and managing printers. Whereas LPRng is derived from the old Berkeley line printer daemon (LPD), CUPS is based on the newer Internet Printing Protocol (IPP). The Internet Printing Protocol is designed to establish a printing standard for the Internet (for more information, see www.pwg.org/ipp). Whereas the older LPD-based printing systems focused primarily on line printers, an IPP-based system provides networking, PostScript, and Web support. CUPS works like an Internet server and employs a configuration setup much like that of the Apache Web server. Its network support lets clients directly access printers on remote servers, without having to configure the printers themselves. Configuration needs to be maintained only on the print servers.
With the RPM version used by Red Hat, a cups startup script is installed in the /etc/rc.d/init.d directory. You can start, stop, and restart CUPS using the service command and the cups script. When you make changes or install printers, be sure to restart CUPS to have your changes take effect. On Red Hat, you can use the following command:
service cups restart
Installing Printers with CUPS
The easiest way to configure and install printers with CUPS is to use redhat-config printer, as described in Chapter 4. You can also use the CUPS configuration tool, which is a Web browser–based configuration tool. To ensure browser access, be sure to first select CUPS with the Printer System Switcher, or if you are using xinetd for CUPS, turn on cups with the chkconfig command.
chkconfig cups on
To start the Web interface on Red Hat, enter the following URL into your Web browser.
http://localhost:631
This opens an administration screen where you can manage and add printers. You will first be asked to enter the administrator's username (usually root) and password (usually the root user's password).
You install a printer on CUPS through a series of Web pages, each of which requests different information. To install a printer, click the Add Printer button to display a page where you enter the printer name and location (see Figure 25-1). The location is the host to which the printer is connected.
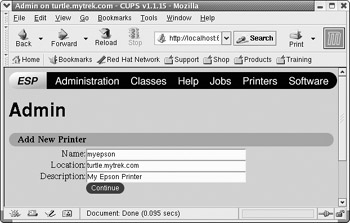
Figure 25-1: CUPS Add Printer page
Subsequent pages will prompt you to enter the model of the printer and driver, which you select from available listings. Once you have added the printer, you can configure it. Clicking the Manage Printers entry in the Administration page lists your installed printers. You can then click a printer to display a page that lets you control the printer. You can stop the printer, configure its printing, modify its installation, and even delete the printer. Clicking the Configure Printer button displays a page where you can configure how your printer prints, by specifying the resolution or paper size.
Configured information for a printer will be stored in the /etc/cups/printers.conf file. You can examine this file directly, even making changes. Here is an example of a printer configuration entry. Notice that it was created using redhat-config-printer. It is currently Idle, with nothing in its queue:
<DefaultPrinter myepson> Info Created by redhat-config-printer 0.6.x DeviceURI parallel:/dev/lp0 Location State Idle Accepting Yes JobSheets none none QuotaLimit 0 PageLimit 0 Klimit 0 </Printer>
The DeviceURI entry specifies the device used, in this case the lp0 parallel device. For remote printers, this entry will include an Internet address, along with its protocol. For example, a remote printer on a CUPS server (ipp) would be indicated as shown here (a Windows printer would use an smb protocol):
DeviceURI ipp://mytsuff.com/printers/queue1
| Note | You can perform all administrative tasks from the command line using the lpadmin command. See the CUPS documentation for more details. |
Configuring Remote Printers on CUPS
To install a remote printer that is attached to a Windows system or another Linux system running CUPS, you specify its location using special URL protocols. For a Windows printer, you first need to install, configure, and run Samba. CUPS uses Samba to access Windows printers. When you install the Windows printer on CUPS, you specify its location using the URL protocol smb. The user allowed to log in to the printer is entered before the hostname and separated from it by a @ sign. On most configurations, this is the guest user. The location entry for a Windows printer called myhp attached to a Windows host named lizard is shown here. Its Samba share reference would be //lizard/myhp.
smb://guest@lizard/myhp
To enable CUPS on Samba, you also have to set the printing option in the /etc/samba/smb.conf file to cups, as shown here:
printing = cups printcap name = cups
To enable CUPS to work with Samba, you have to link the smbspool to the CUPS smb spool directory:
ln -s /usr/bin/smbspool /usr/cups/backend/smb
To access a printer connected to a Linux or Unix system running LPRng, use the lpd protocol to specify its location. In the following example, the printer mylaser is connected to the Linux host rabbit.mytrek.com:
lpd://rabbit.mytrek.com/mylaser
CUPS Printer Classes
CUPS features a way to let you select a group of printers to print a job instead of selecting just one. That way, if one printer is busy or down, another printer can be automatically selected to perform the job. Such groupings of printers are called classes. Once you have installed your printers, you can then group them into different classes. For example, you may want to group all inkjet printers into one class and laser printers into another, or you may want to group printers connected to one specific printer server in their own class. To create a class, select Classes on the Administration page and enter the name of the class. You can then add printers to it.
CUPS Configuration
CUPS configuration files are placed in the /etc/cups directory. These files are listed in Table 25-1. The classes.conf, printers.conf, and client.conf files can be managed by the Web interface. The printers.conf file contains the configuration information for the different printers you have installed. Any of these files can be edited manually, if you wish.
cupsd.conf
The CUPS server is configured with the cupsd.conf file located in /etc/cups. You must edit configuration options manually; the server is not configured with the Web interface. Your installation of CUPS installs a commented version of the cupsd.conf file with each option listed, though most options will be commented out. Commented lines are preceded with a # symbol. Each option is documented in detail. The server configuration uses an Apache Web server syntax consisting of a set of directives. As with Apache, several of these directives can group other directives into blocks.
| Filename | Description |
|---|---|
| classes.conf | Configurations for different local printer classes |
| client.conf | Lists specific options for specified clients |
| cupsd.conf | Configures the CUPS server, cupsd |
| printers.conf | Printer configurations for available local printers |
CUPS Directives
Certain directives allow you to place access controls on specific locations. These can be printers or resources, such as the administrative tool or the spool directories. Location controls are implemented with the Location directive. Allow From and Deny From directives can permit or deny access from specific hosts. CUPS supports both Basic and Digest forms of authentication, specified in the AuthType directive. Basic authentication uses a user and password. For example, to use the Web interface, you are prompted to enter the root user and the root user password. Digest authentication makes use of user and password information kept in the CUPS /etc/cups/passwd.md5 file, using MD5 versions of a user and password for authentication. The AuthClass directive specifies the class allowed access. The System class includes the root, sys, and system users. The following example shows the Location directive for the /admin resource, the administrative tool:
<Location /admin> AuthType Basic AuthClass System ## Restrict access to local domain Order Deny,Allow Deny From All Allow From 127.0.0.1 </Location>
CUPS Command Line Print Clients
Once a print job is placed on a print queue, you can use any of several print clients to manage the printing jobs on your printer or printers, such as Klpq for LPRng and the GNOME Print Manager and the CUPS Printer Configuration tool for CUPS. You can also use several command line print CUPS clients (for which there are corresponding applications by the same name for LPRng). These include the lpr, lpc, lpq, and lprm commands (see Chapter 10). The Printer System Switcher moves you from one set to the other. With these clients, you can print documents, list a print queue, reorder it, and remove print jobs, effectively canceling them. For network connections, CUPS features an encryption option for its commands, -E, to encrypt print jobs and print information sent of a network. Table 25-2 shows various printer commands.
lpr
The lpr client submits a job, and lpd then takes it in turn and places it on the appropriate print queue. lpr takes as its argument the name of a file. If no printer is specified, then the default printer is used. The -P option enables you to specify a particular printer. In the next example, the user first prints the file preface, then prints the file report to the printer with the name myepson:
$ lpr preface $ lpr -P myepson report
| Printer Management | Description |
|---|---|
| GNOME Print Manager | GNOME print queue management tool (CUPS). |
| CUPS Configuration Tool | Print, manage, and configure CUPS. |
| lpr options file-list | Prints a file, copies the file to the printer's spool directory, and places it on the print queue to be printed in turn. |
| lpq options | Displays the print jobs in the print queue. |
| lpstat options | Displays printer status. |
| lprm options printjob-idor printer | Removes a print job from the print queue. You identify a particular print job by its number as listed by lpq. |
| lpc | Manages your printers. At the lpc> prompt, you can enter commands to check the status of your printers and take other actions. |
lpc
You can use lpc to enable or disable printers, reorder their print queues, and reexecute configuration files. To use lpc, enter the command lpc at the shell prompt. You are then given an lpc> prompt at which you can enter lpc commands to manage your printers and reorder their jobs. The status command with the name of the printer displays whether the printer is ready, how many print jobs it has, and so on. The stop and start commands can stop a printer and start it back up. The printers shown depend on the printers configured for a particular print servers. A printer configured on CUPS will only show if you have switched to CUPS. If you switch to the LPRng, those printers you configured for LPRng will show up.
# lpc lpc> status myepson myepson: printer is on device 'parallel' queuing is enabled printing is enabled 1 entry in spool area
lpq and lpstat
You can manage the print queue using the lpq and lprm commands. The lpq command lists the printing jobs currently on the print queue. With the -P option and the printer name, you can list the jobs for a particular printer. If you specify a username, you can list the print jobs for that user. With the -l option, lpq displays detailed information about each job. If you want information on a specific job, simply use that job's ID number with lpq. To check the status of a printer, use lpstat.
# lpq myepson is ready and printing Rank Owner Jobs File(s) Total Size active chris 1 report 1024
lprm
The lprm command enables you to remove a print job from the queue, erasing the job before it can be printed. The lprm command takes many of the same options as lpq. To remove a specific job, use lprm with the job number. To remove all printing jobs for a particular printer, use the -P option with the printer name. lprm with no options removes the job printing currently. The following command removes the first print job in the queue (use lpq to obtain the job number).
# lprm 1
CUPS Administrative Tools
CUPS provides command line administrative tools like lpadmin, lpoptions, lpinfo, enable, disable, accept, and reject. The enable and disable commands start and stop print queues directly, whereas the accept and reject commands start and stop particular jobs. lpinfo provides information about printers, and lpoptions lets you set printing options. The lpadmin command lets you perform administrative tasks like adding printers and changing configurations. CUPS administrative tools are listed in Table 25-3.
lpadmin
You can use the lpadmin command to either set the default printer or configure various options for a printer. You can use the -d option to specify a particular printer as the default destination (you can also do this in redhat-config-printer). Here myepson is made the default printer:
lpadmin -d myepson
| Administration Tool | Description |
|---|---|
| lpadmin | CUPS printer configuration |
| lpoptions | Set printing options |
| enable | Activate a printer |
| disable | Stop a printer |
| accept | Allows a printer to accept new jobs |
| reject | Prevents a printer from accepting print jobs |
| lpinfo | List CUPS devices available |
The -p option lets you designate a printer for which to set various options. The following example sets printer description information:
lpadmin -p myepson -D Epson550
Certain options let you control per-user quotas for print jobs. The job-k-limit sets the size of a job allowed per user, job-page-limit sets the page limit for a job, and the job-quota-period limits the number of jobs with a specified time frame. The following command set a page limit of 100 for each user.
lpadmin -p myepson -o job-page-limit=100
User access control is determined with the -u option with an allow or deny list. Users allowed access are listed following the allow: entry, and those denied access are listed with a deny: entry. Here access is granted to chris but denied to aleina and larisa.
lpadmin -p myepson -u allow:chris deny:aleina,larisa
Use all or none to permit or deny access to all or no users. You can create exceptions by using all or none in combination with user-specific access. The following example allows access to all users except justin:
lpadmin -p myepson -u allow:all deny:justin
lpoptions
The lpoptions command lets you set printing options and defaults that mostly govern how your print jobs will be printed. For example, you can set the color or page format to be used with a particular printer. Default settings for all users are maintained by the root user in the /etc/cups/lpoptions file, and each user can create their own configurations, which are saved in their .lpoptions files. The -l option lists current options for a printer, and the -p option designates a printer (you can also set the default printer to use with the -d option).
lpoptions -p myepson -l
Printer options are set using the -o option along with the option name and value, -o option=value. You can remove a printer option with the -r option. For example, to print on both sides of your sheets, you can set the sides option to two-sided:
lpoptions -p myepson -o sides=two-sided
To remove the option, use -r:
lpoptions -p myepson -r sides
To display a listing of available options, check the standard printing options in the CUPS Software Manual at www.cups.org.
enable and disable
The enable command starts a printer, and the disable command stops it. With the -c option, you can also cancel all jobs on the printer's queue, and with the -r option, you broadcast a message explaining the shutdown.
disable myepson
accept and reject
The accept and reject commands let you control access to the printer queues for specific printers. The reject command prevents a printer from accepting jobs, whereas accept allows new print jobs.
reject myepson
lpinfo
The lpinfo command is a handy tool for letting you know what CUPS devices and drivers are available on your system. Use the -v option for devices, and the -m option for drivers.
lpinfo -m
|
| < Day Day Up > |
|
EAN: 2147483647
Pages: 328
- ERP System Acquisition: A Process Model and Results From an Austrian Survey
- Enterprise Application Integration: New Solutions for a Solved Problem or a Challenging Research Field?
- Data Mining for Business Process Reengineering
- Healthcare Information: From Administrative to Practice Databases
- A Hybrid Clustering Technique to Improve Patient Data Quality