The Secure Shell: OpenSSH
|
| < Day Day Up > |
|
Although a firewall can protect a network from attempts to break into it from the outside, the problem of securing legitimate communications to the network from outside sources still exists. A particular problem is one of users who want to connect to your network remotely. Such connections could be monitored, and information such as passwords and user IDs used when the user logs into your network could be copied and used later to break in. One solution is to use SSH for remote logins and other kinds of remote connections such as FTP transfers. SSH encrypts any communications between the remote user and a system on your network.
Two different implementations of SSH currently use what are, in effect, two different and incompatible protocols. The first version of SSH, known as SSH1, uses the original SSH protocol. Version 2.0, known as SSH2, uses a completely rewritten version of the SSH protocol. Encryption is performed in different ways, encrypting different parts of a packet. SSH1 uses server and host keys to authenticate systems, whereas SSH2 uses only host keys. Furthermore, certain functions, such as sftp, are supported only by SSH2.
| Note | A commercial version of SSH is available from SSH Communications Security, whose Web site is www.ssh.com. SSH Communications Security provides SSH free for noncommercial use and sells SSH for commercial use through Datafellows. |
The SSH protocol has become an official Internet Engineering Task Force (IETF) standard. A free and open source version is developed and maintained by the OpenSSH project, currently supported by the OpenBSD project. OpenSSH is the version supplied with most Linux distributions, including Red Hat, Mandrake, Caldera, SUSE, and Debian. You can find out more about OpenSSH at www.openssh.org, where you can download the most recent version, though your distribution will provide current RPM versions.
SSH Encryption and Authentication
SSH secures connections by both authenticating users and encrypting their transmissions. The authentication process is handled with public key encryption (see Chapter 16). Once authenticated, transmissions are encrypted by a cipher agreed upon by the SSH server and client for use in a particular session. SSH supports multiple ciphers. Authentication is applied to both hosts and users. SSH first authenticates a particular host, verifying that it is a valid SSH host that can be securely communicated with. Then the user is authenticated, verifying that the user is who they say they are.
SSH uses strong encryption methods, and their export from the United States may be restricted. Currently, SSH can deal with the following kinds of attacks:
-
IP spoofing, where a remote host sends out packets that pretend to come from another, trusted host
-
IP source routing, where a host can pretend an IP packet comes from another, trusted host
-
DNS spoofing, where an attacker forges name server records
-
Interception of clear text passwords and other data by intermediate hosts
-
Manipulation of data by people in control of intermediate hosts
-
Attacks based on listening to X authentication data and spoofed connections to the X11 server
Encryption
The public key encryption used in SSH authentication makes use of two keys: a public key and a private key. The public key is used to encrypt data, while the private key decrypts it. Each host or user has their own public and private keys. The public key is distributed to other hosts, who can then use it to encrypt authentication data that only the host's private key can decrypt. For example, when a host sends data to a user on another system, the host encrypts the authentication data with a public key, which it previously received from that user. The data can be decrypted only by the user's corresponding private key. The public key can safely be sent in the open from one host to another, allowing it to be installed safely on different hosts. You can think of the process as taking place between a client and a server. When the client sends data to the server, it first encrypts the data using the server's public key. The server can then decrypt the data using its own private key.
It is recommended that SSH transmissions be authenticated with public-private keys controlled by passphrases. Unlike PGP, SSH uses public-key encryption for the authentication process only. Once authenticated, participants agree on a common cipher to use to encrypt transmission. Authentication will verify the identity of the participants. Each user who intends to use SSH to access a remote account first needs to create the public and private keys along with a passphrase to use for the authentication process. A user then sends their public key to the remote account they want to access and installs the public key on that account. When the user attempts to access the remote account, that account can then use the user's public key to authenticate that the user is who they claim to be. The process assumes that the remote account has set up its own SSH private and public key. For the user to access the remote account, they will have to know the remote account's SSH passphrase. SSH is often used in situations where a user has two or more accounts located on different systems and wants to be able to securely access them from each other. In that case, the user already has access to each account and can install SSH on each, giving each its own private and public keys along with their passphrases.
Authentication
The mechanics of authentication in SSH version 1 and version 2 differ slightly. However, the procedure on the part of users is the same. Essentially, a user creates both public and private keys. For this, you use the ssh-keygen command. The user's public key then has to be distributed to those users that the original user wants access to. Often this is an account a user has on another host. A passphrase further protects access. The original user will need to know the other user's passphrase to access it.
SSH Version 1 uses RSA authentication. When a remote user tries to log in to an account, that account is checked to see if it has the remote user's public key. That public key is then used to encrypt a challenge (usually a random number) that can be decrypted only by the remote user's private key. When the remote user receives the encrypted challenge, that user decrypts the challenge with its private key. SSH Version 2 can use either RSA or DSA authentication. The remote user will first encrypt a session identifier using its private key, signing it. The encrypted session identifier is then decrypted by the account using the remote user's public key. The session identifier has been previously set up by SSH for that session.
SSH authentication is first carried out with the host, and then with users. Each host has its own host keys, public and private keys used for authentication. Once the host is authenticated, the user is queried. Each user has their own public and private keys. Users on an SSH server who want to receive connections from remote users will have to keep a list of those remote user's public keys. Similarly, an SSH host will maintain a list of public keys for other SSH hosts.
SSH Tools
SSH is implemented on Linux systems with OpenSSH. The full set of OpenSSH packages includes the general OpenSSH package (openssh), the OpenSSH server (openssh-server), and the OpenSSH clients (openssh-clients). These packages also require OpenSSL (openssl), which installs the cryptographic libraries that SSH uses. You can easily update them from distribution FTP.
The SSH tools are listed in Table 18-1. They include several client programs like scp and sssh, as well as the ssh server. The ssh server (sshd) provides secure connections to anyone from the outside using the ssh client to connect. Several configuration utilities are also included, such as ssh-add, which adds valid hosts to the authentication agent, and ssh-keygen, which generates the keys used for encryption.
On Red Hat, you can start, restart, and stop the sshd server with the service command or redhat-config-services (Services on Server Settings window and menu):
service sshd restart
For version 2, names of the actual tools have a 2 suffix. Version 1 tools have a 1 as their suffix. During installation, however, links are set for each tool to use only the name with the suffix. For example, if you have installed version 2, there is a link called scp to the scp2 application. You can then use the link to invoke the tool. Using scp starts scp2. Table 18-1 specifies only the link names, as these are the same for each version. Remember, though, some applications, such as sftp, are available only with version 2.
SSH Setup
Using SSH involves creating your own public and private keys and then distributing your public key to other users you want to access. These can be different users or simply user accounts of your own that you have on remote systems. Often people remotely log in from a local client into an account on a remote server, perhaps from a home computer to a company computer. Your home computer would be your client account, and the account on your company computer would be your server account. On your client account, you would need to generate your public and private keys. Then you would have to place a copy of your public key in the server account. You can do this by simply e-mailing the key file or copying the file from a floppy disk. Once the account on your server has a copy of your client user's public key, you can access the server account from your client account. You will be also prompted for the server account's passphrase. You will have to know this to access that account. Figure 18-1 illustrates the SSH setup that allows a user george to access the account cecelia.
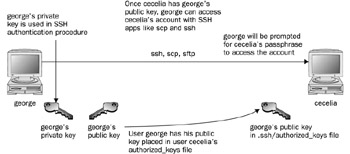
Figure 18-1: SSH setup and access
| Application | Description |
|---|---|
| ssh | SSH client. |
| sshd | SSH server (daemon). |
| sftp | SSH FTP client, Secure File Transfer Program. Version 2 only. Use ? to list sftp commands (SFTP protocol). |
| sftp-server | SSH FTP server. Version 2 only (SFTP protocol). |
| scp | SSH copy command client. |
| ssh-keygen | Utility for generating keys. -h for help. |
| ssh-keyscan | Tool to automatically gather public host keys to generate ssh_known_hosts files. |
| ssh-add | Adds RSD and DSA identities to the authentication agent. |
| ssh-agent | SSH authentication agent that holds private keys for public key authentication (RSA, DSA). |
| ssh-askpass | X Window System utility for querying passwords, invoked by ssh-add (openssh-askpass). |
| ssh-askpass-gnome | GNOME utility for querying passwords, invoked by ssh-add. |
| ssh-signer | Signs host-based authentication packets. Version 2 only. Must be suid root (performed by installation). |
| slogin | Remote login (version 1). |
The following steps are needed to allow you to use SSH to access other accounts:
-
Create public and private keys on your account along with a passphrase. You will need to use this passphrase to access your account from another account.
-
Distribute your public key to other accounts you want to access, placing them in the .ssh/authorized_keys file.
-
Other accounts also have to set up public and private keys along with a passphrase.
-
You will need to also know the other account's passphrase to access it.
Creating SSH Keys with ssh-keygen
You create your public and private keys using the ssh-keygen command. You need to specify the kind of encryption you want to use. You can use either DSA or RSA encryption. Specify the type using the -t option and the encryption name in lowercase (dsa or rsa). In the following example, the user creates a key with the RSA encryption:
ssh-keygen -t rsa
The ssh-keygen command prompts you for a passphrase, which it will use as a kind of password to protect your private key. The passphrase should be several words long. You are also prompted to enter a filename for the keys. If you do not enter one, SSH will use its defaults. The public key will be given the extension .pub. The ssh-keygen command generates the public key and places it in your .ssh/id_dsa.pub or .ssh/id_dsa.pub file depending on the type of key you specified; it places the private key in the corresponding .ssh/id_dsa or .ssh/id_rsa.pub file.
| Note | The .ssh/identity filename is used in SSH version 1; it may be installed by default on older distribution versions. SSH version 2 uses a different filename, .ssh/id_dsa or .ssh/id_rsa, depending on whether RSA or DSA authentication is used. |
If you need to change your passphrase, you can do so with the ssh-keygen command and the -p option. Each user will have their own SSH configuration directory, called .ssh, located in their own home directory. The public and private keys, as well as SSH configuration files, are placed here. If you build from the source code, the make install operation will automatically run ssh-keygen. Table 18-2 lists the SSH configuration files.
Authorized Keys
A public key is used to authenticate a user and its host. You use the public key on a remote system to allow that user access. The public key is placed in the remote user account's .ssh/authorized_keys file. Recall that the public key is held in the .ssh/id_dsa.pub file. If a user wants to log in remotely from a local account to an account on a remote system, they would first place their public key in the .ssh/authorized_keys file in the account on the remote system they want to access. If the user larisa on turtle.mytrek.com wants to access the aleina account on rabbit.mytrek.com, larisa's public key from /home/larisa/.ssh/id_dsa.pub first must be placed in aleina's authorized_keys file, /home/aleina/.ssh/authorized_keys. larisa could send the key or have it copied over. A simple cat operation can append a key to the authorized key file. In the next example, the user adds the public key for aleina in the larisa.pub file to the authorized key file. The larisa.pub file is a copy of the /home/larisa/.ssh/id_dsa.pub file that the user received earlier.
cat larisa.pub >> .ssh/authorized_keys
Loading Keys
If you regularly make connections to a variety of remote hosts, you can use the ssh-agent command to place private keys in memory where they can be accessed quickly to decrypt received transmissions. The ssh-agent command is intended for use at the beginning of a login session. For GNOME, you can use the openssh-askpass-gnome utility, invoked by ssh-add, which allows you to enter a password when you log in to GNOME. GNOME will automatically supply that password whenever you use an SSH client.
Although the ssh-agent command enables you to use private keys in memory, you also must specifically load your private keys into memory using the ssh-add command. ssh-add with no arguments loads your private key from your .ssh/id_dsa or .ssh/id_rsa.pub file. You are prompted for your passphrase for this private key. To remove the key from memory, use ssh-add with the -d option. If you have several private keys, you can load them all into memory. ssh-add with the -l option lists those currently loaded.
SSH Clients
SSH was originally designed to replace remote access operations, such as rlogin, rcp, and Telnet (see Chapter 15), which perform no encryption and introduce security risks such as transmitting passwords in clear text. You can also use SSH to encode X server sessions as well as FTP transmissions (sftp). The ssh-clients package contains corresponding SSH clients to replace these applications. With slogin or ssh, you can log in from a remote host to execute commands and run applications, much as you can with rlogin and rsh. With scp, you can copy files between the remote host and a network host, just as with rcp. With sftp, you can transfer FTP files secured by encryption.
| File | Description |
|---|---|
| $HOME/.ssh/known_hosts | Records host keys for all hosts the user has logged in to (that are not in /etc/ssh/ssh_known_hosts). |
| $HOME/.ssh/random_seed | Used for seeding the random number generator. |
| $HOME/.ssh/id_rsa | Contains the RSA authentication identity of the user. |
| $HOME/.ssh/id_dsa | Contains the DSA authentication identity of the user. |
| $HOME/.ssh/id_rsa.pub | Contains the RSA public key for authentication. The contents of this file should be added to $HOME/.ssh/authorized_keys on all machines where you want to log in using RSA authentication. |
| $HOME/.ssh/id_dsa.pub | Contains the DSA public key for authentication. The contents of this file should be added to $HOME/.ssh/authorized_keys on all machines where you want to log in using DSA authentication. |
| $HOME/.ssh/config | The per-user configuration file. |
| $HOME/.ssh/authorized_keys | Lists the RSA or DSA keys that can be used for logging in as this user. |
| /etc/ssh/ssh_known_hosts | System-wide list of known host keys. |
| /etc/ssh/ssh_config | System-wide configuration file. This file provides defaults for those values not specified in the user's configuration file. |
| /etc/ssh/sshd_config | SSH server configuration file. |
| /etc/ssh/sshrc | System default. Commands in this file are executed by ssh when the user logs in just before the user's shell (or command) is started. |
| $HOME/.ssh/rc | Commands in this file are executed by ssh when the user logs in just before the user's shell (or command) is started. |
ssh
With ssh, you can remotely log in from a local client to a remote system on your network operating as the SSH server. The term local client here refers to one outside the network, such as your home computer, and the term remote refers to a host system on the network to which you are connecting. In effect, you connect from your local system to the remote network host. It is designed to replace rlogin, which performs remote logins, and rsh, which executes remote commands. With ssh, you can log in from a local site to a remote host on your network and then send commands to be executed on that host. ssh is also capable of supporting X Window System connections. This feature is automatically enabled if you make an ssh connection from an X Window System environment, such as GNOME or KDE. A connection is set up for you between the local X server and the remote X server. The remote host sets up a dummy X server and sends any X Window System data through it to your local system to be processed by your own local X server.
The ssh login operation function is much like the rlogin command. You enter the ssh command with the address of the remote host, followed by a -l option and the login name (username) of the remote account you are logging into. The following example logs into the aleina user account on the rabbit.mytrek.com host:
ssh rabbit.mytrek.com -l aleina
You can also use the username in an address format with ssh, as in
ssh aleian@rabbit.mytrek.com
The following listing shows how the user george accesses the cecelia account on turtle.mytrek.com:
[george@turtle george]$ ssh turtle.mytrek.com -l cecelia cecelia@turtle.mytrek.com's password: Last login: Fri Sep 19 15:13:05 2003 from turtle.mytrek.com [cecelia@turtle cecelia]$
A variety of options are available to enable you to configure your connection. Most have corresponding configuration options that can be set in the configuration file. For example, with the -c option, you can designate which encryption method you want to use, for instance, idea, des, blowfish, or arcfour. With the -i option, you can select a particular private key to use. The -c option enables you to have transmissions compressed at specified levels (see the ssh Man page for a complete list of options).
scp
You use scp to copy files from one host to another on a network. Designed to replace rcp, scp actually uses ssh to transfer data and employs the same authentication and encryption methods. If authentication requires it, scp requests a password or passphrase. scp operates much like rcp. Directories and files on remote hosts are specified using the username and the host address before the filename or directory. The username specifies the remote user account that scp is accessing, and the host is the remote system where that account is located. You separate the user from the host address with an @, and you separate the host address from the file or directory name with a colon. The following example copies the file party from a user's current directory to the user aleina's birthday directory, located on the rabbit.mytrek.com host:
scp party aleina@rabbit.mytrek.com:/birthday/party
Of particular interest is the -r option (recursive) option, which enables you to copy whole directories. See the scp Man page for a complete list of options. In the next example, the user copies the entire reports directory to the user justin's projects directory:
scp -r reports justin@rabbit.mytrek.com:/projects
In the next example, the user george copies the mydoc1 file from the user cecelia's home directory:
[george@turtle george]$ scp cecelia@turtle.mytrek.com:mydoc1 . cecelia@turtle.mytrek.com's password: mydoc1 0% | | 0 --:-- ETA mydoc1 100% |*****************************| 17 00:00 [george@turtle george]$
From a Windows system, you can also use scp clients such as winscp, which will interact with Linux scp-enabled systems.
sftp and sftp-server
With sftp, you can transfer FTP files secured by encryption. sftp uses the same commands as ftp (see Chapter 21). This client, which works only with ssh version 2, operates much like ftp, with many of the same commands. Use sftp instead of ftp to invoke the sftp client.
sftp ftp.redhat.com
To use the sftp client to connect to an FTP server, that server needs to be operating the sftp-server application. The ssh server invokes sftp-server to provide encrypted FTP transmissions to those using the sftp client. The sftp server and client use the SSH File Transfer Protocol (SFTP) to perform FTP operations securely.
Port Forwarding (Tunneling)
If, for some reason, you can connect to a secure host only by going through an insecure host, ssh provides a feature called port forwarding. With port forwarding, you can secure the insecure segment of your connection. This involves simply specifying the port at which the insecure host is to connect to the secure one. This sets up a direct connection between the local host and the remote host, through the intermediary insecure host. Encrypted data is passed through directly. This process is referred to as tunneling, creating a secure tunnel of encrypted data through connected servers.
You can set up port forwarding to a port on the remote system or to one on your local system. To forward a port on the remote system to a port on your local system, use the ssh -R option, followed by an argument holding the local port, the remote host address, and the remote port to be forwarded, each separated by a colon. This works by allocating a socket to listen to the port on the remote side. Whenever a connection is made to this port, the connection is forwarded over the secure channel, and a connection is made to a remote port from the local machine. In the following example, port 22 on the local system is connected to port 23 on the rabbit.mytrek.com remote system:
ssh -R 22:rabbit.mytrek.com:23
To forward a port on your local system to a port on a remote system, use the ssh -L option, followed by an argument holding the local port, the remote host address, and the remote port to be forwarded, each two arguments separated by a colon. A socket is allocated to listen to the port on the local side. Whenever a connection is made to this port, the connection is forwarded over the secure channel and a connection is made to the remote port on the remote machine. In the following example, port 22 on the local system is connected to port 23 on the rabbit.mytrek.com remote system:
ssh -L 22:rabbit.mytrek.com:23
You can use the LocalForward and RemoteForward options in your .ssh/config file to set up port forwarding for particular hosts or to specify a default for all hosts you connect to.
SSH Configuration
The SSH configuration file for each user is in their .ssh/config file. The /etc/ssh/sys_config file is used to set site-wide defaults. In the configuration file, you can set various options, as listed in the ssh_config Man document. The configuration file is designed to specify options for different remote hosts to which you might connect. It is organized into segments, where each segment begins with the keyword HOST, followed by the IP address of the host. The following lines hold the options you have set for that host. A segment ends at the next HOST entry. Of particular interest are the User and Cipher options. Use the User option to specify the names of users on the remote system who are allowed access. With the Cipher option, you can select which encryption method to use for a particular host. Encryption methods include idea, des (standard), triple-des (3des), blowfish (128 bit), arcfour (RSA's RC4), and twofish. The following example allows access from larisa at turtle.mytrek.com and uses Blowfish encryption for transmissions:
Host turtle.mytrek.com User larisa Compression no Cipher blowfish
To specify global options that apply to any host you connect to, create a HOST entry with the asterisk as its host, HOST *. This entry must be placed at the end of the configuration file because an option is changed only the first time it is set. Any subsequent entries for an option are ignored. Because a host matches on both its own entry and the global one, its specific entry should come before the global entry. The asterisk, *, and the question mark, ?, are both wildcard matching operators that enable you to specify a group of hosts with the same suffix or prefix.
Host * FallBackToRsh yes KeepAlive no Cipher idea
|
| < Day Day Up > |
|
EAN: 2147483647
Pages: 328