Getting Started Programming Forward Kinematics
| | ||
| | ||
| | ||
Programming both types of kinematics involves a few basic elements:
-
The parts of the system. Ill call them segments .
-
The position of each segment.
-
The rotation of each segment.
Each segment in these examples will be an oblong shape like a forearm or upper arm, or any part of a leg. Of course, the last segment could be some other shape, such as a hand, a foot , a gripper, a stinger, or a device that shoots green laser beams at intruders.
Each segment will have a pivot point at one end, around which it can rotate. If that segment has any subsegments, they will pivot on the opposite end of that segment. Just like your upper arm pivots on your shoulder, your forearm pivots on your elbow , and your hand pivots on your wrist.
Of course, in many real systems, that pivoting can be in many directions. Think of how many ways you can move your wrist. By the end of this book, you might want to try to do something like that in Flash on your own, but right now, the system is going to be strictly two-dimensional.
Moving one segment
Lets start with a single segment and get it moving somehow. First, you need something to use as a segment. If youre guessing that might be a movie clip, youre right. A movie clip can have graphics, it can have a position, and it can be rotated . Well take it. Figure 13-1 shows what I came up with.
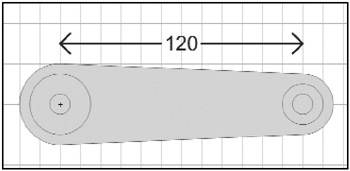
Figure 13-1: A single segment
Notice two things in the segment illustrated in Figure 13-1, which apply regardless of what graphic you create for your segment:
-
The little crosshair inside the circles on the left, which is the position of the registration point, or pivot point
-
The distance from that point to the pivot point of this segments subsegment, marked as 120 in the figure
The position of the registration point (the little crosshair) is the pivot point of the movie clip. When you position the movie clip with its _x and _y properties, this is the point that will be placed at those coordinates. When you rotate the clip, it will rotate around this point.
Most likely, the only way you're going to get your movie clips registration point in the right place is by manually positioning the graphics after you create it. As you know, when you create a movie clip, you can set its registration point to any one of nine positions : the corners, center of any edge, or center of the movie clip. None of those are particularly useful for what you are doing here. So, after you create your movie clip symbol, go inside and edit it. Select all the graphics and move them so that the point you want to pivot on is right on that registration point. You can do this numerically . For example, I knew that the center of that inner circle was 20 pixels from the left edge. So I centered my graphics vertically and moved them to be 20 pixels left of the registration point.
The next thing to take note of is the distance from that pivot point to the pivot point of this segments subsegment. In other words, how long from the shoulder to the elbow? Obviously, youre dealing with just a single segment for the moment, but I might as well cover this now, as youll need to know it. On the right side of the segment in Figure 13-1, I have another circle. This is where I want to position the next segment eventually. And Ive measured and found that the distance between the two pivot points is 120 pixels. Its important to find this out manually, because theres no way to do it automatically. Flash has no way of knowing where you want that next limb to be placed. Of course, there could be other solutions to this, such as placing another movie clip inside the segment to represent where the next pivot point would be, and calculating that distance. But the point is that somehow you need to tell Flash where that point is.
Now that you have your first segment, get an instance on stage and name it seg0 . In the file ch13_01.fla , Ive included a slider component, which youre free to use for whatever you want. Its pretty useful for adjusting numeric values on the fly. You can use that or any other similar component for this example. If you look at the component parameters (in the Property inspector or Component panel), youll see that I set maximum to ˆ 90, minimum to 90, and value to 0. Yes, I know that maximum and minimum look backwards , but the slider supports this kind of use, and youll see that it makes sense in a moment. Ive named the slider instance slider0 . Now, you just need a small code snippet to tie it all together:
slider0.changeHandler = update; function update():Void { seg0._rotation = slider0.value; } This just says that whenever the value of the slider changes, it will call the update function, which sets the rotation of seg0 to the sliders value. Try that out, and you should see something like Figure 13-2. If it all works, youve completed the first phase of forward kinematics.
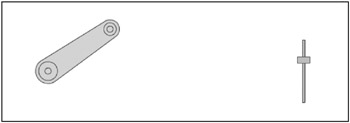
Figure 13-2: It moves!
Moving two segments
Working with one segment was very simple and rather boring, but necessary. Its time to move on. Throw another copy of the segment movie clip on stage and name the instance seg1 . You might want to arrange it so its behind seg0 , but thats a purely cosmetic issue. Dont worry about seg1 s position on stage for now. Youll be handling that with code. You can also throw another slider instance down there and call it slider1 .
Now for the code:
update(); slider0.changeHandler = update; slider1.changeHandler = update; function update():Void { seg0._rotation = slider0.value; seg1._rotation = slider1.value; var radians:Number = seg0._rotation * Math.PI / 180; seg1._x = seg0._x + Math.cos(radians) * 120; seg1._y = seg0._y + Math.sin(radians) * 120; } Take a quick look down at the bottom of the update function, and youll see that it now contains code to position seg1 . Since you didnt do that manually, you better call update as your first action, so that segment isnt just floating out in space when the viewer first sees it.
You set up slider1 to call the update function in the same way as slider0 . And, obviously, you have seg1 s rotation now based on slider1 .
The rest of the code should be pretty simple if youve followed the trigonometry stuff (introduced in Chapter 3). It simply converts seg0 s rotation to radians and uses that angle with the cosine and sine to find the next pivot point, which will be seg1 s new position. Remember that 120 is the distance measured between the two pivot points. If you made your own graphic for the segment, youll want to use whatever distance you came up with.
You can find this example in the ch13_02.fla file. If you test this file, youll see that as you rotate seg0 around, seg1 remains attached to the end of it, as shown in Figure 13-3. Realize that there is no actual physical attachment between the two movie clips. Its all being done with math. You can also rotate seg1 independently with its slider.
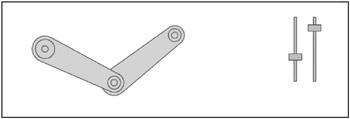
Figure 13-3: Forward kinematics with two segments
One thing that looks a bit strange is that while seg1 moves with seg0 ; it doesnt rotate with it. Its like theres some gyro-stabilizer inside of it, holding its orientation steady. I dont know about you, but my forearm doesnt have a gyro-stabilizer in it (though that might be kind of cool), so to me, this looks unnatural . What really should be happening is that seg1 s rotation should be seg0 s rotation plus the value of slider1 . The ch13_03.fla file handles this with the following code:
update(); slider0.changeHandler = update; slider1.changeHandler = update; function update():Void { seg0._rotation = slider0.value; seg1._rotation = seg0._rotation + slider1.value; var radians:Number = seg0._rotation * Math.PI / 180; seg1._x = seg0._x + Math.cos(radians) * 120; seg1._y = seg0._y + Math.sin(radians) * 120; } Now, that looks more like a real arm. Of course, if youre talking about a human arm, you might not like the way the elbow can bend in both directions. Just change the range of slider1 so minimum is 0 and maximum is something like -160, and that should look more normal.
This might be a good time to reflect on the term forward kinematics again. The base of this system is the pivot point of seg0 . The free end is the other end of seg1 . If you want, you can imagine a hand there. The rotation and position of the base determine the position of seg1 . And seg1 s rotation and position determine the position of the free end. The free end has no say at all in where it is, should be, or would like to be. It just goes along for the ride. Thus, control is moving forward from the base to the free end.
| | ||
| | ||
| | ||
EAN: 2147483647
Pages: 137