Springing
| | ||
| | ||
| | ||
Maybe its just me, but Ive always found springing to be one of the most powerful and useful physics concepts in ActionScripted animation. It seems like you can do almost anything with a spring. Of course, its just another technique that has its specific uses. Ive just gotten so much mileage out of this one that I get a bit enthusiastic about it. So, lets look at what a spring is and how you can program it in Flash.
As I mentioned at the beginning of the chapter, a springs acceleration is proportional to its distance from a target. Think about a real, physical spring, or better yet, a ball on the end of a rubber band. You attach the other end to something solid. As the ball is hanging there with no force applied, thats its target point. Thats where it wants to be. Now pull it away a tiny bit and let it go. At that point, the balls velocity is zero, but the rubber band applies force to it, pulling it back to the target. Now pull it away as far as you can and let it go. The rubber band applies a lot more force. The ball zooms right past its target and starts going the other way. Its velocity is very high. But when it gets a little bit past the target, the rubber band starts pulling it back a bitchanges its velocity. The ball keeps going, but the farther it goes, the more the band pulls back on it. Eventually, the velocity reaches zero, the direction reverses, and the whole thing starts over again. Finally, after bouncing back and forth a few times, it slows down and comes to a stop atyou guessed whereits target.
Now, lets start translating this into ActionScript so you can use it. To keep things simple, lets start off with one dimension.
Springing in one dimension
Lets drag our good friend, the red ball movie clip, back into active service. Youll stick it over on the left hand side of the screen and have it spring to the middle. As with easing, youll need a variable to hold the proportionate value of the spring. You can think of this as the proportion of the distance that will be added to the velocity. A high spring value will make a very stiff spring. Something lower will look more like a loose rubber band. Youll start off with 0.1. Heres what you have so far:
spring = 0.1; ball._x = 0; targetX = Stage.width / 2;
Again, dont worry about where to put this just yet. Just make sure you know what these variables and statements are about.
Then find the distance to the target.
dist = targetX ball._x;
Now, compute some acceleration. The acceleration will be proportional to that distance. In fact, it will be the distance multiplied by the spring value.
ax = dist * spring;
Once you have a value for acceleration, you should be back on familiar ground. Add the acceleration to the velocity and add the velocity to the position, right?
vx += ax; ball._x += vx;
Before you write any code, lets simulate it with some sample numbers . Lets say the x position is 0, vx is 0, the target x is 100, and the spring variable is 0.1. Here is how it might progress:
-
Multiply distance (100) by spring , and you get 10. Add that to vx , which then becomes 10. Add velocity to position, making the x position 10.
-
Next round, distance is 90. Acceleration is 90 times 0.1, or 9 this time. This gets added to vx , which becomes 19. The x position becomes 29.
-
Next round, distance is 71, acceleration is 7.1, added to vx makes it 26.1. The x position becomes 55.1.
-
Next round, distance is 44.9, acceleration is 4.49, and vx becomes 30.59. The x position is then 85.69.
The thing to note is that the acceleration on each frame becomes less and less as the object approaches its target, but the velocity continues to build. Its not building as rapidly as it was on previous frames , but its still moving faster and faster.
After a couple more rounds, the object goes right past the target to an x position of around 117. The distance is now ˆ 17. A fraction of this gets added to the velocity, slowing the object down a bit.
Now that you understand how springing works, lets make a real file. As usual, place a ball movie clip on the stage, and then add the following code on frame 1 ( ch08_05.fla ):
var spring:Number = 0.1; ball._x = 0; ball._y = Stage.height / 2; var targetX:Number = Stage.width / 2; var vx:Number = 0; onEnterFrame = function () { var ax:Number = (targetX - ball._x) * spring; vx += ax; ball._x += vx; }; Test this, and youll see you definitely have something spring-like going on there. The only problem is that it kind of goes on forever. Earlier, when I described a spring, I said that it slows down and comes to a stop. As is though, the ball builds up the same velocity on each leg of its swing, so it keeps bouncing back and forth at the same speed. You need something to reduce its velocity and slow it down. Hmmm . . . sound familiar? Thats right, you need to apply some friction. Easy enoughjust make a friction variable, with a value like 0.95 for starters. Then multiply vx by friction somewhere in the enterFrame handler. Heres the corrected code ( ch08_06.fla ):
var spring:Number = 0.1; var friction:Number = 0.95; ball._x = 0; ball._y = Stage.height / 2; var targetX:Number = Stage.width / 2; var vx:Number = 0; onEnterFrame = function () { var ax:Number = (targetX - ball._x) * spring; vx += ax; vx *= friction; ball._x += vx; }; At this point, you have a full-fledged, albeit one-dimensional, spring. Definitely play with this one a lot. See what different values for spring and friction do and how they interact. Check out how a different starting position or target position affects the action of the system, the speed of the ball, and the rate at which it slows down and comes to a stop. Knowing this one file well will take you a long way. When youve got it down cold, youre ready to move on to a two-dimensional spring.
Springing in two dimensions
If you are thinking that a two-dimensional spring is as simple as adding a second target, velocity, and acceleration, I have news for you: Youre right. So, without further ado, here is a two-dimensional spring ( ch08_07.fla ):
var spring:Number = 0.1; var friction:Number = 0.9; ball._x = 0; ball._y = 0; var targetX:Number = Stage.width / 2; var targetY:Number = Stage.height / 2; var vx:Number = 0; var vy:Number = 0; onEnterFrame = function () { var ax:Number = (targetX - ball._x) * spring; var ay:Number = (targetY - ball._y) * spring; vx += ax; vy += ay; vx *= friction; vy *= friction; ball._x += vx; ball._y += vy; }; As you can see, the only difference is adding in all the y-axis stuff. The problem is, it still seems rather one-dimensional. Yes, the ball is now moving on the x and y axes, but its just going in a straight line. Thats because its velocity starts out as zero, and the only force acting on it is the pull towards the target, so it goes in a straight line towards its target.
To make things a little more interesting, initialize vx to something other than 0. Try something nice and big like 50. Now, you have something that looks a little more loose and fluid. But youre only getting started. It gets a lot cooler .
Springing to a moving target
You probably wont be surprised to hear that springing doesnt require the target to be the same on each frame. When I covered easing, I gave you a quick and easy example of the ball following the mouse. Its pretty easy to adapt that example to make the ball spring to the mouse. Instead of the targetX and targetY youve been using, use the mouse coordinates. In springing, as with easing, the distance to the target is always calculated newly on each frame. Acceleration is based on that, and that acceleration is added to the velocity.
The effect is so cool, I feel like I should be writing on and on about it. But the fact is, theres really not much more to say on the subject, and the code isnt all that different. In the preceding example, simply change these lines:
var ax:Number = (targetX - ball._x) * spring; var ay:Number = (targetY - ball._y) * spring;
to read like this:
var ax:Number = ( _xmouse - ball._x) * spring; var ay:Number = ( _ymouse - ball._y) * spring;
You can also remove the lines that declare the targetX and targetY variables, though they are not going to hurt anything if you leave them in. The updated file is available as ch08_08.fla .
This is another good point to stop and play. Get a really good feeling for how all these variables work, and try out many variations. Break it. Find out what breaks it. Have fun with it!
So wheres the spring?
At this point, you have a very realistic looking ball on the end of a rubber band. But it seems to be an invisible rubber band. Well, you can remedy that pretty easily with a few lines of drawing API code!
Since you have a fairly simple file without much else going on, you can safely apply your drawing code directly to the stage. In a more complex application, you might want to create an empty movie clip and use that as a kind of drawing layer.
The strategy is simple. In each frame, after the ball is in position, you call clear() to erase any previous lines. Then you reset the lineStyle and draw a line from the ball to the mouse. You just need the following code in the enterFrame handler, immediately after you set the balls position (youll see it in the full code shortly):
clear(); lineStyle(1, 0, 100); moveTo(ball._x, ball._y); lineTo(_xmouse, _ymouse);
Well, this is fun! What else can you do? How about adding some gravity so the ball looks like its actually hanging off the end of the mouse? Thats easy. Just add a gravity variable and add that to the vy for each frame. You know the drill by now. The following code incorporates the line drawing and gravity additions ( ch08_09.fla ):
var spring:Number = 0.1; var friction:Number = 0.9; var gravity:Number = 5; ball._x = 0; ball._y = 0; var vx:Number = 0; var vy:Number = 0; onEnterFrame = function () { var ax:Number = (_xmouse - ball._x) * spring; var ay:Number = (_ymouse - ball._y) * spring; vx += ax; vy += ay; vy += gravity; vx *= friction; vy *= friction; ball._x += vx; ball._y += vy; clear(); lineStyle(1, 0, 100); moveTo(ball._x, ball._y); lineTo(_xmouse, _ymouse); }; When you test this version, you should see something like Figure 8-2.
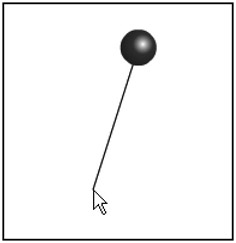
Figure 8-2: Springing from the mouse, with a visible spring
Notice how you needed to increase the gravity variable to 5 in order to get the ball to actually hang down. Much less than that, and the force of the spring overcomes the force of gravity and you dont see the effect.
Now, heres another point where Ive just butchered real-world physics. Of course, you cant go around increasing gravity on objects! Gravity is a constant, based on the size and mass of the planet you happen to be on. What you can do is increase the mass of the object, so that gravity has more of an effect on it. So, technically I should keep gravity at something like 0.5, and then create a mass property and make it something like 10. Then I could multiply mass by gravity and come up with 5 again. Or I could change the name of the gravity variable to something like forceThatGravityIsExertingOnThisObjectBasedOnItsMass . But as long as you know thats what I mean, Ill save the space and shorten it to gravity .
Again, experiment with this one. Try decreasing the gravity and spring values. Try changing the friction value. Youll see you can have a nearly endless number of combinations, allowing you to create all kinds of systems.
Chaining springs
Moving right along, lets chain a few springs together. In the easing section, I discussed mouse trailers briefly , where one object eases to the mouse, another object eases to that object, and so on. I didnt give you an example because its an old, and somewhat cheesy, effect. But, when you apply the same concept using springing instead, well, thats just different.
Heres the plan: Start off with three balls on stage, named ball0 , ball1 , and ball2 . The first one, ball0 , will behave pretty much like the single ball did in the previous example. Then ball1 will spring to ball0 , and ball2 will spring to ball1 . All will have gravity, so they should kind of hang down in a chain. The code isnt really anything you havent seen before, just a little more complex. Here it is, assuming that the three balls are already on stage ( ch08_10.fla ):
var spring:Number = 0.1; var friction:Number = 0.8; var gravity:Number = 5; ball0.vx = 0; ball0.vy = 0; ball1.vx = 0; ball1.vy = 0; ball2.vx = 0; ball2.vy = 0; onEnterFrame = function () { ball0.vx += (_xmouse - ball0._x) * spring; ball0.vy += (_ymouse - ball0._y) * spring; ball1.vx += (ball0._x - ball1._x) * spring; ball1.vy += (ball0._y - ball1._y) * spring; ball2.vx += (ball1._x - ball2._x) * spring; ball2.vy += (ball1._y - ball2._y) * spring; clear(); lineStyle(1, 0, 100); moveTo(_xmouse, _ymouse); for(var i:Number=0;i<3;i++) { var ball:MovieClip = this["ball" + i]; ball.vy += gravity; ball.vx *= friction; ball.vy *= friction; ball._x += ball.vx; ball._y += ball.vy; lineTo(ball._x, ball._y); } }; Notice that you now assign each ball its own vx and vy and initialize them to 0. Then in the onEnterFrame function, you perform all the springing. Then you set up a line style and move the drawing cursor to the mouse position. Then you loop through the three balls, getting a reference to each one using array notation (this["ball" + i]) , and apply basic motion code to them. At the end of the function, you draw a line to each successive ball, creating the rubber band holding them all together.
Actually, this code could be a lot more concise . I left a lot of stuff out of for loops that could have gone into them, such as the spring code itself. I did this just to make it very clear what the code is doing. But if you want to extend this to add a chain of a dozen balls or moresomething like Figure 8-3youll probably want to put that in a loop as well, rather than having several dozen extra lines of code. Heres an example of one way of doing that ( ch08_11.fla ):
var spring:Number = 0.1; var friction:Number = 0.8; var gravity:Number = 5; var ballCount:Number = 5; for(var i=0;i<ballCount;i++) { var ball:MovieClip = attachMovie("ball", "ball" + i, i); ball.vx = 0; ball.vy = 0; } onEnterFrame = function () { clear(); lineStyle(1, 0, 100); moveTo(_xmouse, _ymouse); ball0.vx += (_xmouse - ball0._x) * spring; ball0.vy += (_ymouse - ball0._y) * spring; for(var i=0;i<ballCount;i++) { var ballA:MovieClip = this["ball" + i]; if(i > 0) { var ballB:MovieClip = this["ball" + (i-1)]; ballA.vx += (ballB._x - ballA._x) * spring; ballA.vy += (ballB._y - ballA._y) * spring; } ballA.vy += gravity; ballA.vx *= friction; ballA.vy *= friction; ballA._x += ballA.vx; ballA._y += ballA.vy; lineTo(ballA._x, ballA._y); } }; 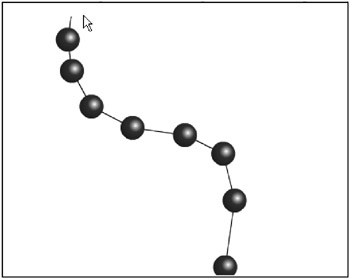
Figure 8-3: Chained springs
This code will allow you to enter any number of objects just by changing the ballCount variable. But make sure the ball movie clip symbol is now set to export with the linkage name ball , as you are attaching the instances (this is the setup in the ch08_11.fla file).
Here, you still need to handle ball0 s spring by itself, as that springs to the mouse. By checking if(i>0) in the for loop, you can ignore ball0 for the spring action there. You just find ballB , which is the previous ball in the chain, and ballA , which is the current one, and spring ballA to ballB . I also made gravity and friction less so the chain kind of sticks together a little better.
Springing to multiple targets
Back when I introduced the subjects of velocity and acceleration in Chapter 5, I talked about how you could have multiple forces acting on an object. Each force is an acceleration, and you just add them on to the velocity, one by one. Well, since a spring is nothing more than something exerting acceleration on an object, its pretty simple to create multiple springs acting on a single object.
Heres the setup for demonstrating springing to multiple targets: Youll create three handles, which will just be movie clips with simple drag-and-drop functionality, but they will also be targets for the ball to spring to. The ball will try to spring to all three of them at once and find its equilibrium somewhere between them. Or, to put it another way, each target will exert a certain amount of acceleration on the ball, and its motion will be the sum total of all of those forces.
For this example, place these handles on stage and name them handle0 , handle1 , and handle2 . Then add the code ( ch08_12.fla ):
var spring:Number = 0.1; var friction:Number = 0.9; var vx:Number = 0; var vy:Number = 0; handle0.onPress = doDrag; handle0.onRelease = handle0.onReleaseOutside = doDrop; handle1.onPress = doDrag; handle1.onRelease = handle1.onReleaseOutside = doDrop; handle2.onPress = doDrag; handle2.onRelease = handle2.onReleaseOutside = doDrop; onEnterFrame = function () { vx += (handle0._x - ball._x) * spring; vy += (handle0._y - ball._y) * spring; vx += (handle1._x - ball._x) * spring; vy += (handle1._y - ball._y) * spring; vx += (handle2._x - ball._x) * spring; vy += (handle2._y - ball._y) * spring; vx *= friction; vy *= friction; ball._x += vx; ball._y += vy; clear(); lineStyle(1, 0, 100); moveTo(ball._x, ball._y); lineTo(handle0._x, handle0._y); moveTo(ball._x, ball._y); lineTo(handle1._x, handle1._y); moveTo(ball._x, ball._y); lineTo(handle2._x, handle2._y); }; function doDrag() { this.startDrag(); } function doDrop() { this.stopDrag(); } Figure 8-4 shows an example of the results of this code.
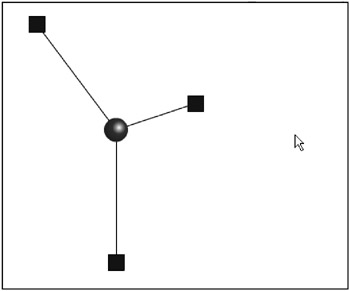
Figure 8-4: Multiple springs
Again, you could use a for loop several places in this code. I kept it unlooped just so it is easier to see exactly what youre doing. You should have enough knowledge under your belt now to be able to alter the code to use a for loop. If you do that, you can add as many handles as you want. Or try making the handles throwablethat should create some interesting effects.
By now, Im sure youve already started taking many detours and creating a few things that I havent even mentioned (or perhaps, thought of). If so, thats excellent ! Thats exactly my goal in writing this book.
Offsetting the target
If you took a real springan actual coil of bouncy metaland attached one end of it to something solid and the other end to a ball or some other object, what would be the target? Would the target be the point where the spring is attached? No, not really. The ball would never be able to reach that point, because the spring itself would be in the way. Furthermore, once the spring had contracted to its normal length, it wouldnt be applying any more force on the ball. So, the target would actually be the position of the loose end of the spring in its unstretched state. But that point could vary as the spring pivots around the fixed point.
To find the actual target, you need to first find the angle between the object and the fixed point, and then move out from the fixed point at that anglethe length of the spring. In other words, if the length of the spring were 50, and the angle between the ball and fixed point were 45, you would move out 50 pixels from the fixed point, at an angle of 45 degrees, and that would be the balls target to spring to. Figure 8-5 illustrates how this works.
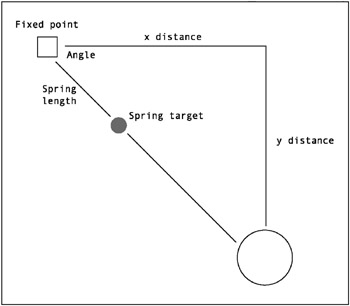
Figure 8-5: Offsetting a spring
The code to find the target in this case is roughly as follows :
var dx:Number = ball._x fixedX; var dy:Number = ball._y fixedY; var angle:Number = Math.atan2(dy, dx); var targetX:Number = fixedX + Math.cos(angle) * springLength; var targetY:Number = fixedY + Math.sin(angle) * springLength;
So, the result is that the object will spring towards the fixed point, but will come to rest some distance away from it. Also, note that although Im calling it a fixed point, this just means the point to which the spring is fixed. It doesnt mean that point cannot move. Perhaps its better just to see it in action. Youll go back to using the mouse position, but this time, it will be the springs fixed point. The springs length will be 75. Heres the code ( ch08_13.fla ):
var spring:Number = 0.1; var friction:Number = 0.9; var springLength:Number = 75; var vx:Number = 0; var vy:Number = 0; onEnterFrame = function () { var dx:Number = ball._x - _xmouse; var dy:Number = ball._y - _ymouse; var angle:Number = Math.atan2(dy, dx); var targetX:Number = _xmouse + Math.cos(angle) * springLength; var targetY:Number = _ymouse + Math.sin(angle) * springLength; vx += (targetX - ball._x) * spring; vy += (targetY - ball._y) * spring; vx *= friction; vy *= friction; ball._x += vx; ball._y += vy; clear(); lineStyle(1, 0, 100); moveTo(ball._x, ball._y); lineTo(_xmouse, _ymouse); }; Even though you can see what is happening here, it might not be too obvious exactly where you would find this technique particularly useful. Well, the next section will give you a specific example.
Attaching multiple objects with springs
I remember the exact moment I realized I could do this. It was something like, OK, I know how to spring an object to a point. And I know that point does not have to be fixed. I can even have one object spring to another object. Well, how about if the other object sprang back to the first object? So these two objects were linked to each other by a spring. Move either one and the other one springs to it.
My initial impression was that it would probably cause some weird feedback loop that would crash Flash, or at least bring up some kind of warning message. But I bravely went ahead and tried it anyway. And to my complete amazement, it worked perfectly !
Ive already pretty much described the strategy, but to recap: Object A has object B as its target. It springs towards it. Object B in turn has object A as its target. Actually, this is the point where the offset has a great role. If each object had the other as a direct target, they would collapse in on each other and occupy the same point. By applying an offset, you keep them apart a bit, as shown in Figure 8-6.
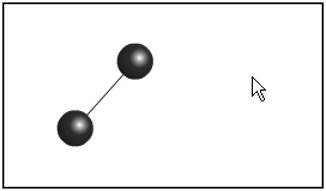
Figure 8-6: Two objects connected by a spring
For this next example, youll need two ball movie clips on stage. Ill call them ball0 and ball1 . ball0 springs to ball1 with an offset. And ball1 springs to ball0 with an offset. Rather than writing out all the offset, spring, and motion code twice, I put it all into a function called springTo . So, you can spring ball0 to ball1 by saying springTo(ball0, ball1) , and then spring ball1 to ball0 by saying springTo(ball1, ball0) . Heres the code ( ch08_14.fla ):
var spring:Number = 0.1; var friction:Number = 0.9; var springLength:Number = 75; ball0.vx = 0; ball0.vy = 0; ball0.onPress = doDrag; ball0.onRelease = ball0.onReleaseOutside = doDrop; ball1.vx = 0; ball1.vy = 0; ball1.onPress = doDrag; ball1.onRelease = ball1.onReleaseOutside = doDrop; onEnterFrame = function () { springTo(ball0, ball1); springTo(ball1, ball0); clear(); lineStyle(1, 0, 100); moveTo(ball0._x, ball0._y); lineTo(ball1._x, ball1._y); } function springTo(ballA, ballB) { if(!ballA.dragging) { var dx:Number = ballA._x - ballB._x; var dy:Number = ballA._y - ballB._y; var angle:Number = Math.atan2(dy, dx); var targetX:Number = ballB._x + Math.cos(angle) * springLength; var targetY:Number = ballB._y + Math.sin(angle) * springLength; ballA.vx += (targetX - ballA._x) * spring; ballA.vy += (targetY - ballA._y) * spring; ballA.vx *= friction; ballA.vy *= friction; ballA._x += ballA.vx; ballA._y += ballA.vy; } }; function doDrag() { this.dragging = true; this.startDrag(); } function doDrop() { this.dragging = false; this.stopDrag(); } For this file, the balls are placed on stage and are set up for drag-and-drop. The enterFrame handler function simply calls the springTo function twice:
springTo(ball0, ball1); springTo(ball1, ball0);
The springTo function is where all the action happens and is identical in both versions. Everything in this function should be familiar to you. First, it makes sure the ball in question is not being dragged. It finds the distance and angle to the other ball, and calculates a target point based on that. It then performs basic spring mechanics on that target point. When the function is called again, with the parameters reversed , the balls swap roles, and the original target ball springs towards the other one. This may not be the most efficient code, but it demonstrates what is happening as clearly as possible.
Youll see that neither ball is attached to any fixed point or the mouse; they are both free-floating. Their only constraint is that they maintain a certain distance from each other. The great thing about this setup is that it is now very easy to incorporate additional objects. For example, if you create a third ball ( ball2 ) and set it up like the others, you can add that into the mix like so:
springTo(ball0, ball1); springTo(ball1, ball0); springTo(ball1, ball2); springTo(ball2, ball1); springTo(ball2, ball0); springTo(ball0, ball2);
This will create a triangle formation, as shown in Figure 8-7, which to me is pretty cool. Im sure once you get the hang of this, youll quickly move onto a square, and from there, all kinds of complex springy structures.
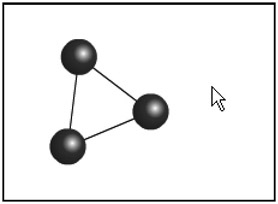
Figure 8-7: Three objects connected by a spring
| | ||
| | ||
| | ||
EAN: 2147483647
Pages: 137