Environmental Boundaries
| | ||
| | ||
| | ||
Well start by setting some boundaries, literally. With any activity youre involved inwhether its playing a sport, working at your job, building a house, and so ontheres usually some concept of the space for that activity. Youre saying, Im only interested in things that happen in this area. If something is happening somewhere outside this area, I dont really care about it at this moment. If something is happening inside this space though, I need to pay attention to it.
If one of the objects in your zone of interest moves outside that space, then you have a choice to make. You can move it back into the zone somehow, or you can cross it off the list of things that youre paying attention to. Another option is to follow it. In other words, you move the space so that it continues to enclose the object, even though the object is moving. Its not so much different in Flash.
In your movie, you set up a space for your objects. Generally , this is the whole stage, but the area can be some portion of the stage, or even a space that is larger than the stage. Since the objects are moving, theres a good chance that they will eventually leave that space. When they leave, you can forget about them, move them back into the area, or follow them. Ill cover strategies for all of these approaches. First, though, lets just figure out where the boundaries are and how to specify them.
Setting boundaries
In most cases, a simple rectangle works as a boundary. Lets start with the simplest example, with the boundaries based on the size of the stage. In this case, the top and left boundaries are zero, and the right and bottom boundaries are Stage.width and Stage.height . You can store these in variables if you want, like so:
var left:Number = 0; var top:Number = 0; var right:Number = Stage.width; var bottom:Number = Stage.height;
Or you can simply use the stage properties directly in your code. As I mentioned earlier, it is best to set variables like this early in the code, and not refer to actual numbers in the midst of your animation code. In this case, though, there is one small side effect of hard-coding these values. If the stage size changes, do you want to continue using the old values, or change things so that the area of interest still encompasses the entire stage?
As is, the values for right and bottom wont change when the movie is resized. You need to change them yourself. To accomplish this, you need to know when the stage is changing size. Luckily, the Stage object broadcasts a resize event whenever this happens. By listening for this event, you can know when to update your boundary values. You listen for this event as follows :
Stage.addListener(this); onResize = function() { right = Stage.width; bottom = Stage.height; } First, you set up the current timeline as a listener for Stage events. Then you define an event handler called onResize , which is the default name of the event-handling function for the resize event. When that is called, it updates the right and bottom variables. The top and left variables dont need to change, as they will continue to be zero.
OK, now that you have your boundaries in place, what do you do with them? Well, you check all the movable objects you are paying attention to at the moment, and see if they are still within this space. You can do this with a couple of if statements. Here is a simplified version of what they look like:
if(ball._x > right) { // do something } else if(ball._x < left) { // do something } if(ball._y > bottom) { // do something } else if(ball._y < top) { // do something } Here again, Ive used if statement shortcutting for efficiency. If the balls x position is greater than the right edge, then it is way over there on the right. Theres no way it could also be way over by the left edge, so you dont need to check that in a separate if statement. You need to check the left variable only in the case that the first if fails. Do the same for the top and bottom . However, it is possible for the object to be out of bounds on the x and y axis at the same time, so keep those two checks separate.
But what is this something youre supposed to do when the object goes out of bounds? You have four main options:
-
Remove it
-
Bring it back into play as if it were a brand-new object (regeneration)
-
Wrap it back onto the screen, as if it were the same object reappearing at a different location
-
Have it bounce back into the area
Lets start with simple removal.
Removing objects
Simply removing the object once it goes out of bounds is especially useful if you have objects being continually generated. The ones you remove will be replaced by new ones coming in, so you wont end up with an empty stage. Also, you wont wind up with too many objects being moved around, which would eventually slow down the Flash player.
To remove a movie clip, simply call movieClipName .removeMovieClip() . This will remove the instance from the stage. Youll also want to make sure that the code doesnt continue to try to move the movie clip. If the handler is attached directly to the clip itself, such as movieClipName.onEnterFrame = . . . , you are all set, as this function will be removed along with the clip. But if you are moving the clip from an external enterFrame handler, youll need to do this manually.
If the instance is the only thing being moved, and that motion is the only thing being done by the onEnterFrame function, you can simply say delete onEnterFrame; to stop running that code altogether. On the other hand, if a number of objects are being moved around, you should have references to them stored in an array, and you loop through the array to move each object. If so, you can simply use the Array.splice method to remove that particular reference from the array. Youll see that in action shortly.
So, if you want to remove a movie clip, knowing what the boundaries are, you can come up with something like this for your if statement:
if(ball._x > right) { ball.removeMovieClip(); } else if(ball._x < left) { ball.removeMovieClip(); } if(ball._y > bottom) { ball.removeMovieClip(); } else if(ball._y < top) { ball.removeMovieClip(); } Per Flash documentation, removeMovieClip is only for movie clips that have been dynamically generated via createEmptyMovieClip , attachMovie , or duplicateMovieClip . A movie clip instance placed on stage in the authoring environment will not be removed using this method. The full story is a little more complicated, though. It all has to do with depths.
Whenever you dynamically create a movie clip, you must specify a depth for it. Normally, you choose zero or some positive whole number. If you ever want to know at what depth youve placed a movie clip, you can check it with the movie clips getDepth method. But if you try it out on a movie clip instance created at author time, youll see its a negative number, starting at ˆ 16,383. Thats the real reason these types of movie clips cant be removed. Flash cant remove an instance at a negative depth.
The good news is that this brings up a workaround. You can use swapDepths to move the movie clip up to a positive depth, and then remove it. You can use it in accordance with getNextHighestDepth to automatically choose a safe depth. The code would look some thing like this for a movie clip named ball on _root :
ball.swapDepths(_root.getNextHighestDepth()); ball.removeMovieClip();You should be aware of one caveat, however: Movie clips above a depth of 1,048,575 can not be removed either. If you know that you havent used any depths close to that, you can be relatively safe using getNextHighestDepth . But bewareFlash MX 2004 components sometimes place elements at that depth, even if the component is just in your library and never placed on stage! So, if you have any of these components in your movie, you should check to make sure that the return value of getNextHighestDepth is less than 1,048,575 before using it, and if so, swap to a lower number.
All seems well and good. But there is one small problem. Now, you might not even notice this problem in many cases, but sometimes, it could wind up making things look wrong. To see what I mean, take a look at the picture in Figure 6-1.
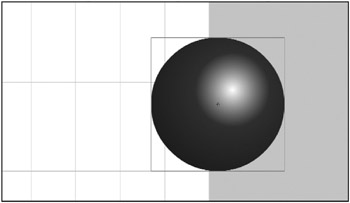
Figure 6-1: This ball isnt fully off stage, but it will be removed.
In Figure 6-1, you can see that the balls position, as determined by its registration point in the center, is indeed past the right edge of the screen. It will be removed. If the ball is moving fast enough, that will probably look OK. But what if its moving very slowly, just a pixel per frame or less? Youre watching it ease off the edge of the screen, it gets halfway, and POP! Its gone. Its kind of like an actor removing his costume when he is only halfway off stage. It kind of ruins the illusion.
So, instead, you want to let the ball get all the way out of the picture. Then, when its out of sight and out of mind, you can quietly execute it.
To do this, you need to take into account the movie clips width. Actually, since the registration point is in the center, you just need to worry about half of its width. You can do that right in the if statement, like so:
if(ball._x - ball._width / 2 > right) { ball.removeMovieClip(); } else if(ball._x + ball._width / 2 < left) { ball.removeMovieClip(); } You do the same on the y axis with the balls height. This gives you the picture shown in Figure 6-2.
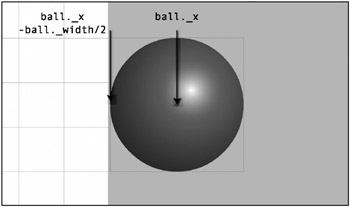
Figure 6-2: This ball is completely off stage and can be safely removed.
Note that although this particular example uses a ball, or round object, the same code should work for an object of any shape, as long as the registration point of the movie clip is in the center.
Lets try it out. Using an FLA file with a movie clip symbol named ball , exported from the library with the same linkage name, here is the code to put on frame 1 (in the ch06_01.fla file, available from the books download page at www.friendsofed.com, along with the rest of the code for this book):
init(); function init() { count = 20; top = 0; left = 0; bottom = Stage.height; right = Stage.width; balls = new Array(); for (var i = 0; i < count; i++) { var ball = attachMovie("ball", "ball" + i, i); ball._x = Math.random() * Stage.width; ball._y = Math.random() * Stage.height; ball.vx = Math.random() * 2 - 1; ball.vy = Math.random() * 2 - 1; balls.push(ball); } } function onEnterFrame(Void):Void { for (var i:Number=balls.length 1;i>=0;i--) { var ball = balls[i]; ball._x += ball.vx; ball._y += ball.vy; if (ball._x - ball._width / 2 > right) { ball.removeMovieClip(); balls.splice(i, 1); } else if (ball._x + ball._width / 2 < left) { ball.removeMovieClip(); balls.splice(i, 1); } if (ball._y - ball._height / 2 > bottom) { ball.removeMovieClip(); balls.splice(i, 1); } else if (ball._y + ball._height / 2 < top) { ball.removeMovieClip(); balls.splice(i, 1); } } } This should be pretty simple for you to follow. First, you create the boundaries based on the stage size. Then attach 20 instances, randomly placing them on the stage and giving them random x and y velocities, and push them into the array.
The onEnterFrame function simply uses a flat velocity to move the balls around, checks the boundaries, and removes any balls that are out of bounds. Note that it not only removes the ball from the display list, but uses the Array.splice function to remove the reference from the array. Array.splice takes the index at which you want to start removing elements and how many elements you want to remove. In this case, you are removing only one element: the one at the current index. When you test this, you wont even be aware of them being removed, which is a good thing, but you can rest assured that they are not hanging around off stage, consuming valuable memory and CPU cycles.
You might notice that the for statement in this example is a little different from those in other examples:
for (var i:Number=balls.length 1;i>=0;i--)
This causes the for statement to go backwards through the array instead of forwards. This is necessary because, if you use splice on the array, the indexing for the array will change, and when you increment i , you will wind up skipping over one of the elements. Going backwards handles this.
Note that in a simple case like this, the result of the if statement is exactly the same in every instance. If that is the case, you can combine all the statements into a single if statement, like so:
if(ball._x - ball._width / 2 > right ball._x + ball._width / 2 < left ball._y - ball._height / 2 > bottom ball._y + ball._height / 2 < top) { ball.removeMovieClip(); balls.splice(i, 1); } The symbol means or. So, youre essentially saying, If the object is off to the right, OR the object is off to the left, OR it is off to the top OR the bottom, remove it. This technique is probably fine for most cases of removal, as it doesnt really matter where the object went out of bounds, just that it did. In other cases, though, you might want to respond differently if the object hit a particular boundary, such as the left wall as opposed to the right wall. In those instances, you will need to use separate if statements. Youll see that in the example of screen wrapping, coming up shortly.
Regenerating objects
The next strategy is to regenerate the object that has gone off stage. Actually, its not really so much regeneration as repositioning and revelocitizing (yeah, I just made up that word). The idea is that when an object has gone off stage and is no longer necessary, you can bring it back into play as if it were a brand-new object. This gives you a steady stream of objects without ever having to worry about having too many objects on stage, as there will always be a set amount.
This technique is very useful for things like fountain effects, where you have a stream of particles spraying constantly. The particles go off stage and are reintroduced at the source point of the stream.
The mechanics of regeneration are pretty similar to removal. You need to wait until the object is out of bounds, but instead of removing it, you just move it.
Lets dive right in by making a fountain. For the fountain particles, I used the same ball from the last experiment, but resized the graphic to be just 4 pixels across. The source of the fountain will be the bottom center of the stage. All particles will originate there, and when they go off stage, they will be replaced there. Also, all particles will start out with a random negative y velocity and a smaller random x velocity. This means they will shoot upwards and also move slightly either to the left or right. When particles regenerate, their velocities will be reset the same way. Particles will also react to gravity. Heres the code ( ch06_02.fla ):
init(); function init() { count = 50; top = 0; left = 0; bottom = Stage.height; right = Stage.width; gravity = 0.5; balls = new Array(); } function onEnterFrame(Void):Void { var ball:MovieClip; var index:Number = balls.length; if (index < count) { ball = attachMovie("ball", "ball" + index, index); ball._x = Stage.width / 2; ball._y = Stage.height; ball.vx = Math.random() * 2 - 1; ball.vy = Math.random() * -10 - 10; balls.push(ball); } for (var i = 0; i < balls.length; i++) { ball = balls[i]; ball.vy += gravity; ball._x += ball.vx; ball._y += ball.vy; if (ball._x - ball._width / 2 > right ball._x + ball._width / 2 < left ball._y - ball._height / 2 > bottom ball._y + ball._height / 2 < top) { ball._x = Stage.width / 2; ball._y = Stage.height; ball.vx = Math.random() * 2 - 1; ball.vy = Math.random() * -10 - 10; } } } You start off in the init function by defining the number of particles, an array to hold them, the boundary definitions, and a value for gravity.
The first section of the onEnterFrame function creates a new ball on each frame, until enough have been created, as determined by the count variable. It positions them at the bottom of the stage, gives them a random velocity, and pushes them onto the array.
The next section just loops through all the elements of the balls array. For each one, it adds gravity to its vy , adds the velocity to the position, and then checks to see if it has crossed any boundaries. If it has, it gets sent back to the starting position and reborn with a new velocity. It will act the same as a newly created particle. Thus, your fountain will flow forever.
You should definitely play around with this one. Have the fountain shoot off in different directions. Make it shoot out of a wall, or even the ceiling. Change the random factors to make a wider or narrower fountain, or one that shoots higher or lower. Try adding some wind into the mix (hint: make a wind variable and add it to vx ).
Screen wrapping
The next common way to handle objects going out of bounds is what I call screen wrapping . The concept is simple: If an object goes off the left side of the screen, it reappears on the right. If it goes off the right, it comes back on the left. If it goes off the top, it comes back on the bottom. You get the idea.
Screen wrapping is pretty similar to regeneration, in that you put the object back on the screen at a different location. But in regeneration, you generally return all objects to the same location, making them look like brand-new objects. In wrapping, you are usually trying to maintain the idea that this is the same object; that it has just gone out the back door and in the front, so to speak. Thus, you generally dont change velocity during a screen wrap.
This again hearkens back to one of my old favorite games , Asteroids . As you remember from Chapter 5, this was one of the problems with the spaceship movie: The ship would fly off stage, and it was sometimes impossible to figure out where it was and how to get it back. With screen wrapping, your movie clip is never more than a pixel from the edge of the screen.
Lets rebuild that spaceship example and add this behavior. Heres the code youll want to use ( ch06_03.fla ), with the new stuff in bold:
init(); function init() { vr = 5; thrust = 0.2; vx = 0; vy = 0; left = 0; right = Stage.width; top = 0; bottom = Stage.height; ship = attachMovie("ship", "ship", 0); ship._x = Stage.width / 2; ship._y = Stage.height / 2; } function onEnterFrame(Void):Void { if (Key.isDown(Key.LEFT)) { ship._rotation -= vr; } else if (Key.isDown(Key.RIGHT)) { ship._rotation += vr; } if (Key.isDown(Key.UP)) { var radians:Number = ship._rotation * Math.PI / 180; var ax:Number = Math.cos(radians) * thrust; var ay:Number = Math.sin(radians) * thrust; vx += ax; vy += ay; ship.gotoAndStop(2); } else { ship.gotoAndStop(1); } ship._x += vx; ship._y += vy; if (ship._x - ship._width / 2 > right) { ship._x = left - ship._width / 2; } else if (ship._x + ship._width / 2 < left) { ship._x = right + ship._width / 2; } if (ship._y - ship._height / 2 > bottom) { ship._y = top - ship._height / 2; } else if (ship._y < top - ship._height / 2) { ship._y = bottom + ship._height / 2; } } As you can see, youve just added boundary definitions and the checks for them. Note that you are back to separate if and else statements, as the actions are different for each circumstance.
Bouncing
And now we arrive at probably the most common and possibly the most complex of bounds handling methods . But its really not much more complicated than wrapping, so dont get scared.
The strategy with bouncing is to detect when the object has gone off screen, only this time, you leave it pretty much where it is and just change its velocity. The rules are simple: If it went off the left or right edge, you reverse its x velocity. If it went off the top or bottom, you reverse its y velocity. Reversing an axis velocity is pretty simple. Just multiply the value by ˆ 1. If the velocity is 5, it becomes ˆ 5. If its ˆ 13, it becomes 13. The code is even simpler: vx *= -1 or vy *= -1 .
There are a couple more changes from wrapping. First, in wrapping, you let the object go completely off stage before you reposition it. You do that by taking its position and adding or subtracting half its width. For bouncing, you want to do almost exactly the opposite . You dont want to wait until the object is totally off stage before you make it bounce. In fact, you dont want it to be even part way out of the picture. If you were to throw a real ball against a real wall, you wouldnt expect to see it go part-way into the wall before bouncing back. It would hit the wall, stop right there, and then bounce back. So, the first thing you want to know is the instant that any part of the object has gone over the edge. All you need to do is reverse the way you are adding the half width/height. So, for example, instead of saying this:
if(ball._x ball._width / 2 > right) . . .
you say this:
if(ball._x + ball._width / 2 > right) . . .
The difference between these two can be seen in Figure 6-3.
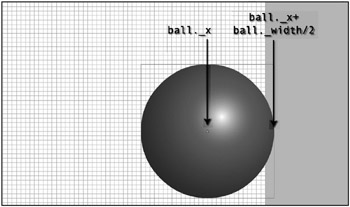
Figure 6-3: This ball is just slightly off stage, but it needs to bounce.
So, youve now determined that the object has crossed the least bit of one of the boundaries. I said before that you now reverse the velocity on that axis. But theres a little more to it than that. You also need to reposition the object so that it is sitting right on the edge of the boundary. This has the obvious cosmetic effect of making the object look more like its hitting and bouncing, rather than sinking into the wall. But it is also a necessary step for other reasons. Youll find that if you dont adjust the objects position, then on the next frame, it may still be past that boundary, even after it moves. If this happens, the object will again reverse its velocity and head back into the wall! Then you get this situation where the movie clip seems to be stuck halfway in and out of the wall, just sitting there and vibrating. Its not pretty.
The point where you need to place the object to have it sitting right on the boundary is actually the same point you are checking in the if statement. You just need to restate it a bit with a little basic algebra. Heres the full if statement for the x axis:
if(ball._x + ball._width / 2 > right) { ball._x = right ball._width / 2; vx *= -1; } else if(ball._x ball._width / 2 < left) { ball._x = left + ball._width / 2; vx *= -1; } Figure 6-4 shows what the ball would look like after being repositioned.
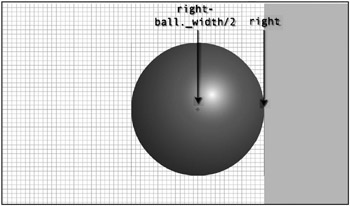
Figure 6-4: The ball has been repositioned to be exactly against the boundary.
So, the steps for bouncing are as follows:
-
Check if the object went past any boundary.
-
If so, place it on the edge of that boundary.
-
Then reverse the velocity.
Thats all there is to it. I guess its time to stop talking and show you some action. This next example uses the same ball movie clip once again, but scaled back up to a decent size. Heres the code ( ch06_04.fla ):
init(); function init() { top = 0; left = 0; bottom = Stage.height; right = Stage.width; ball = attachMovie("ball", "ball", 0); ball._x = Stage.width / 2; ball._y = Stage.height / 2; vx = Math.random() * 10 - 5; vy = Math.random() * 10 - 5; } function onEnterFrame(Void):Void { ball._x += vx; ball._y += vy; if (ball._x + ball._width / 2 > right) { ball._x = right - ball._width / 2; vx *= -1; } else if (ball._x - ball._width / 2 < left) { ball._x = left + ball._width / 2; vx *= -1; } if (ball._y + ball._height / 2 > bottom) { ball._y = bottom - ball._height / 2; vy *= -1; } else if (ball._y - ball._height / 2 < top) { ball._y = top + ball._height / 2; vy *= -1; } } Test this a few times to see the ball moving at different angles. Try making the velocity higher or lower.
I have to admit that this is one of those many areas in the book where the math and calculations are not exactly in accordance with real-world physics. If you look at Figure 6-5, youll see where the ball should actually hit the wall, and also where this simulation places it.
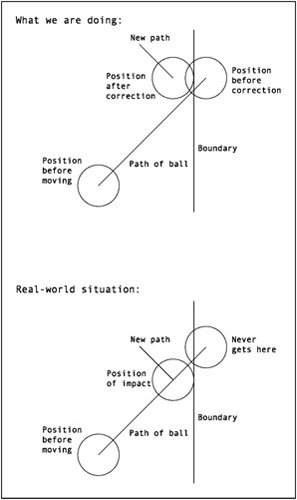
Figure 6-5: This technique isnt perfect, but is quick, easy, and close enough for most situations.
Determining the correct position takes more complex calculations. Although you are free to figure out how to do this (using the trigonometry covered in Chapter 3), I guarantee you that you wouldnt really notice much of a difference in most situations. Again, if youre doing some kind of simulation where exact calculations and positions are vital , youll really need to find another book, and probably reconsider your choice of software. But for almost any game or visual effect youll be creating with Flash, this method will serve you just fine. However, you can add one more thing to take the realism just one notch higher.
If you were to hold the most rubbery, bounciest rubber ball ever made out at arms length and drop it, it would fall to the floor and bounce up almost back to where it started. The fact is that it will never make it all the way back to your hand. This is because it loses a little bit of energy in the bounce. It might lose some energy in the form of sound; maybe a little heat. The floor will absorb some of its energy, and maybe the surrounding air will, too. However it works out, the important point is that the ball is traveling slower after the bounce than before. In other words, it loses some velocity on the axis of the bounce.
You can easily re-create this with Flash. So far, youve been using ˆ 1 as your bounce factor. That means that the object bounces back with 100% of the force it hit with. To make it lose some energy, simply use a fraction of ˆ 1 . As with other numeric values, its best to define this as a variable up at the top of your file and use the variable in your code. Just create a variable named bounce and set it to something like ˆ 0.7 at the top of your file:
var bounce:Number = -0.7;
Then replace each instance of ˆ 1 in the if statements with the variable, bounce . Go ahead and try that, and youll see how much more real the bounces look. Try different factors for the bounce variable until you get a feel for how it works.
One of the best ways to learn this stuff is to take each principle you learn and see how many other principles you can combine it with. To give you a start, the following example combines bouncing with gravity ( ch06_05.fla ):
init(); function init() { bounce = -0.7; gravity = 0.5; top = 0; left = 0; bottom = Stage.height; right = Stage.width; ball = attachMovie("ball", "ball", 0); ball._x = Stage.width / 2; ball._y = Stage.height / 2; vx = Math.random() * 10 - 5; vy = Math.random() * 10 - 5; } function onEnterFrame(Void):Void { vy += gravity; ball._x += vx; ball._y += vy; if (ball._x + ball._width / 2 > right) { ball._x = right - ball._width / 2; vx *= bounce; } else if (ball._x - ball._width / 2 < left) { ball._x = left + ball._width / 2; vx *= bounce; } if (ball._y + ball._height / 2 > bottom) { ball._y = bottom - ball._height / 2; vy *= bounce; } else if (ball._y - ball._height / 2 < top) { ball._y = top + ball._height / 2; vy *= bounce; } } This gives you quite a realistic simulation of a ball bouncing around and finally coming to rest. Perhaps you want to try to use the keyboard to add some acceleration to the ball, or apply something else youve already learned.
Now, lets leave behind the discussion of boundaries and talk about what happens in between the boundarieswhat happens while your movie clip is moving through space.
| | ||
| | ||
| | ||
EAN: 2147483647
Pages: 137